Overview
Databricks AI Gateway (Beta) is a governance layer on top of Databricks Model Serving that adds rate limiting, usage tracking, and inference logging to your LLM endpoints. Bifrost connects to AI Gateway endpoints as custom providers.
Unified vs Native APIs
AI Gateway exposes two categories of APIs on every endpoint:
- Unified APIs - Provider-agnostic, OpenAI-compatible interfaces powered by MLflow. You can swap the underlying model without changing client code. Path:
/mlflow/v1/chat/completions.
- Native APIs - Provider-specific interfaces that give full access to a provider’s latest features. For Anthropic, the path is
/anthropic/v1/messages.
In Bifrost, each API category maps to a different custom provider base format:
| API Category | Bifrost Base Format | Chat | Chat (stream) | Responses | Responses (stream) | Text | Coding Agents | List Models |
|---|
| Unified (MLflow) | openai | ✅ | ✅ | ❌ | ❌ | ❌ | ❌ | ✅ (via Unity Catalog) |
| Native (Anthropic Messages) | anthropic | ✅ | ✅ | ✅ | ✅ | ✅ | ✅ | ❌ |
The Unified (MLflow) API is a pure chat completions interface - it does not support the Responses API. Coding agents like Claude Code, Cursor, or Codex CLI that depend on the Responses API will not work through the Unified API.Use the Native Anthropic Messages API if you need Responses API support, coding agent compatibility, or text completions.
Prerequisites
Before configuring Bifrost, you need:
- A Databricks workspace with Unity Catalog enabled and AI Gateway access turned on by an account admin via Account Console > Previews
- An AI Gateway endpoint with at least one model destination - create one from the AI Gateway page in the Databricks sidebar
- The endpoint’s AI Gateway URL - visible at the top of the endpoint overview page, in the format:
https://<workspace-id>.ai-gateway.cloud.databricks.com
- A Databricks Personal Access Token (PAT) - generate one from Settings > Developer > Access tokens in your Databricks workspace, or click Generate Access Token at the bottom of the endpoint page
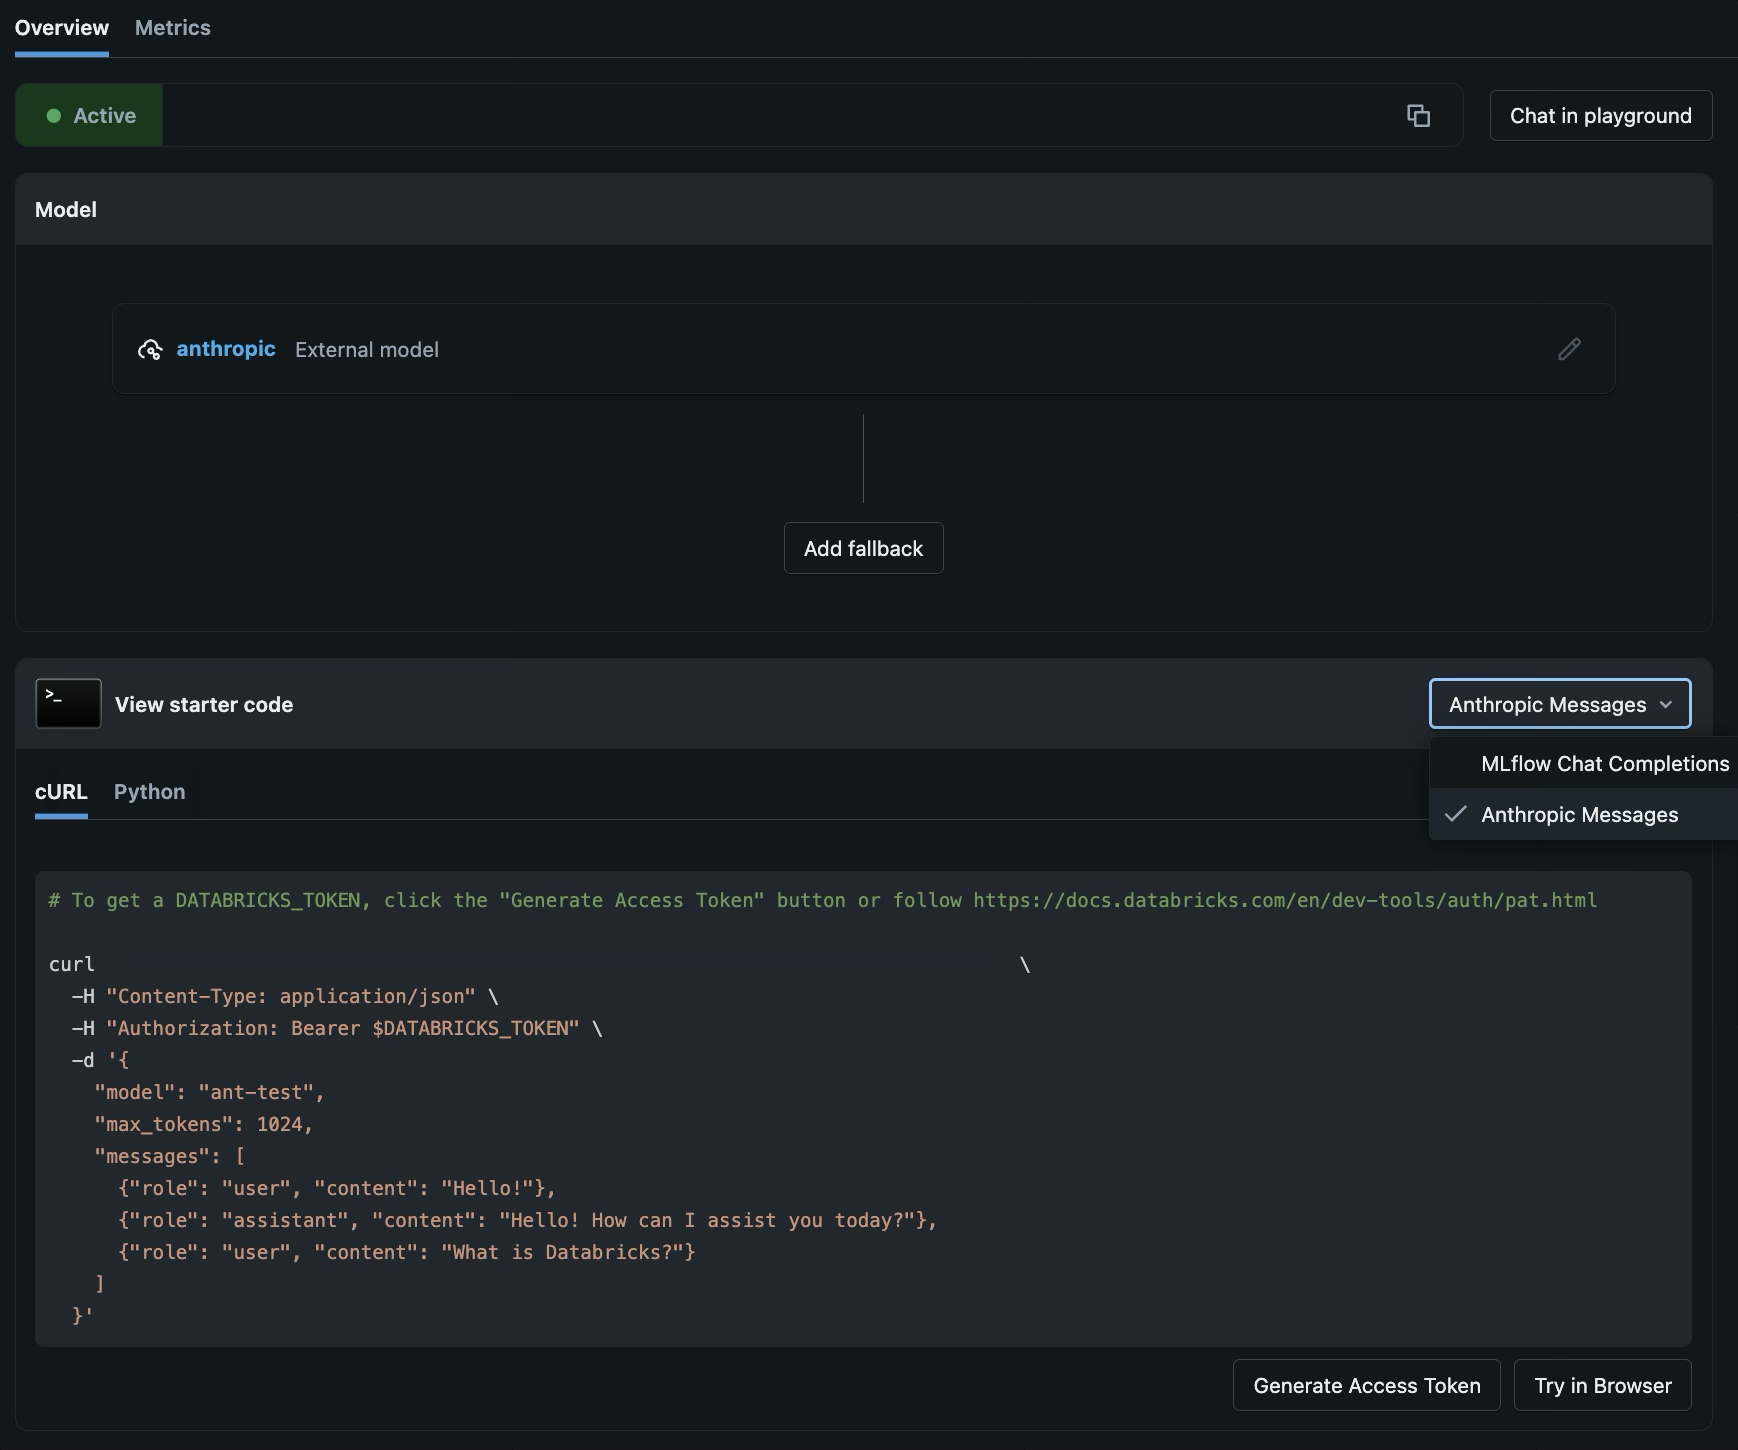
1. Unified API (MLflow Chat Completions)
The Unified API exposes an OpenAI-compatible chat completions interface through AI Gateway’s MLflow layer. Use this when you only need chat completions.
How it works
AI Gateway exposes every endpoint at a /mlflow/v1/chat/completions path. Because this follows the OpenAI spec, Bifrost treats it as an OpenAI-compatible custom provider. The full endpoint URL looks like:
https://<workspace-id>.ai-gateway.cloud.databricks.com/mlflow/v1/chat/completions
/mlflow) as the custom provider’s Base URL - Bifrost appends the standard /v1/chat/completions path automatically.
Step 1: Create the Custom Provider
In Bifrost, go to Models > Model Providers in the sidebar. Click Add New Provider and select Custom provider… at the bottom of the dropdown.
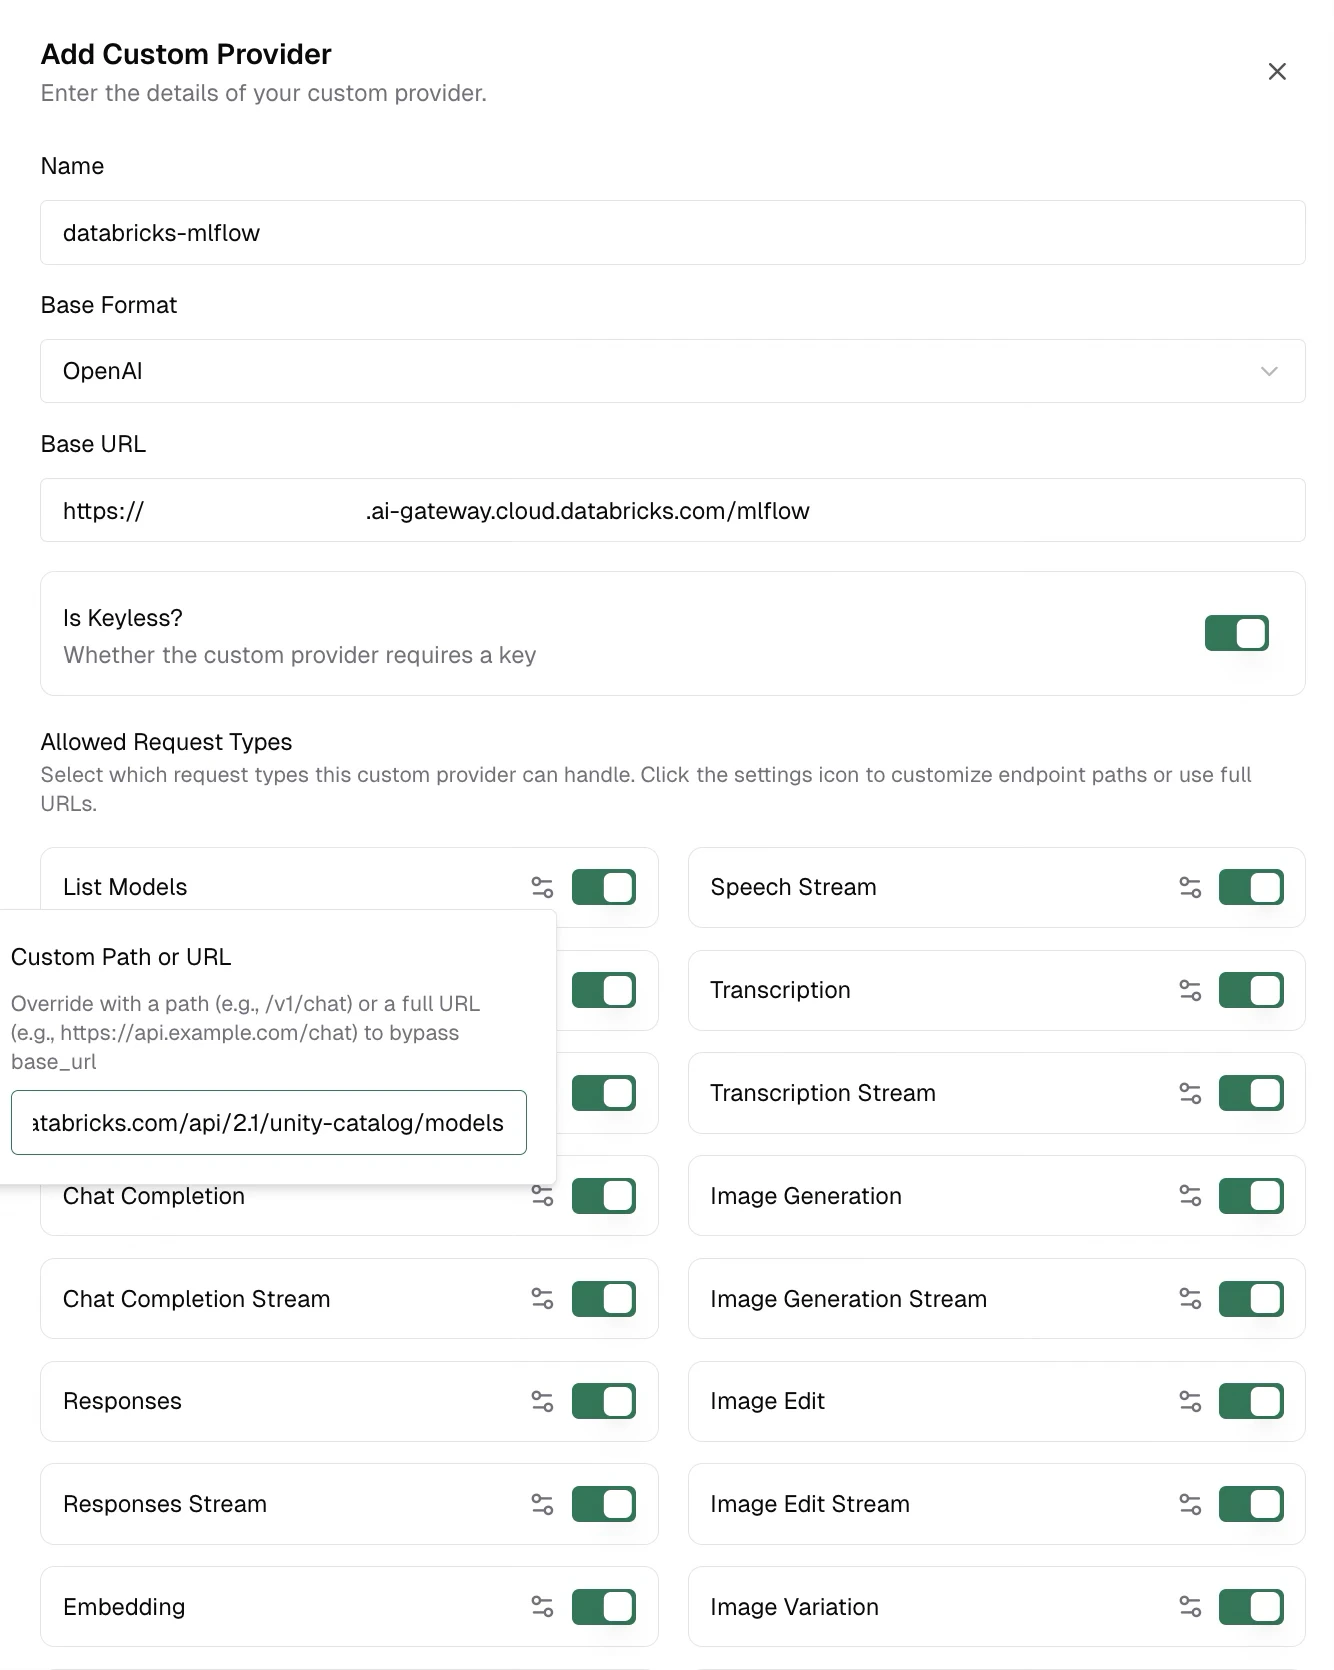
In the Add Custom Provider dialog, fill in:
| Field | Value |
|---|
| Name | Your choice (e.g., databricks-mlflow) |
| Base Format | Select OpenAI from the dropdown |
| Base URL | https://<workspace-id>.ai-gateway.cloud.databricks.com/mlflow |
| Is Keyless? | Toggle on |
/v1/models path does not work against the AI Gateway URL. To enable model listing, point it at the Unity Catalog API on your Databricks workspace instead.
In the Allowed Request Types section of the dialog:
- Find the List Models toggle (make sure it’s enabled)
- Click the settings icon (gear) next to List Models - this opens the Custom Path or URL popover
- Enter your workspace’s Unity Catalog models endpoint:
https://<your-databricks-workspace-url>/api/2.1/unity-catalog/models
The Unity Catalog URL uses your Databricks workspace URL (e.g., https://adb-1234567890.azuredatabricks.net), which is a different host from the AI Gateway URL (*.ai-gateway.cloud.databricks.com).
 Click Add to save the custom provider.
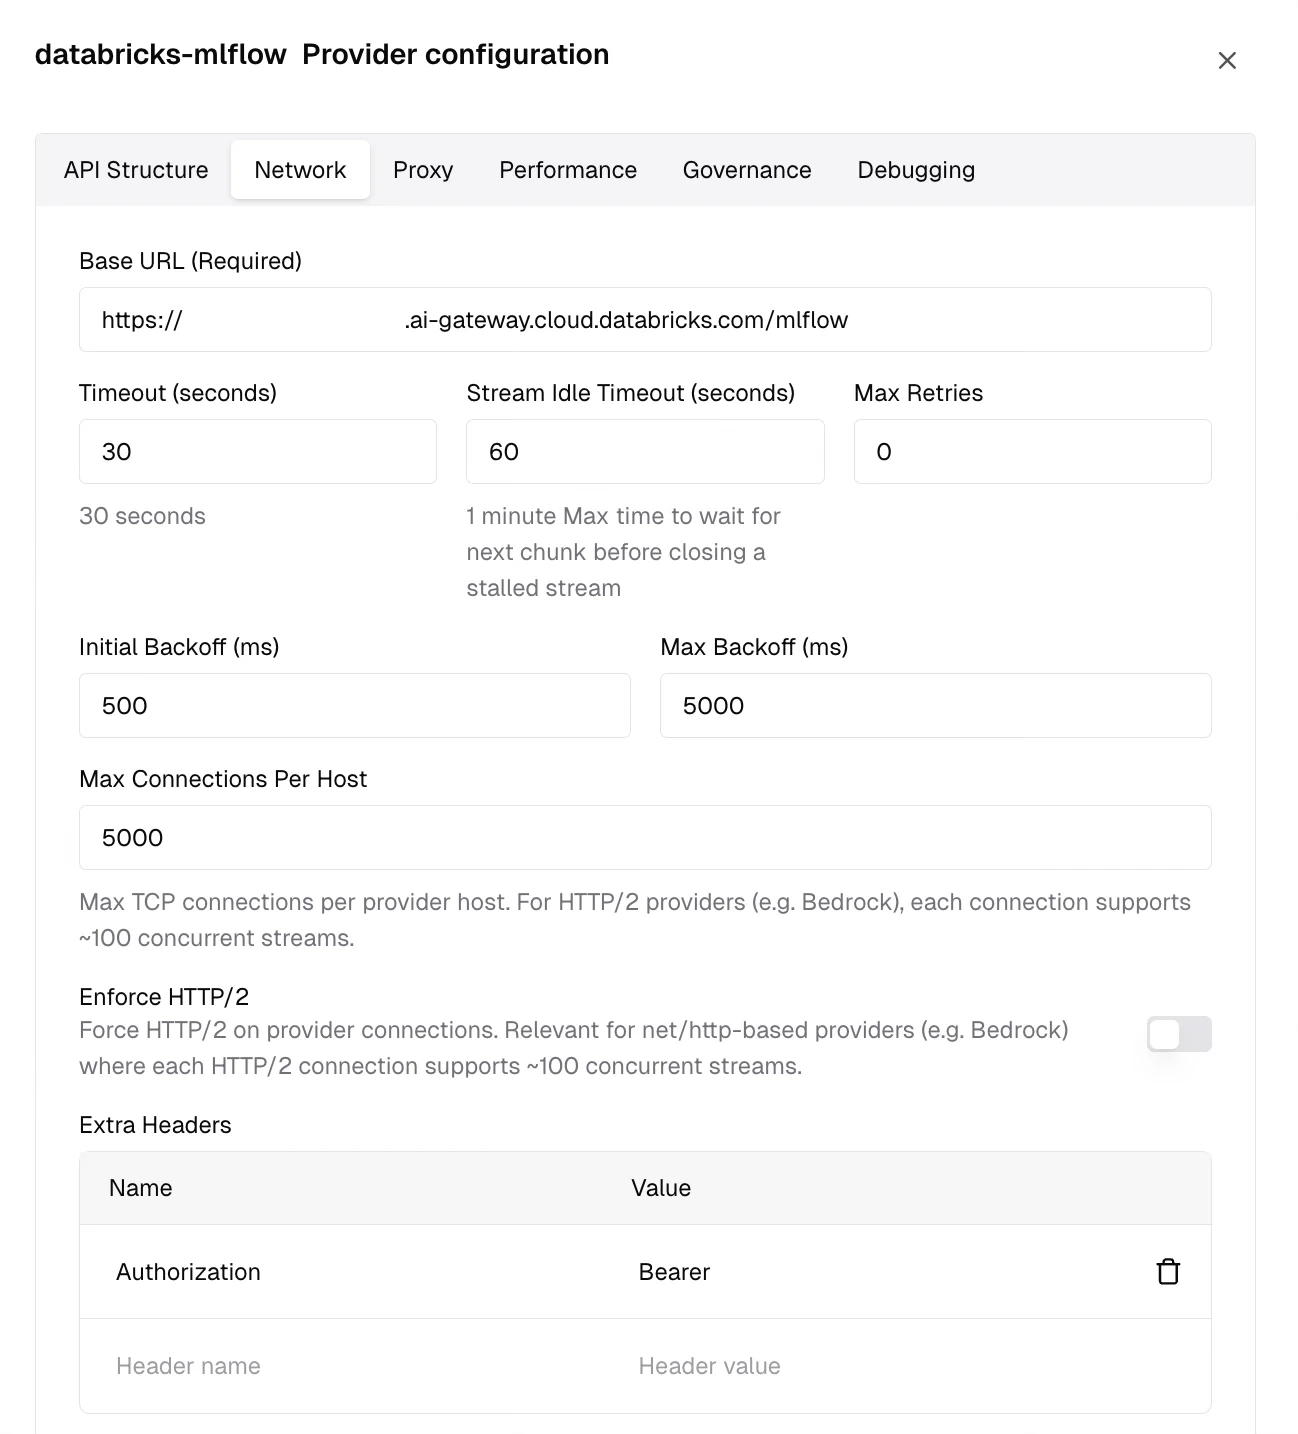
After saving, your new provider appears in the Configured Providers list on the left. Select it, then click Edit Provider Config (the settings icon in the top-right corner) to open the provider configuration panel.
Click Add to save the custom provider.
After saving, your new provider appears in the Configured Providers list on the left. Select it, then click Edit Provider Config (the settings icon in the top-right corner) to open the provider configuration panel.
- Switch to the Network tab
- Scroll down to the Extra Headers table
- Add a new row:
- Name column:
Authorization
- Value column:
Bearer <your-databricks-pat>
- Click Save Network Configuration
Step 4: Send Requests
Use your custom provider prefix with any model name registered as a destination on your AI Gateway endpoint:
curl -X POST http://localhost:8080/v1/chat/completions \
  -H "Content-Type: application/json" \
  -d '{
    "model": "databricks-mlflow/<your-endpoint-model>",
    "messages": [{"role": "user", "content": "Hello!"}]
  }'
response, err := client.ChatCompletionRequest(
    schemas.NewBifrostContext(ctx, schemas.NoDeadline),
    &schemas.BifrostChatRequest{
        Provider: "databricks-mlflow",
        Model:    "<your-endpoint-model>",
        Input:    messages,
    },
)
2. Native API (Anthropic Messages)
The Native API exposes an Anthropic-compatible messages interface through AI Gateway. Use this when you need the Responses API, text completions, or coding agent support (Claude Code, Cursor, Codex CLI).
How it works
AI Gateway exposes every endpoint at an /anthropic/v1/messages path that follows the Anthropic API spec. Bifrost treats this as an Anthropic-compatible custom provider. The full endpoint URL looks like:
https://<workspace-id>.ai-gateway.cloud.databricks.com/anthropic/v1/messages
/anthropic) as the custom provider’s Base URL - Bifrost appends the standard Anthropic paths automatically.
Step 1: Create the Custom Provider
In Bifrost, go to Models > Model Providers in the sidebar. Click Add New Provider and select Custom provider… at the bottom of the dropdown.
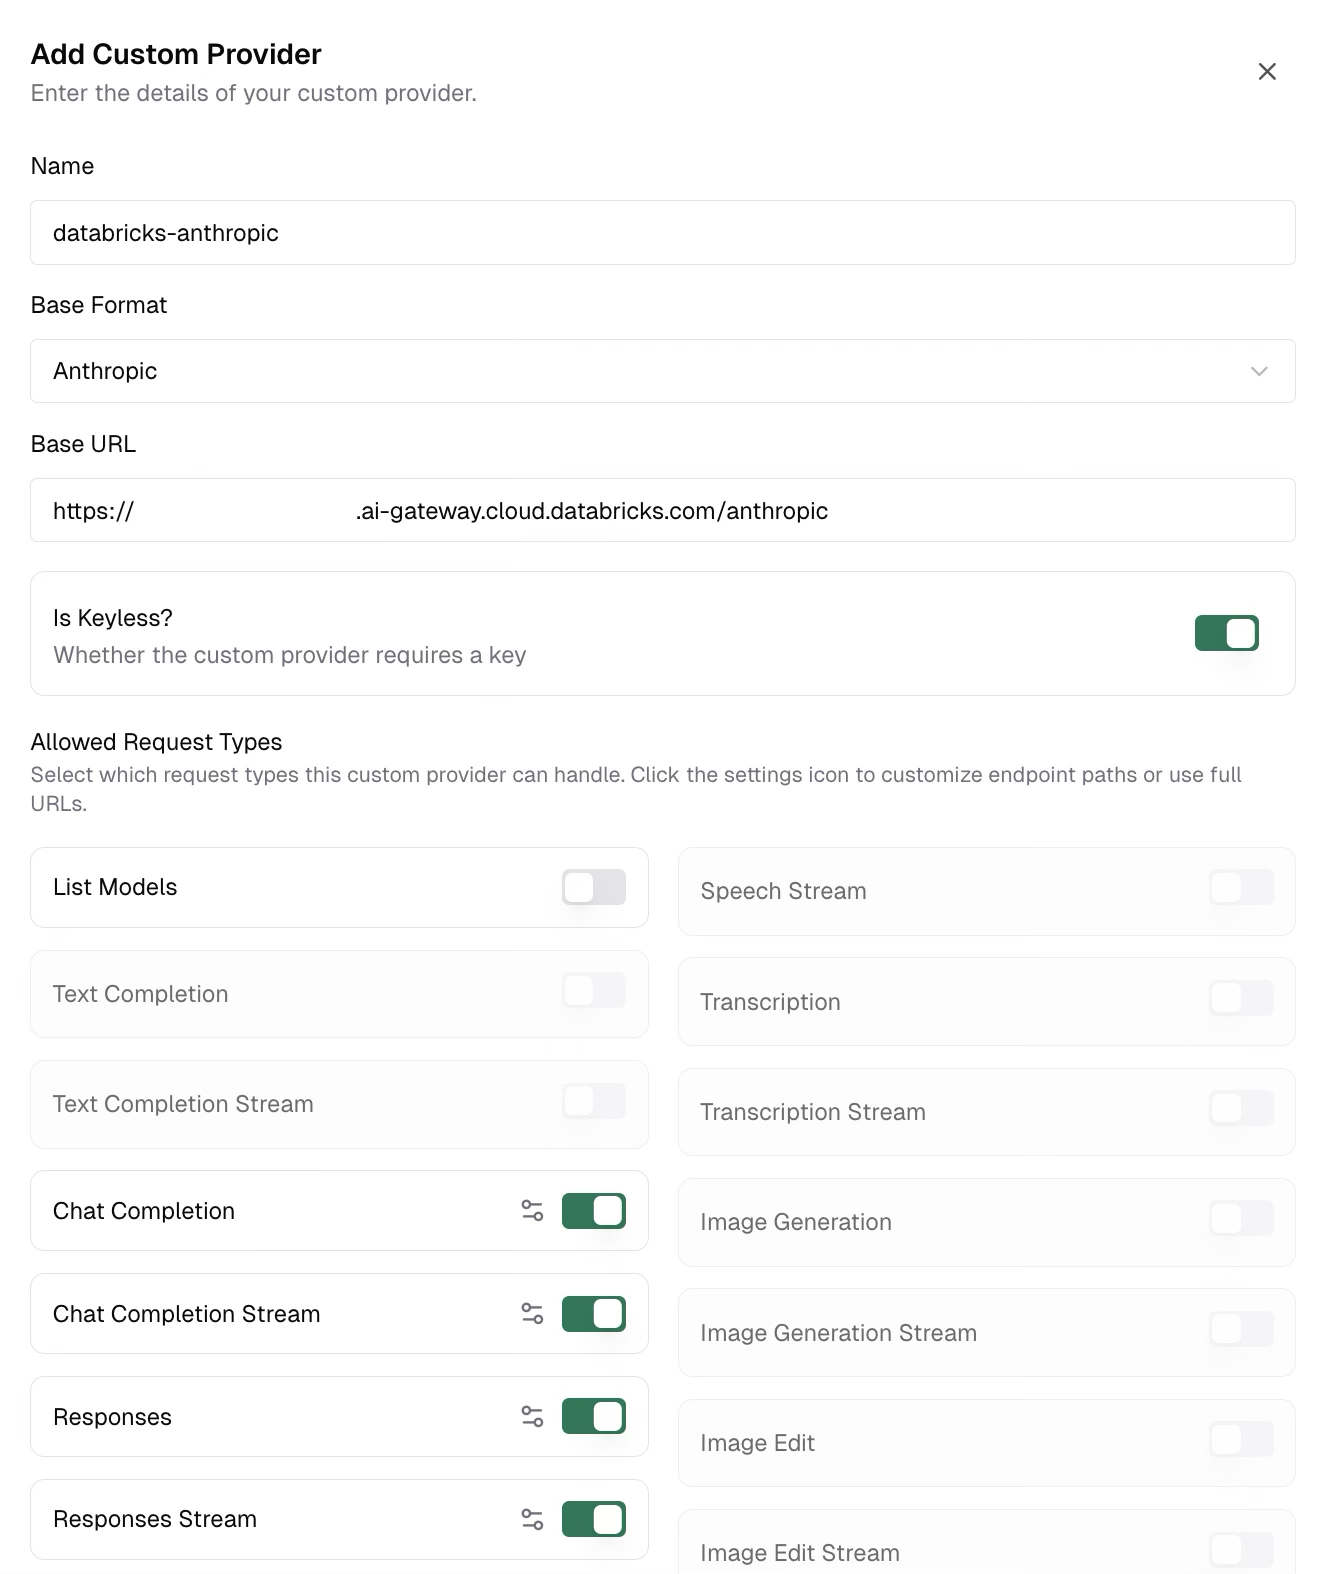
In the Add Custom Provider dialog, fill in:
| Field | Value |
|---|
| Name | Your choice (e.g., databricks-anthropic) |
| Base Format | Select Anthropic from the dropdown |
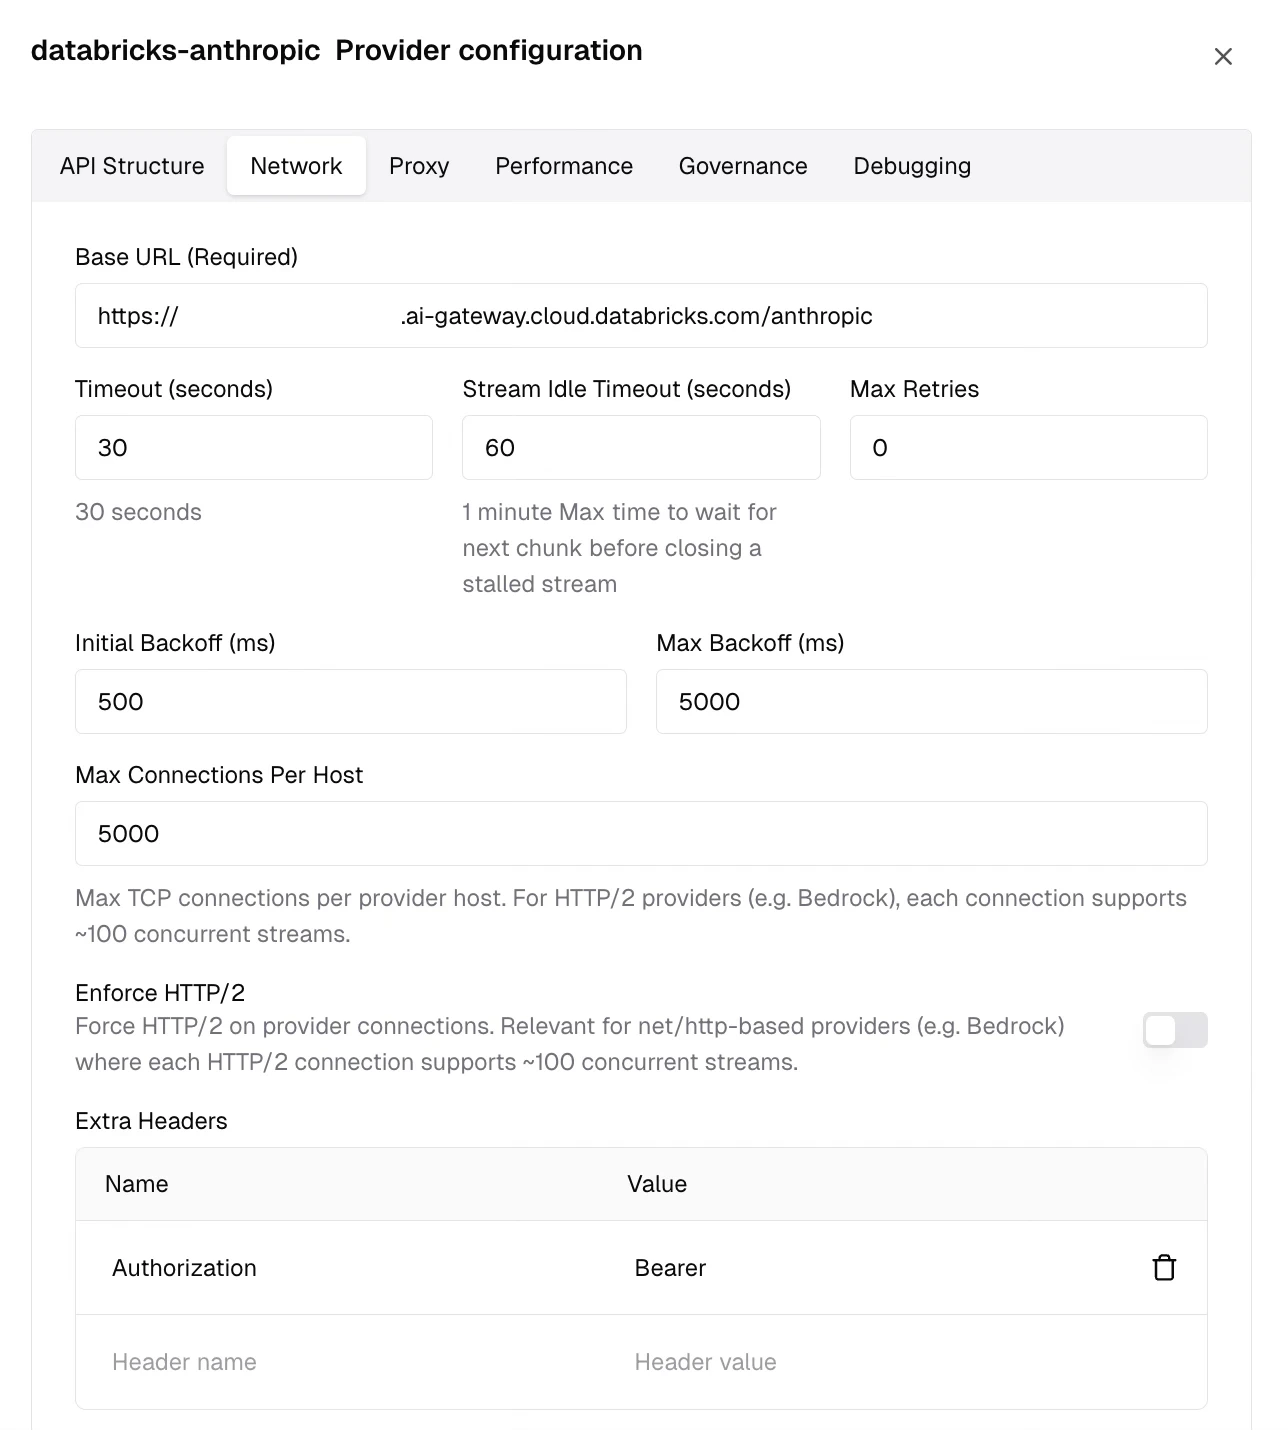
| Base URL | https://<workspace-id>.ai-gateway.cloud.databricks.com/anthropic |
| Is Keyless? | Toggle on |
Step 2: Disable List Models
AI Gateway’s model listing endpoint uses an OpenAI-compatible format, which is incompatible with the Anthropic base format. You must disable it.
In the Allowed Request Types section of the dialog, find the List Models toggle and turn it off.
 Click Add to save the custom provider.
After saving, select your new provider from the Configured Providers list and click Edit Provider Config to open the configuration panel.
Click Add to save the custom provider.
After saving, select your new provider from the Configured Providers list and click Edit Provider Config to open the configuration panel.
- Switch to the Network tab
- Scroll down to the Extra Headers table
- Add a new row:
- Name column:
Authorization
- Value column:
Bearer <your-databricks-pat>
- Click Save Network Configuration
Step 4: Send Requests
Use your custom provider prefix with any model name registered as a destination on your AI Gateway endpoint:
curl -X POST http://localhost:8080/v1/chat/completions \
  -H "Content-Type: application/json" \
  -d '{
    "model": "databricks-anthropic/<your-endpoint-model>",
    "messages": [{"role": "user", "content": "Hello!"}]
  }'
response, err := client.ChatCompletionRequest(
    schemas.NewBifrostContext(ctx, schemas.NoDeadline),
    &schemas.BifrostChatRequest{
        Provider: "databricks-anthropic",
        Model:    "<your-endpoint-model>",
        Input:    messages,
    },
)
Coding Agent Compatibility
The Native Anthropic Messages API works with Claude Code and other coding agents that depend on the Responses API. Point your coding agent at your Bifrost instance and use the databricks-anthropic/<model> prefix to route through your AI Gateway endpoint.
Choosing the Right API
| Consideration | Unified (MLflow) | Native (Anthropic Messages) |
|---|
| Chat Completions | ✅ | ✅ |
| Streaming | ✅ | ✅ |
| Responses API | ❌ | ✅ |
| Text Completions | ❌ | ✅ |
| Coding Agents (Claude Code, Cursor, Codex) | ❌ | ✅ |
| List Models | ✅ (via Unity Catalog) | ❌ |
| Provider-agnostic (swap models without code changes) | ✅ | ❌ |
| Bifrost Base Format | openai | anthropic |
You can create two separate custom providers - one per API category - pointing to the same AI Gateway endpoint. Use the Unified provider for chat completions with model listing, and the Native Anthropic provider for Responses API or coding agents.
Reference Links