Overview
This guide walks you through configuring Okta as your identity provider for Bifrost Enterprise. After completing this setup, your users will be able to sign in to Bifrost using their Okta credentials, with roles and team memberships synchronized from Okta.Prerequisites
- An Okta organization with admin access
- Bifrost Enterprise deployed and accessible
- The redirect URI for your Bifrost instance (e.g.,
https://your-bifrost-domain.com/login) - Ensure you have created all the roles in Bifrost that you are aiming to map to with Okta.
Step 1: Create an OIDC Application
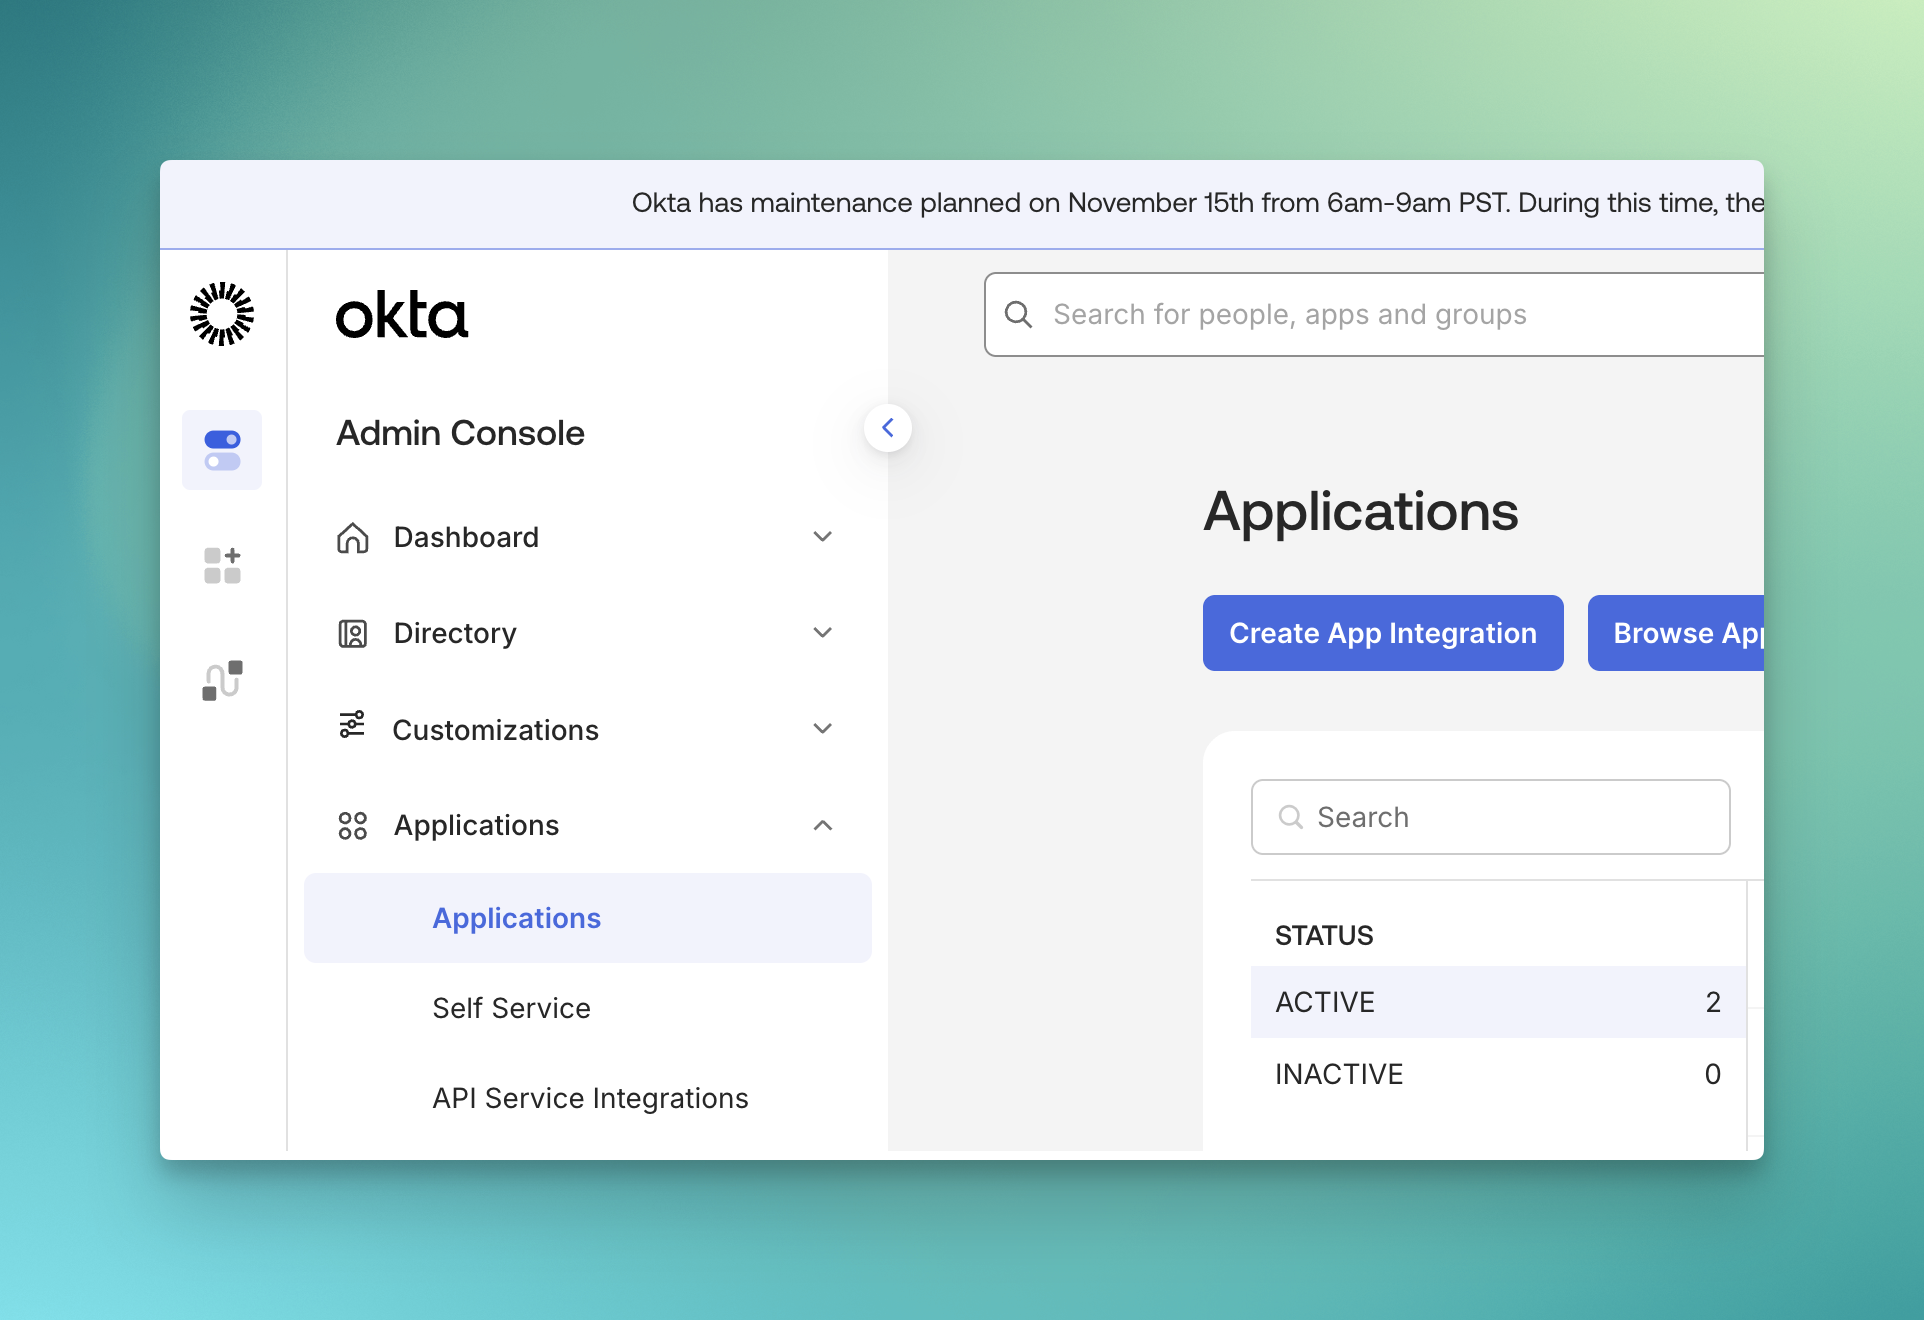
- Log in to the Okta Admin Console
- Navigate to Applications → Applications
- Click Create App Integration
- In the dialog, select:
- Sign-in method: OIDC - OpenID Connect
- Application type: Web Application
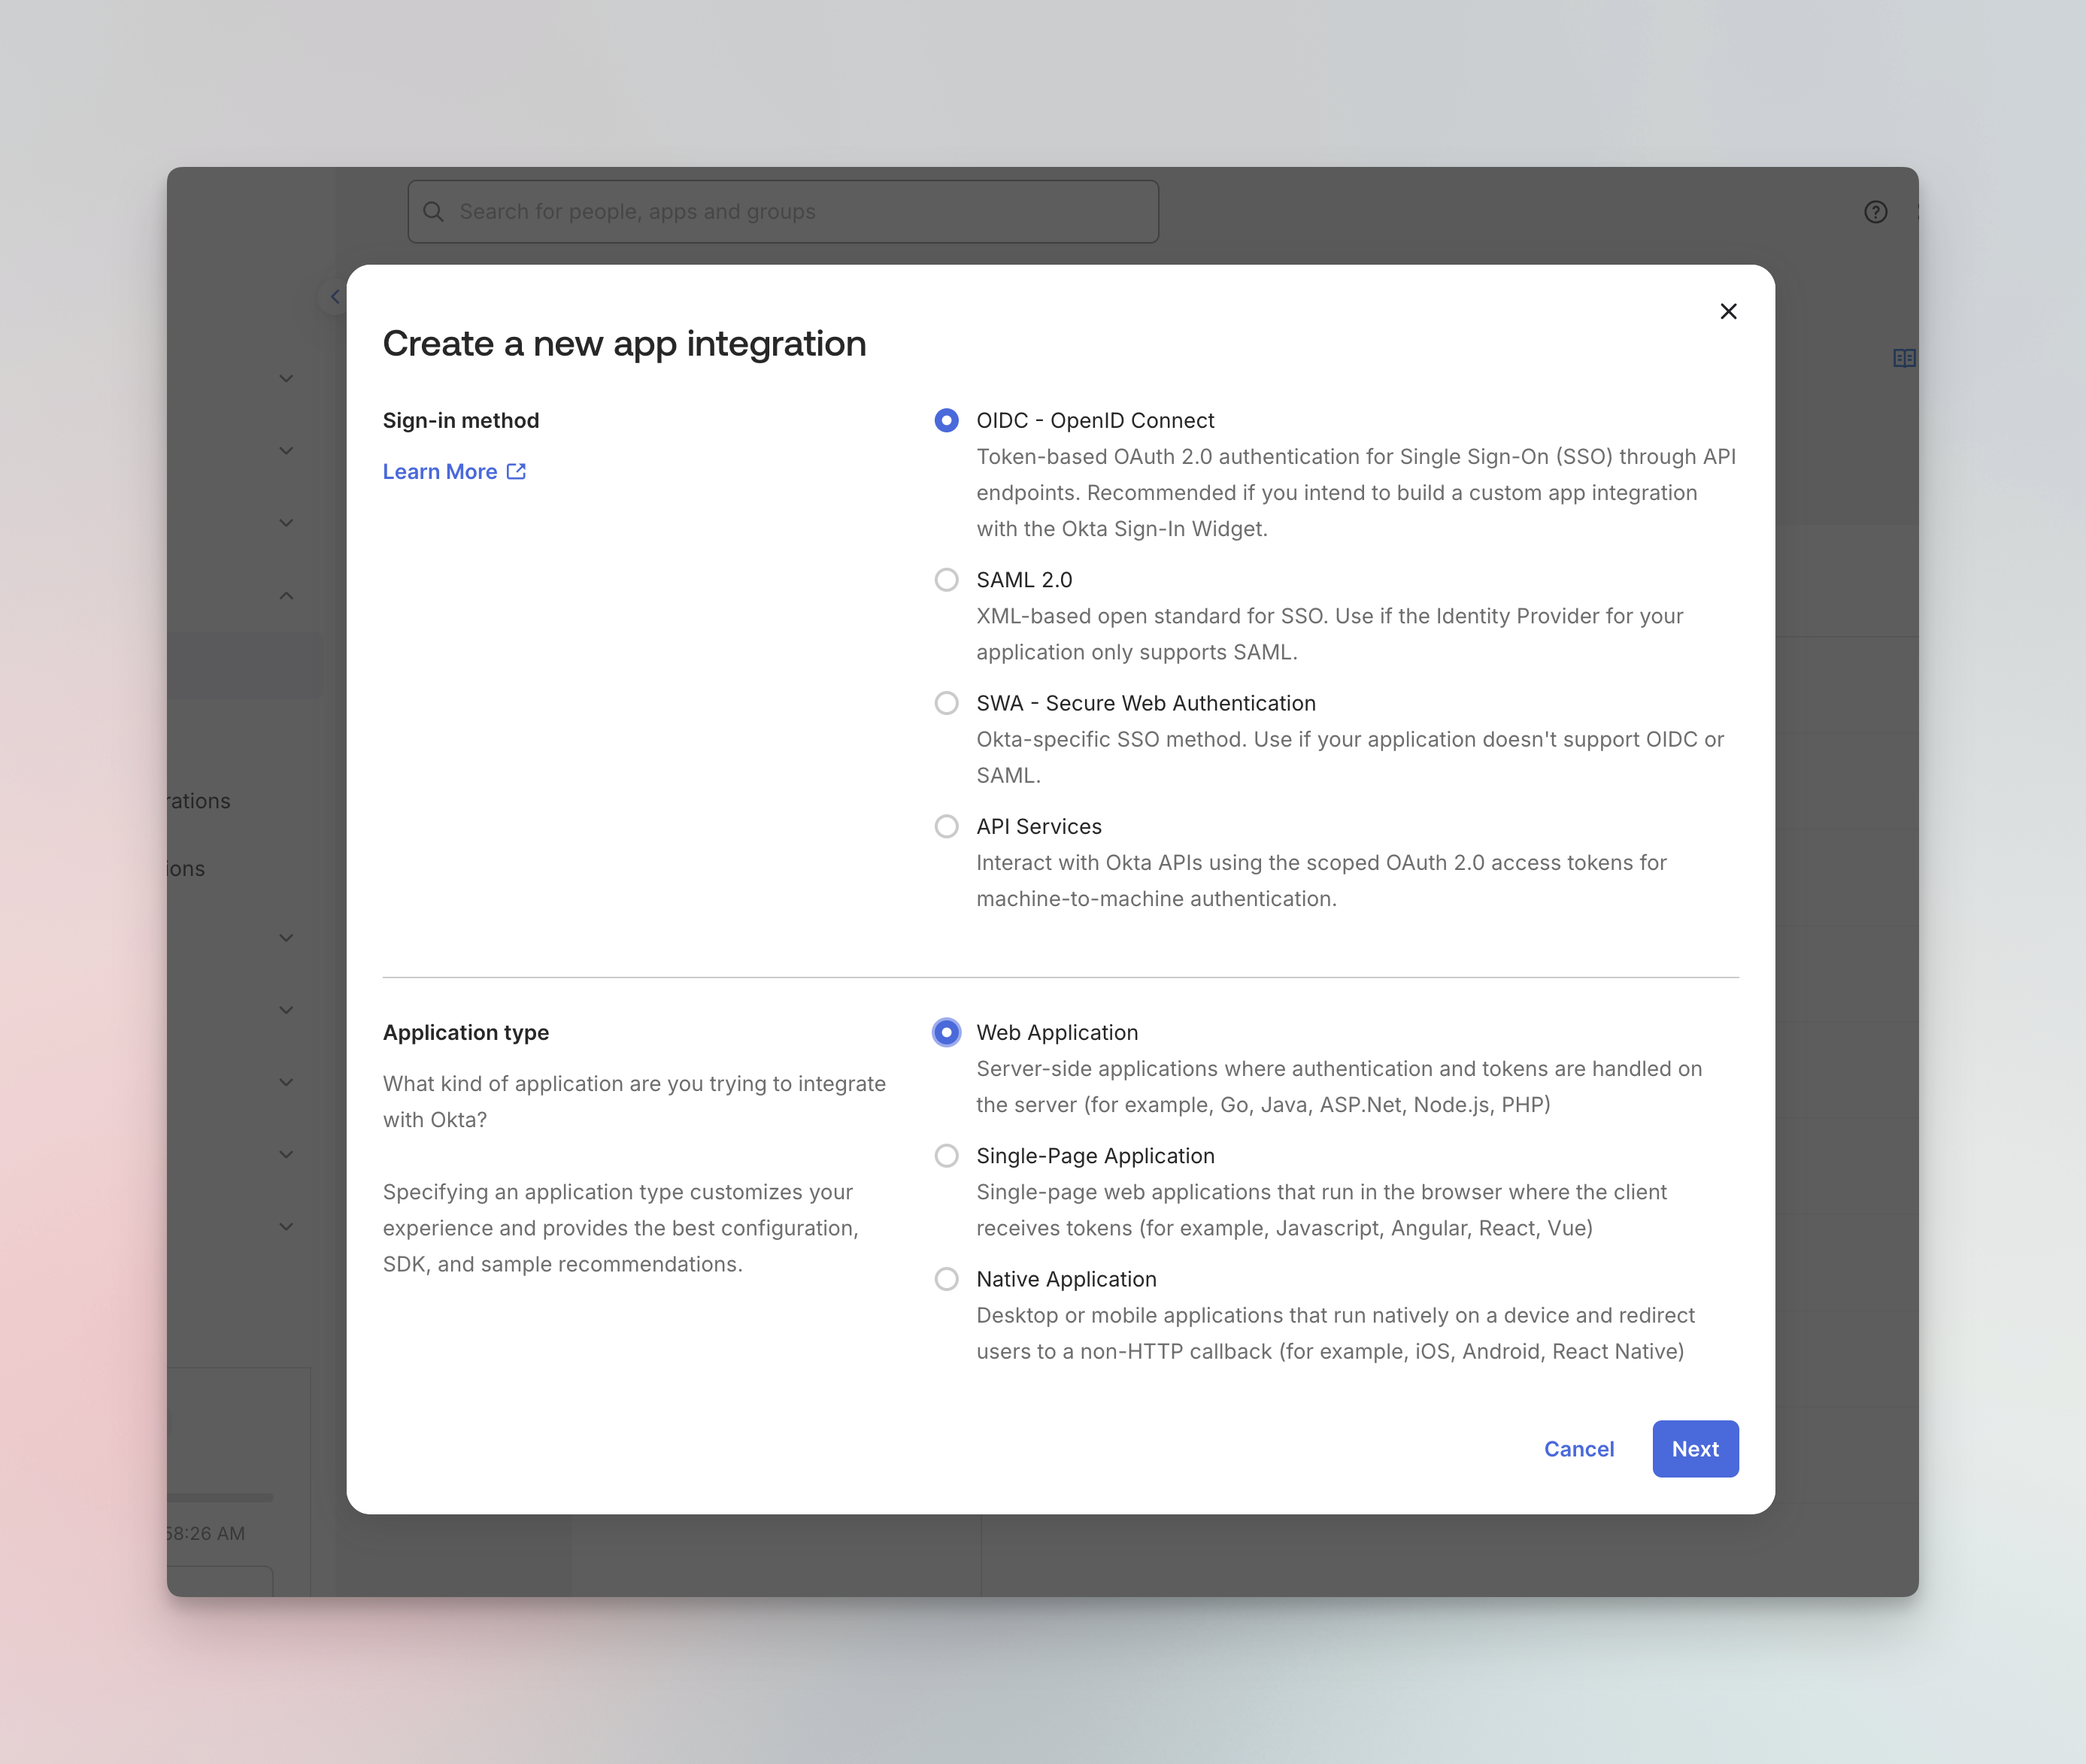
- Click Next to continue
Step 2: Configure Application Settings
Configure the following settings for your application: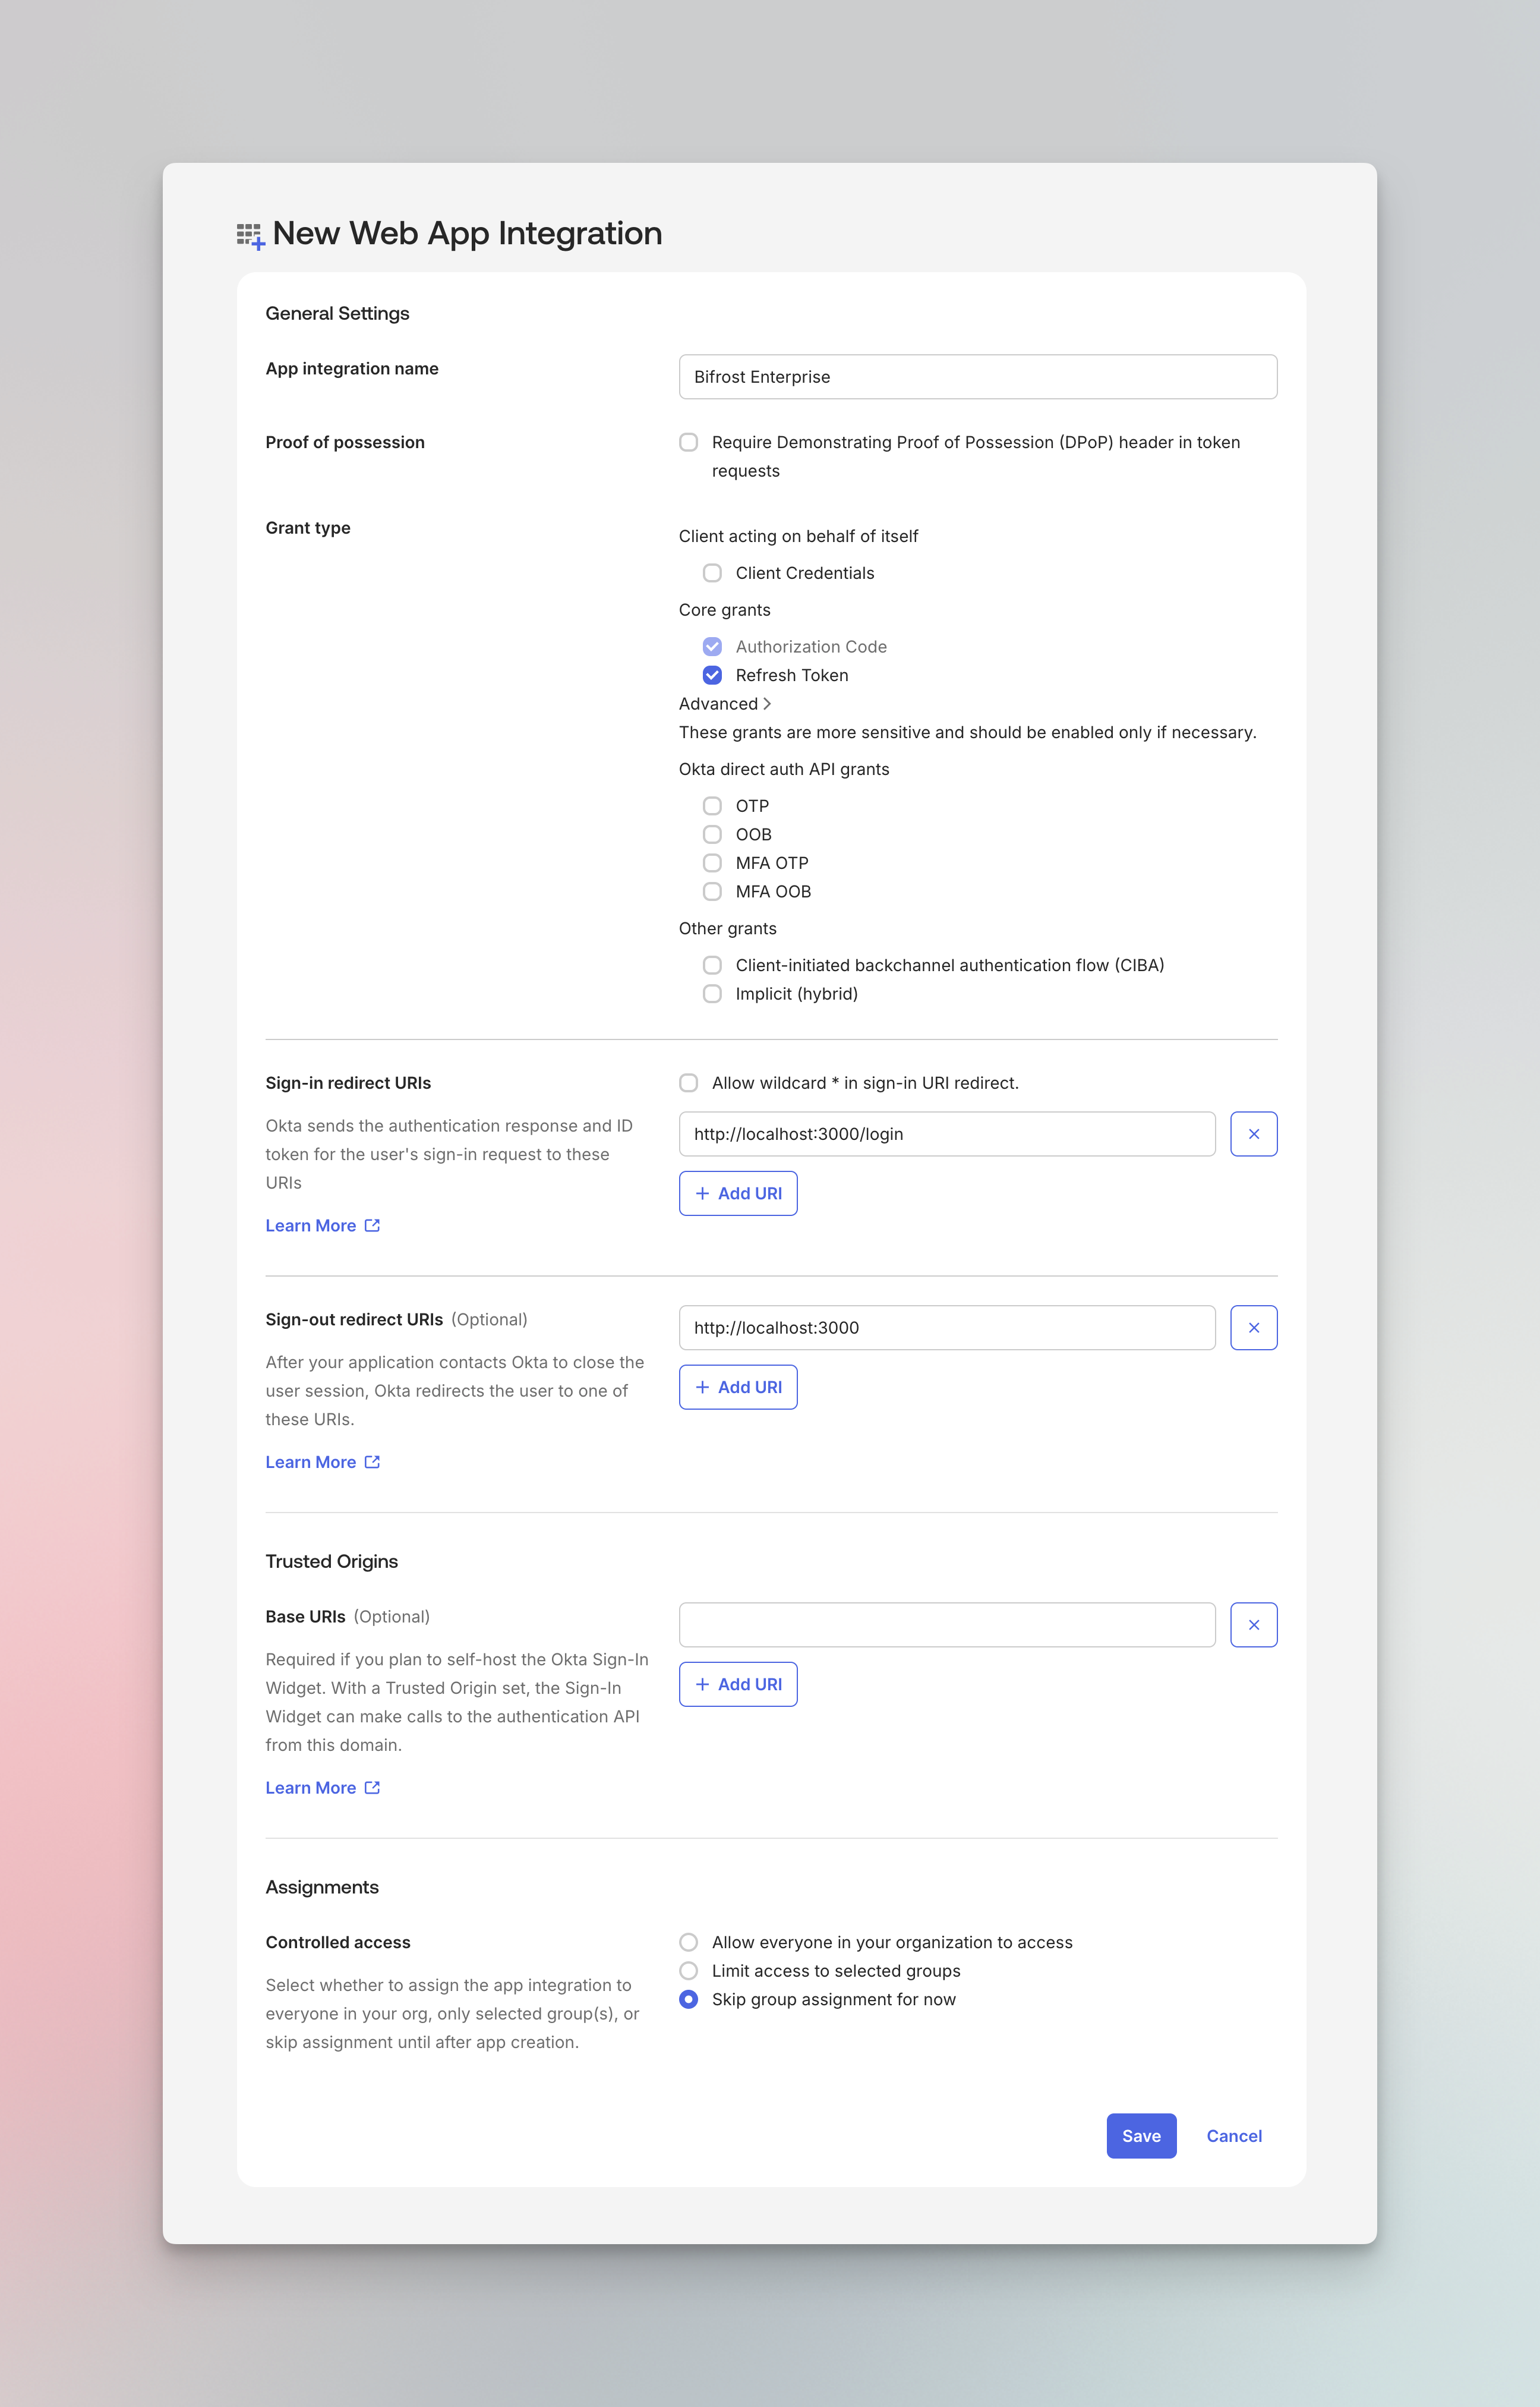
- App integration name:
Bifrost Enterprise - Logo (optional): You can upload the Bifrost logo from https://www.getmaxim.ai/bifrost/bifrost-logo-only.png
- Enable Authorization Code
- Enable Refresh Token
- Add your Bifrost login callback URL:
https://your-bifrost-domain.com/login
- Add your Bifrost base URL:
https://your-bifrost-domain.com
- Choose Skip group assignment for now (we’ll configure this later)
- Click Save to create the application
-
After saving, note down the following from the General tab:
- Client ID
- Client Secret (click to reveal)
Step 3: Create Custom Role Attribute (Optional)
You can map any attribute (include custom roles/groups) to assign roles to users. You can learn more about
RBAC docs.
- Navigate to Directory → Profile Editor

- Click on your application’s user profile (e.g., Bifrost Enterprise User)
- Click Add Attribute
- Configure the attribute:
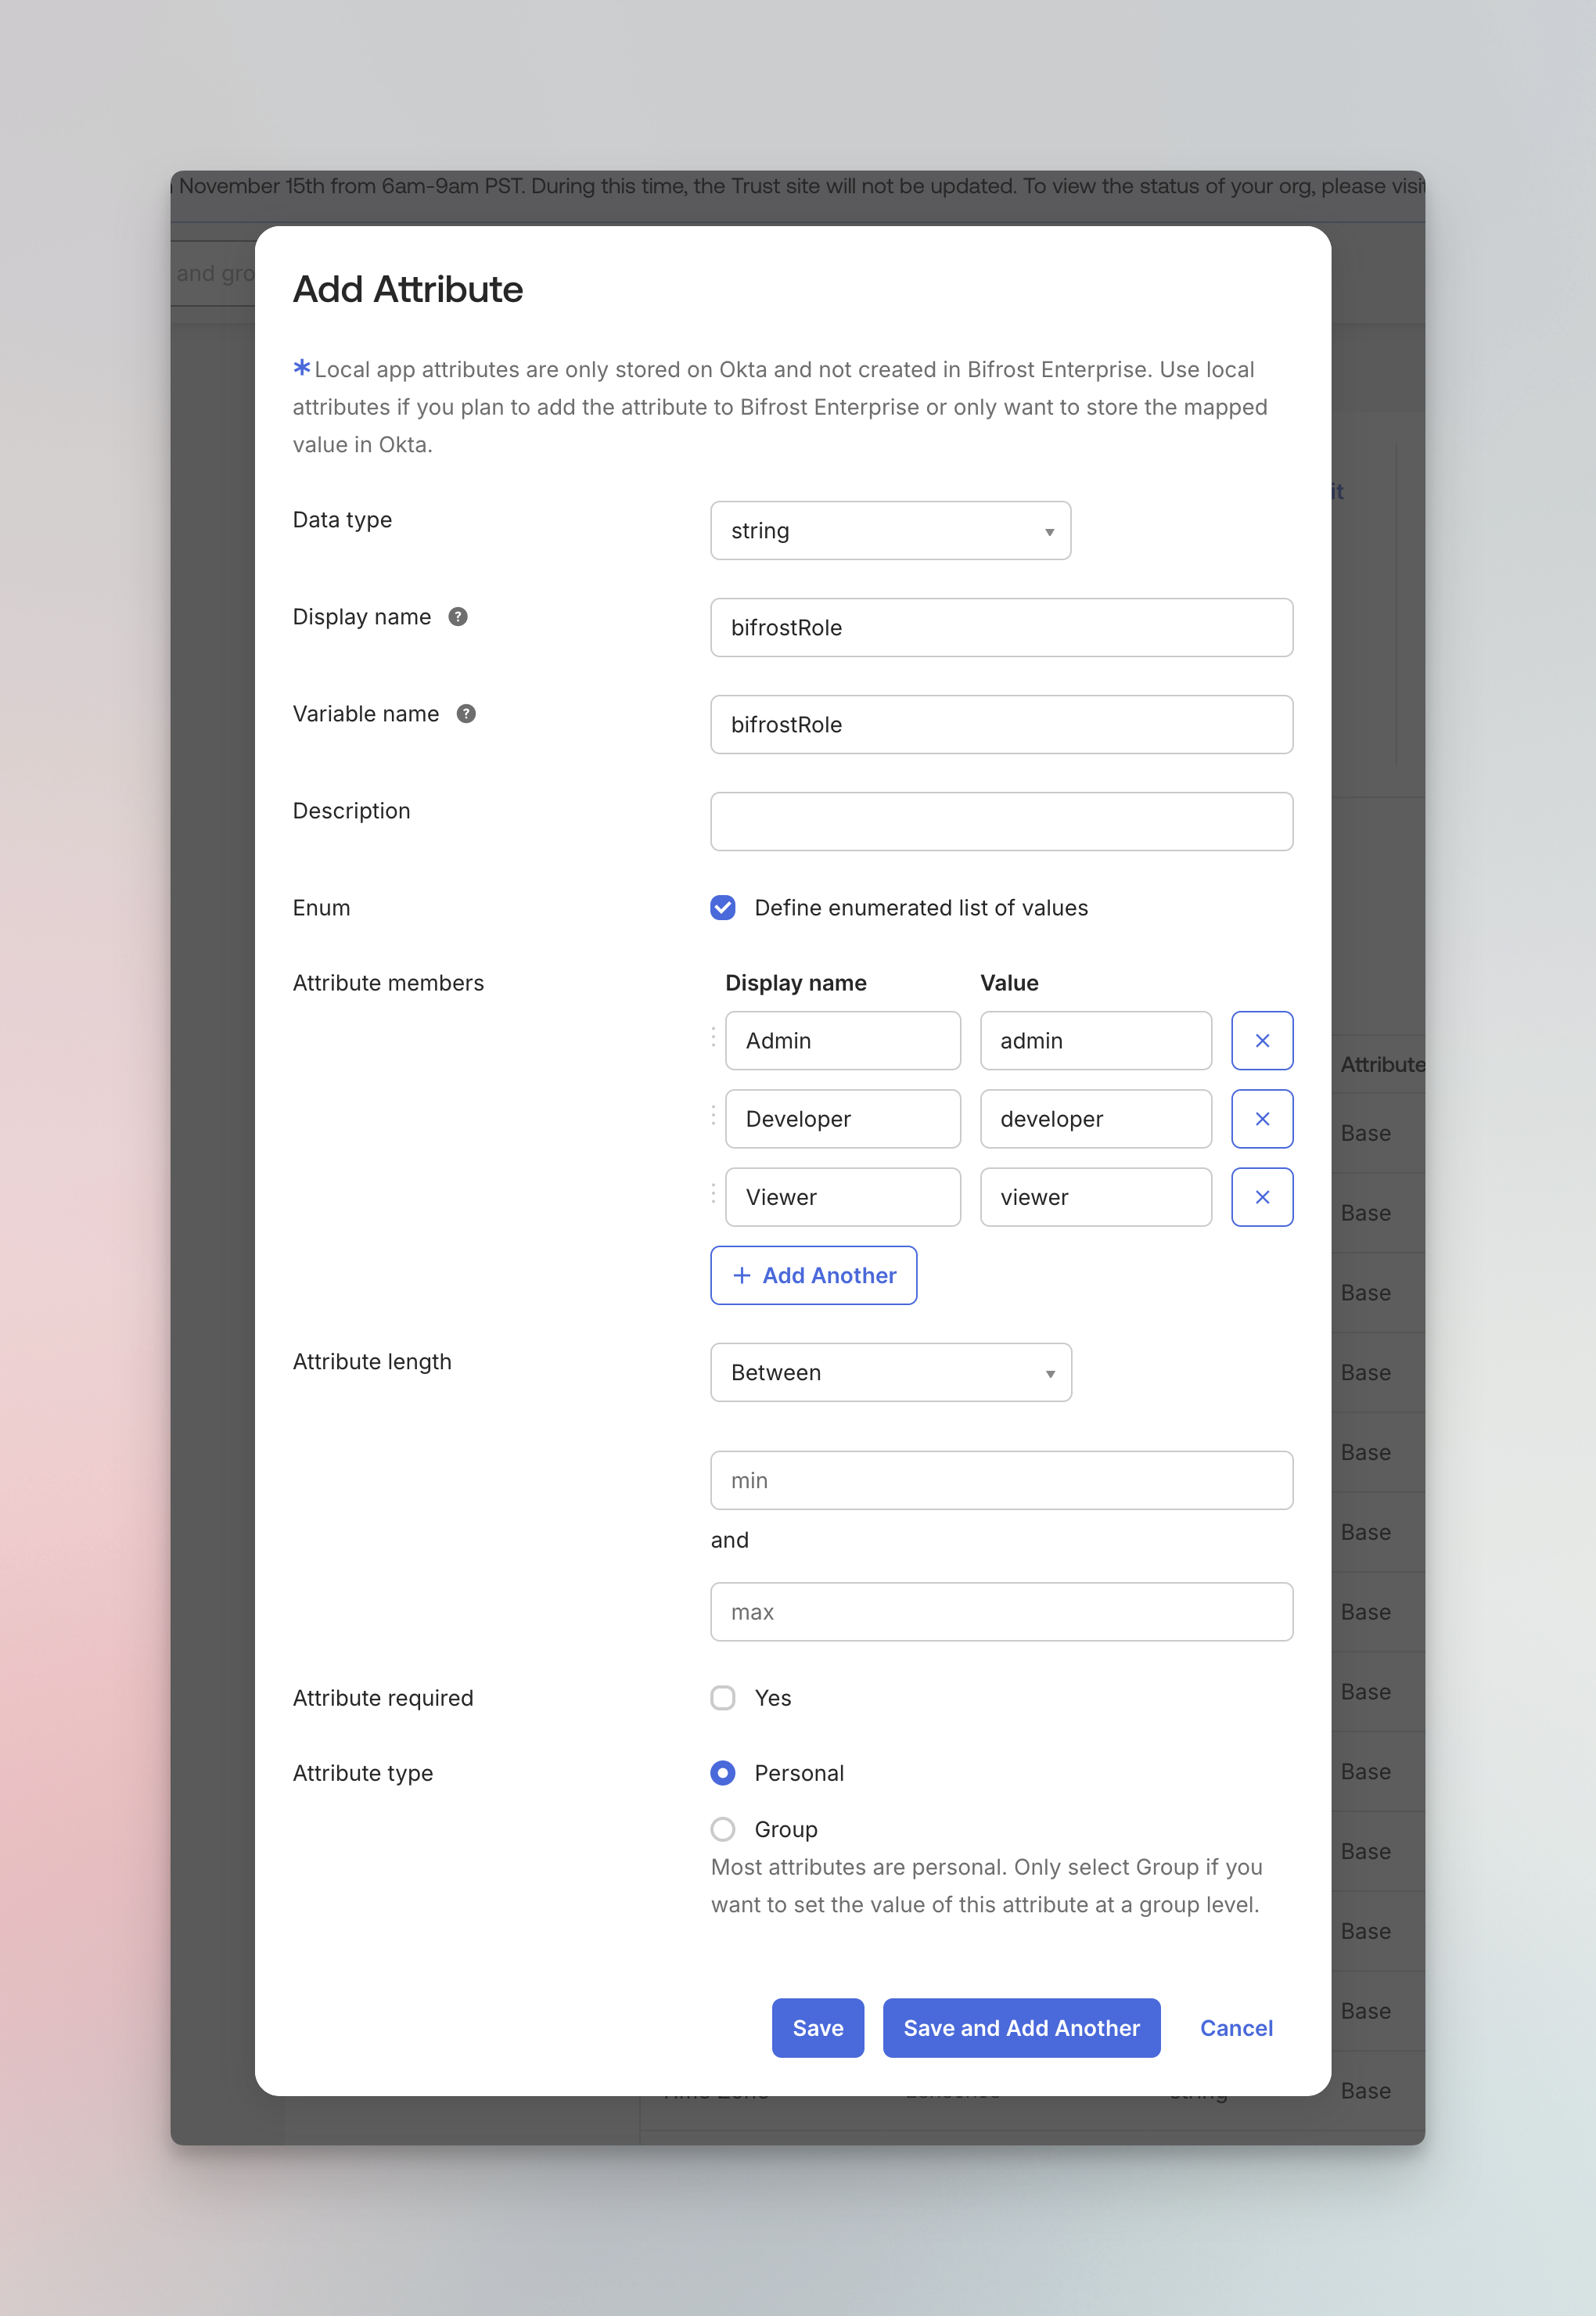
| Field | Value |
|---|---|
| Data type | string |
| Display name | bifrostRole |
| Variable name | bifrostRole |
| Enum | Check “Define enumerated list of values” |
| Attribute members | Admin → admin, Developer → developer, Viewer → viewer |
| Attribute type | Personal |
- Click Save
Step 4: Add Claims to Tokens
Configure the authorization server to include attributes in the access token so Bifrost can use them for role, team, and business unit mappings.This step applies to Custom Authorization Server only. The Org Authorization Server does not support custom claim expressions — use app-level Group Claims (Step 5) for group-based mappings instead.
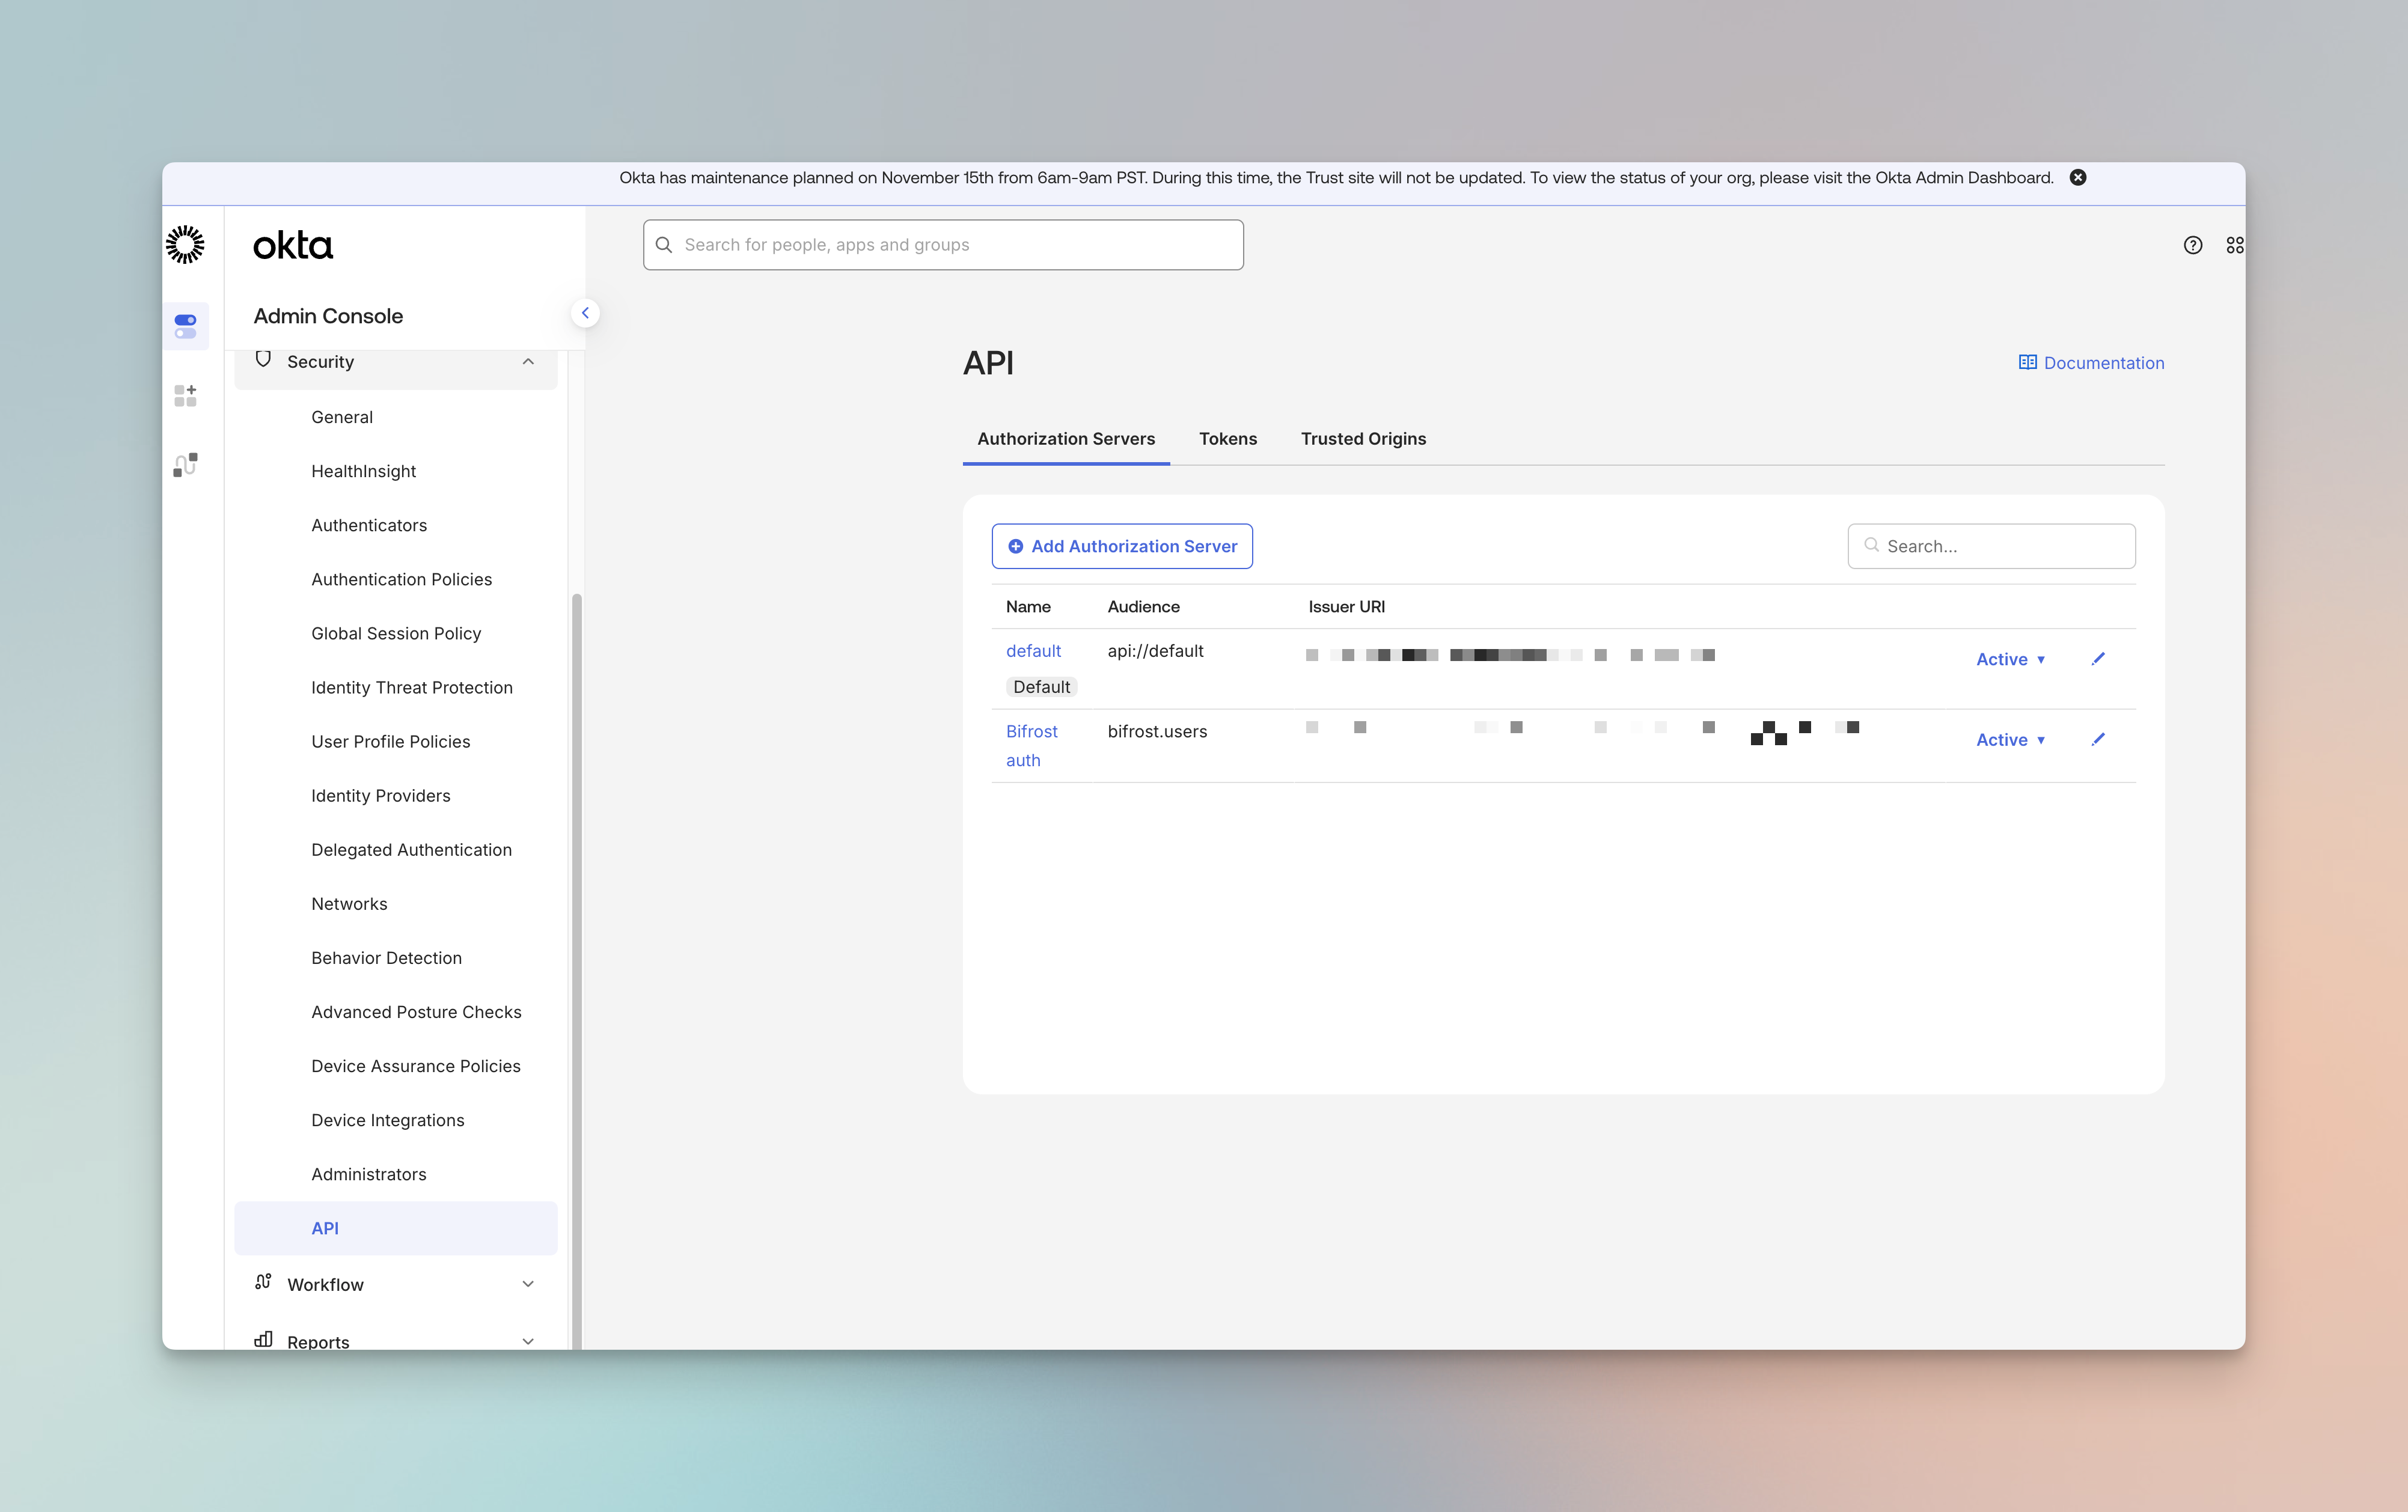
- Navigate to Security → API → Authorization Servers
- Click on your authorization server (e.g., default)
- Go to the Claims tab
- Click Add Claim
Any other custom attribute
The same process works for any Okta user profile attribute —department, costCenter, a custom field, or the bifrostRole attribute from Step 3. The Value can be a direct attribute reference or an expression:
| Value type | Example | When to use |
|---|---|---|
| Attribute | user.department | Pass the raw profile value through as-is |
| Expression | user.department != null ? user.department : "unknown" | Transform or provide a fallback |
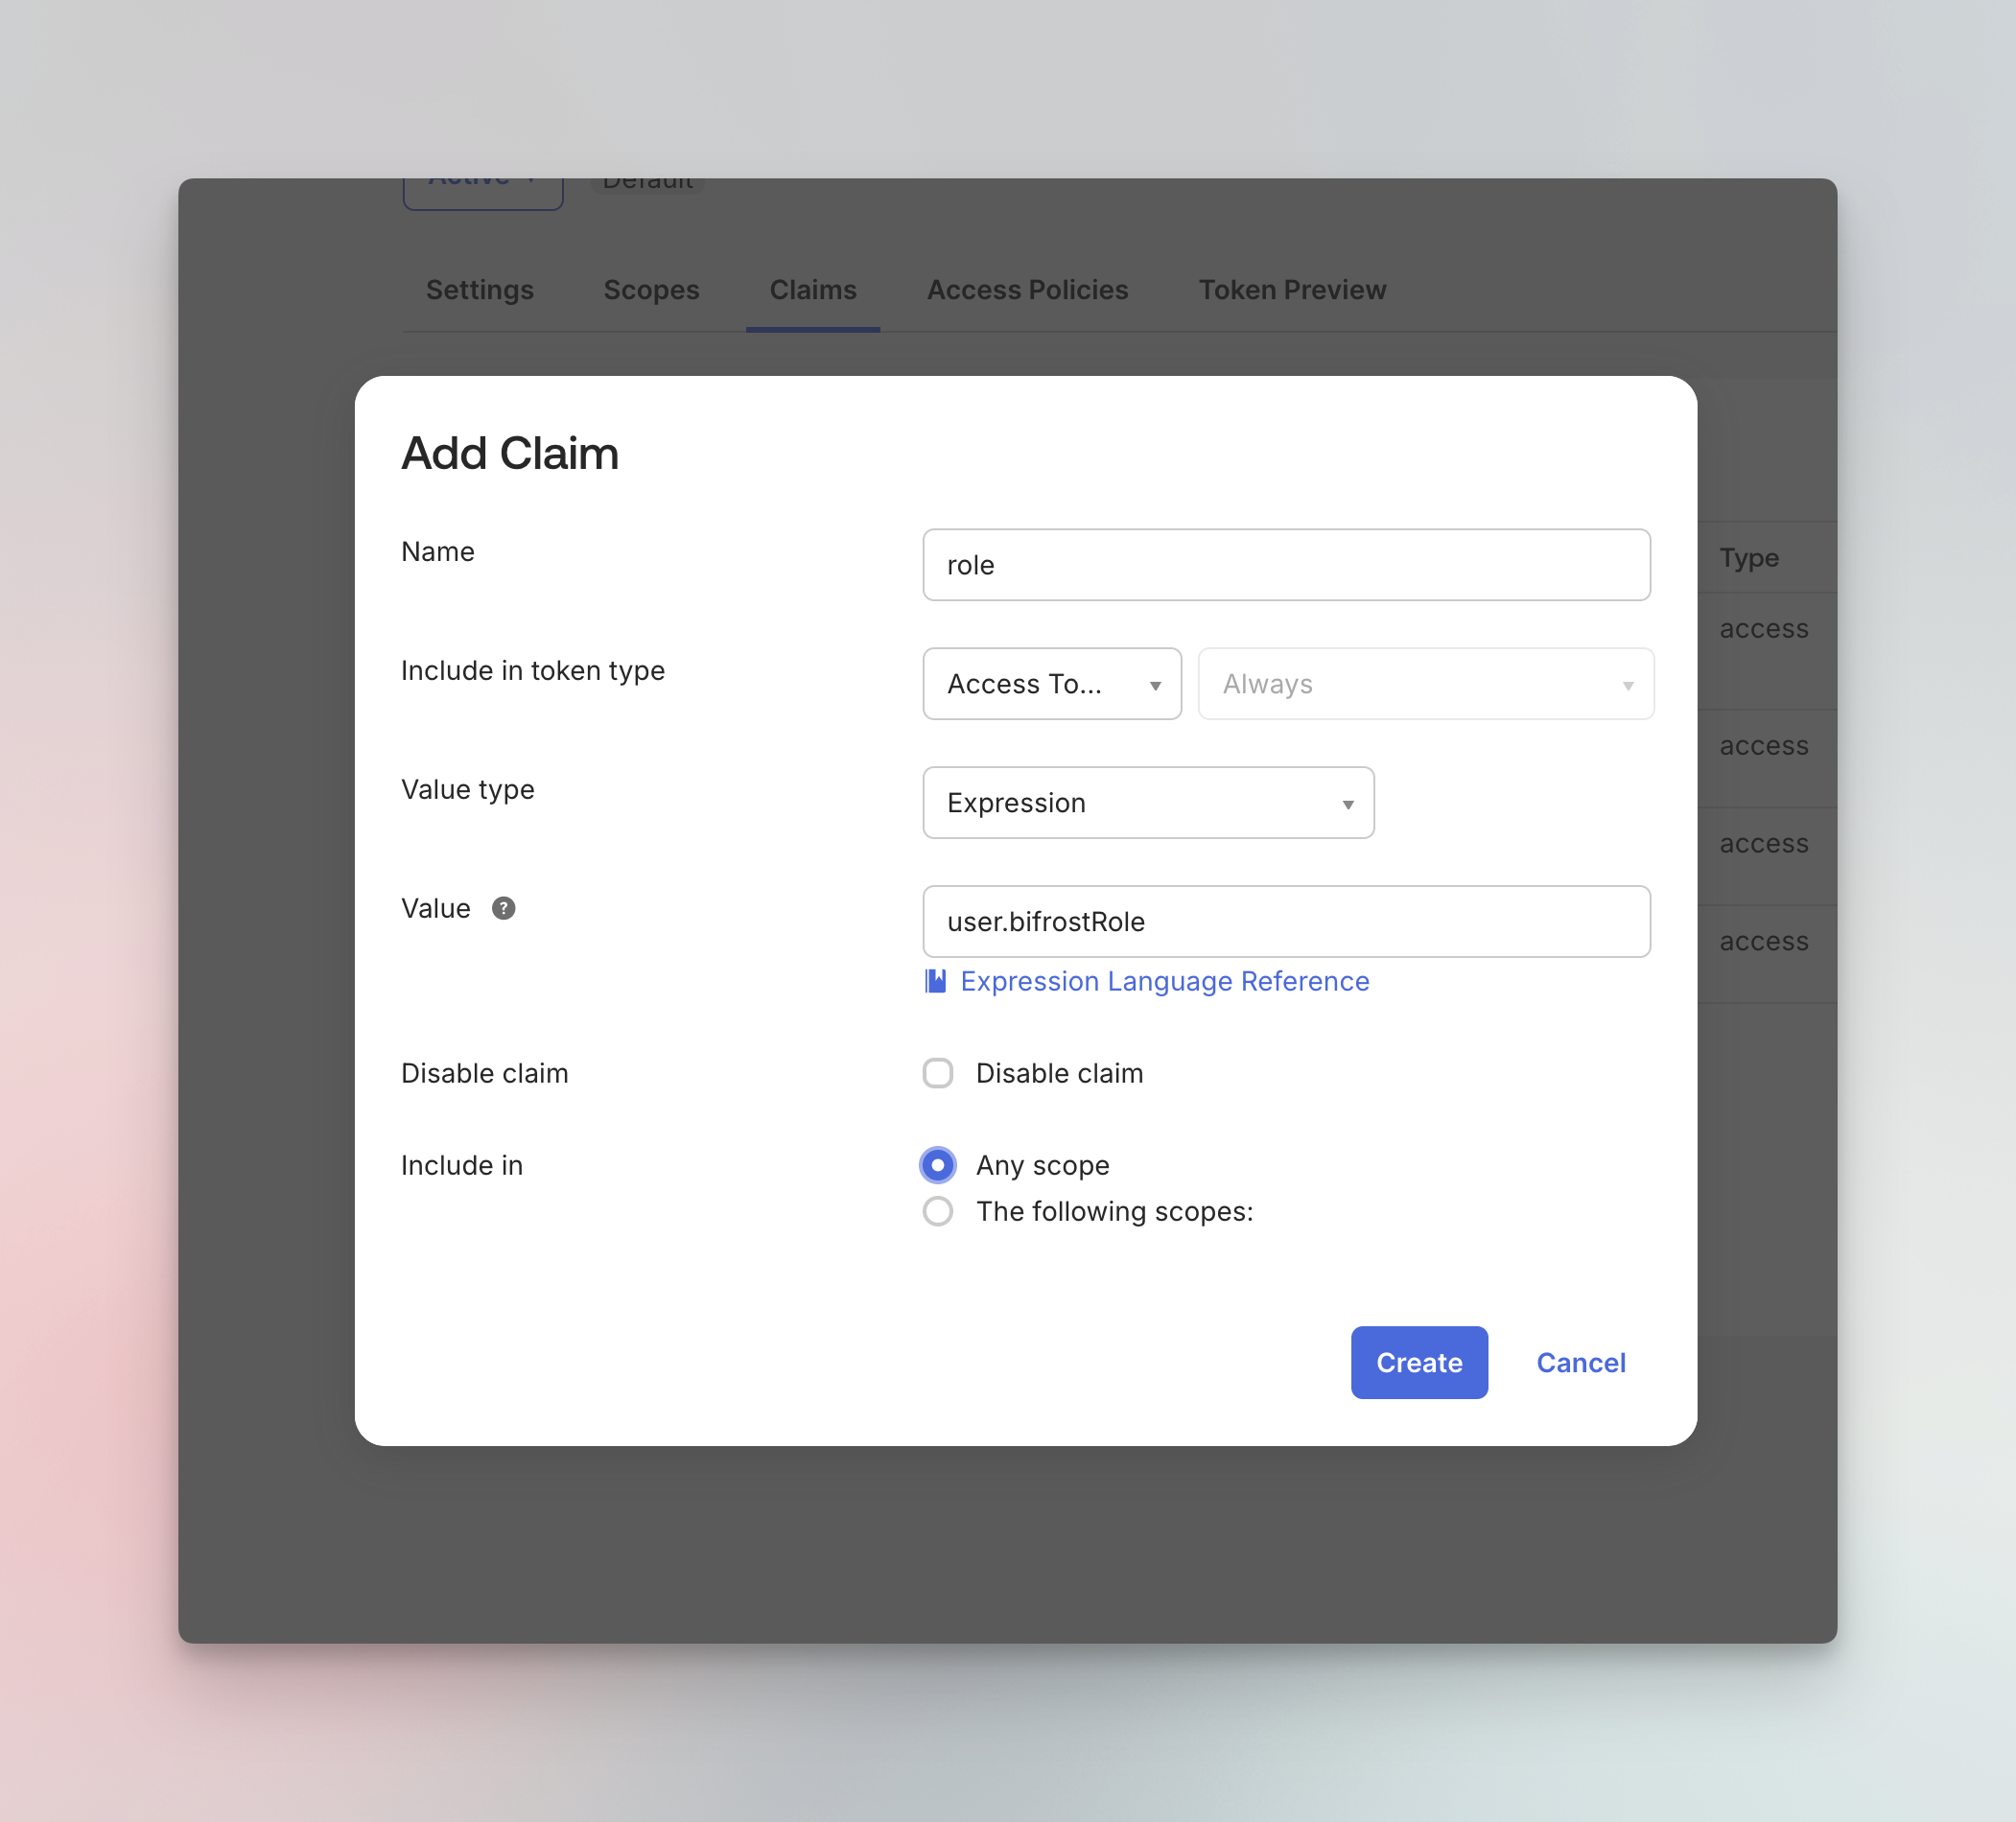
bifrostRole attribute created in Step 3 as a token claim:
| Field | Value |
|---|---|
| Name | bifrostRole |
| Include in token type | Access Token, Always |
| Value type | Expression |
| Value | user.bifrostRole |
| Include in | Any scope |
attribute is sufficient. If SCIM is enabled, each Bifrost mapping must also include attributeValue set to the SCIM attribute’s external_name. Aligning the OIDC claim name with external_name makes it easier to keep the two in sync, but does not remove the requirement to set attributeValue for SCIM mappings.
- Click Create
Step 5: Configure Groups
Bifrost can automatically sync Okta groups for two purposes:- Team synchronization - Groups are synced as Bifrost teams
- Role mapping - Groups can be mapped to Bifrost roles (Admin, Developer, Viewer) using Group-to-Role Mappings in the Bifrost UI.
Create Groups in Okta
- Navigate to Directory → Groups
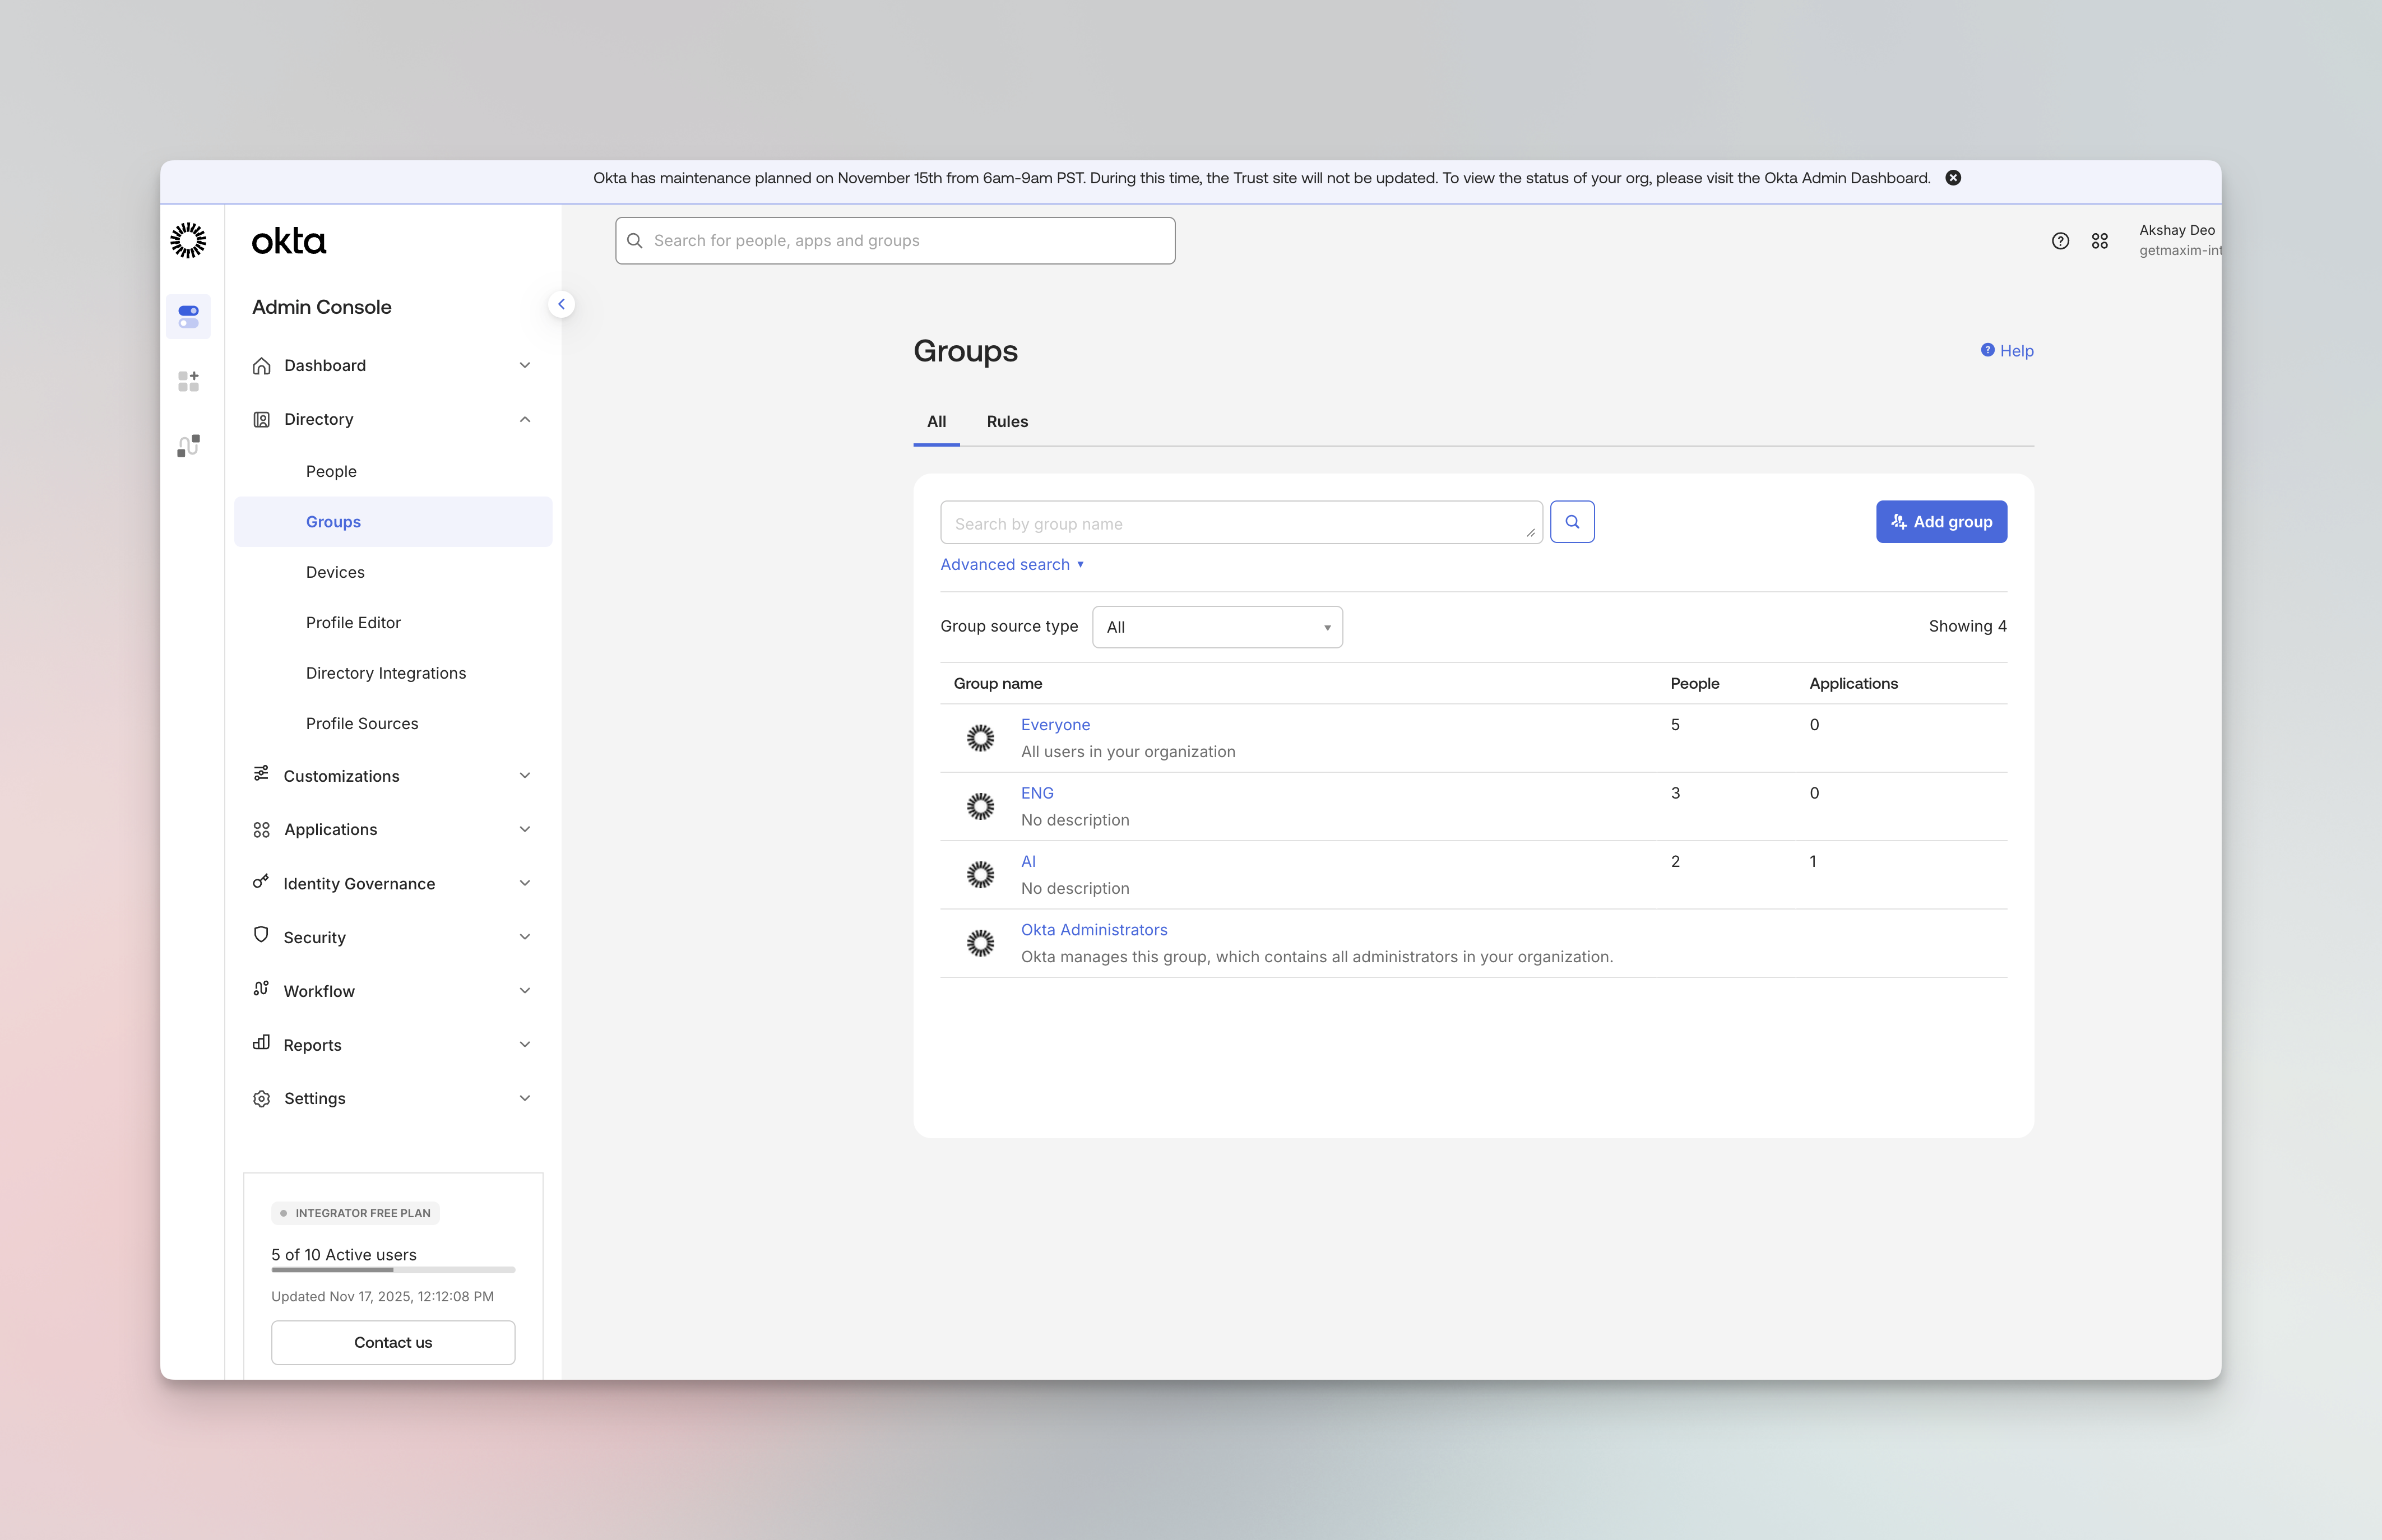
- Click Add group
- Create groups that correspond to your teams or roles (e.g.,
bifrost-staging-admins,bifrost-staging-viewers)
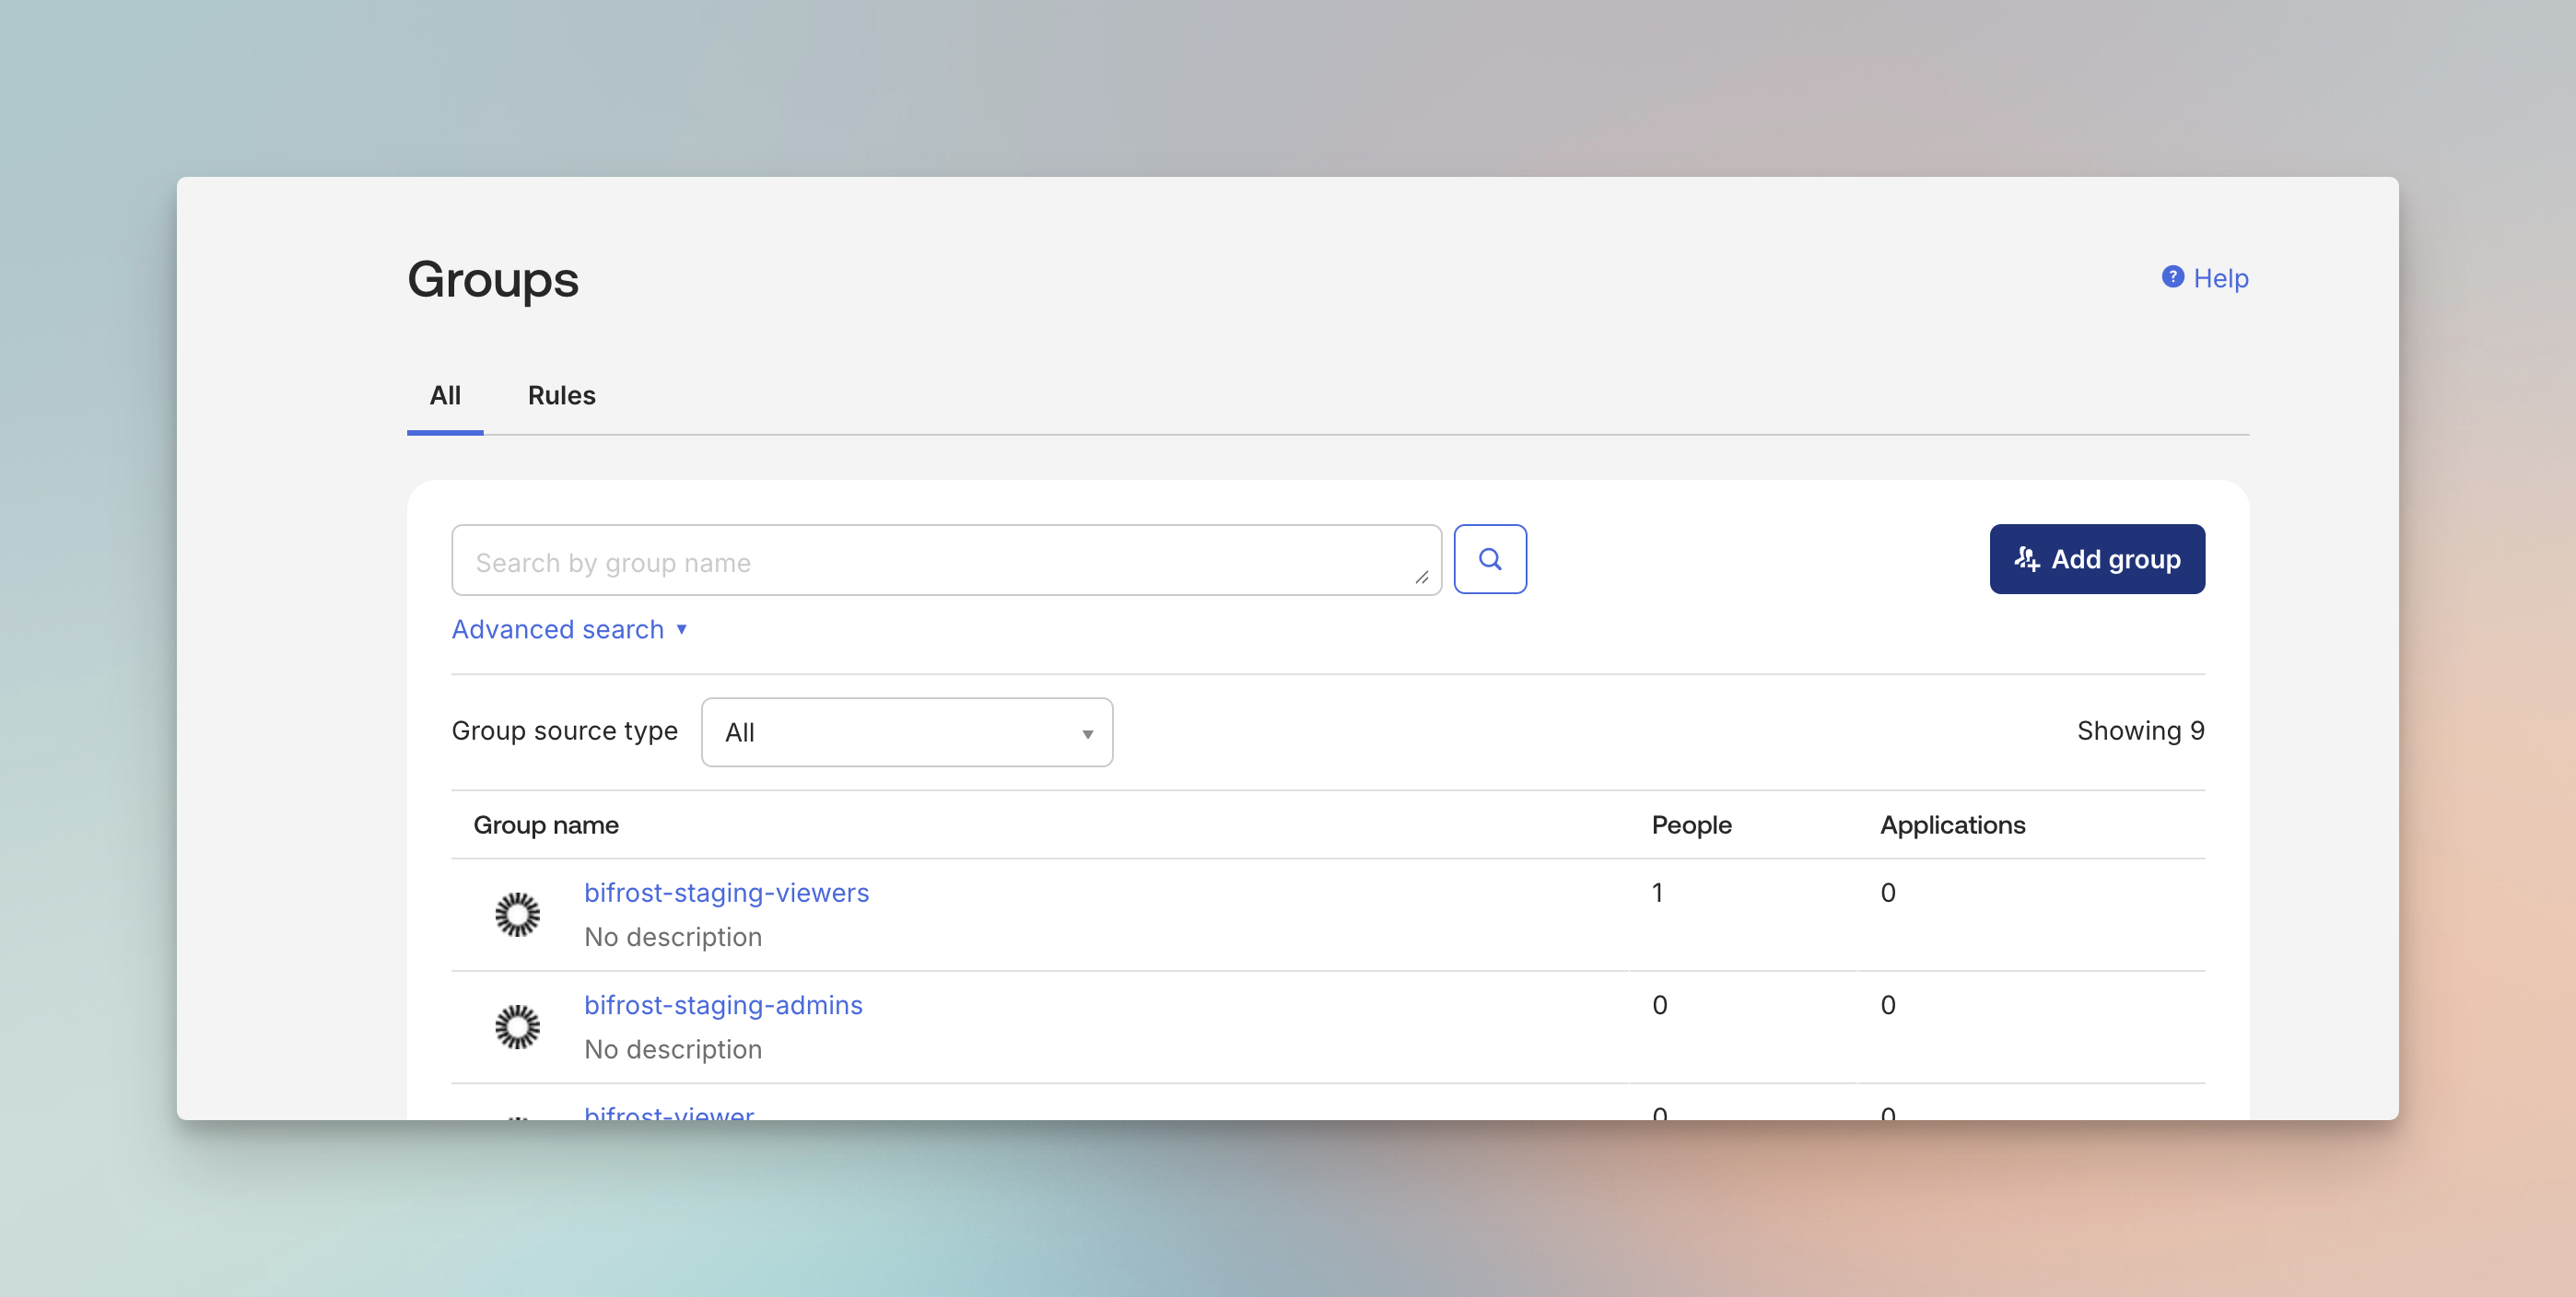
Use a consistent naming convention for your groups. This makes it easier to configure group filters and role mappings
later.
Add Groups Claim to Tokens
Okta exposes group claims in different places depending on which authorization server you use in Bifrost.Org Authorization Server: App-Level Group Claims
Use this path when Bifrost is configured with Org Authorization Server. This works on every Okta tenant and uses Okta’s legacy app-level Group Claims configuration.- Navigate to Applications → Applications
- Open your Bifrost Enterprise application
- Go to the Sign On tab
- In the OpenID Connect ID Token section, configure Group Claims
- Set the claim name to
groups - Set the filter to match the groups Bifrost should receive, for example
.*orbifrost-.* - Save the application settings
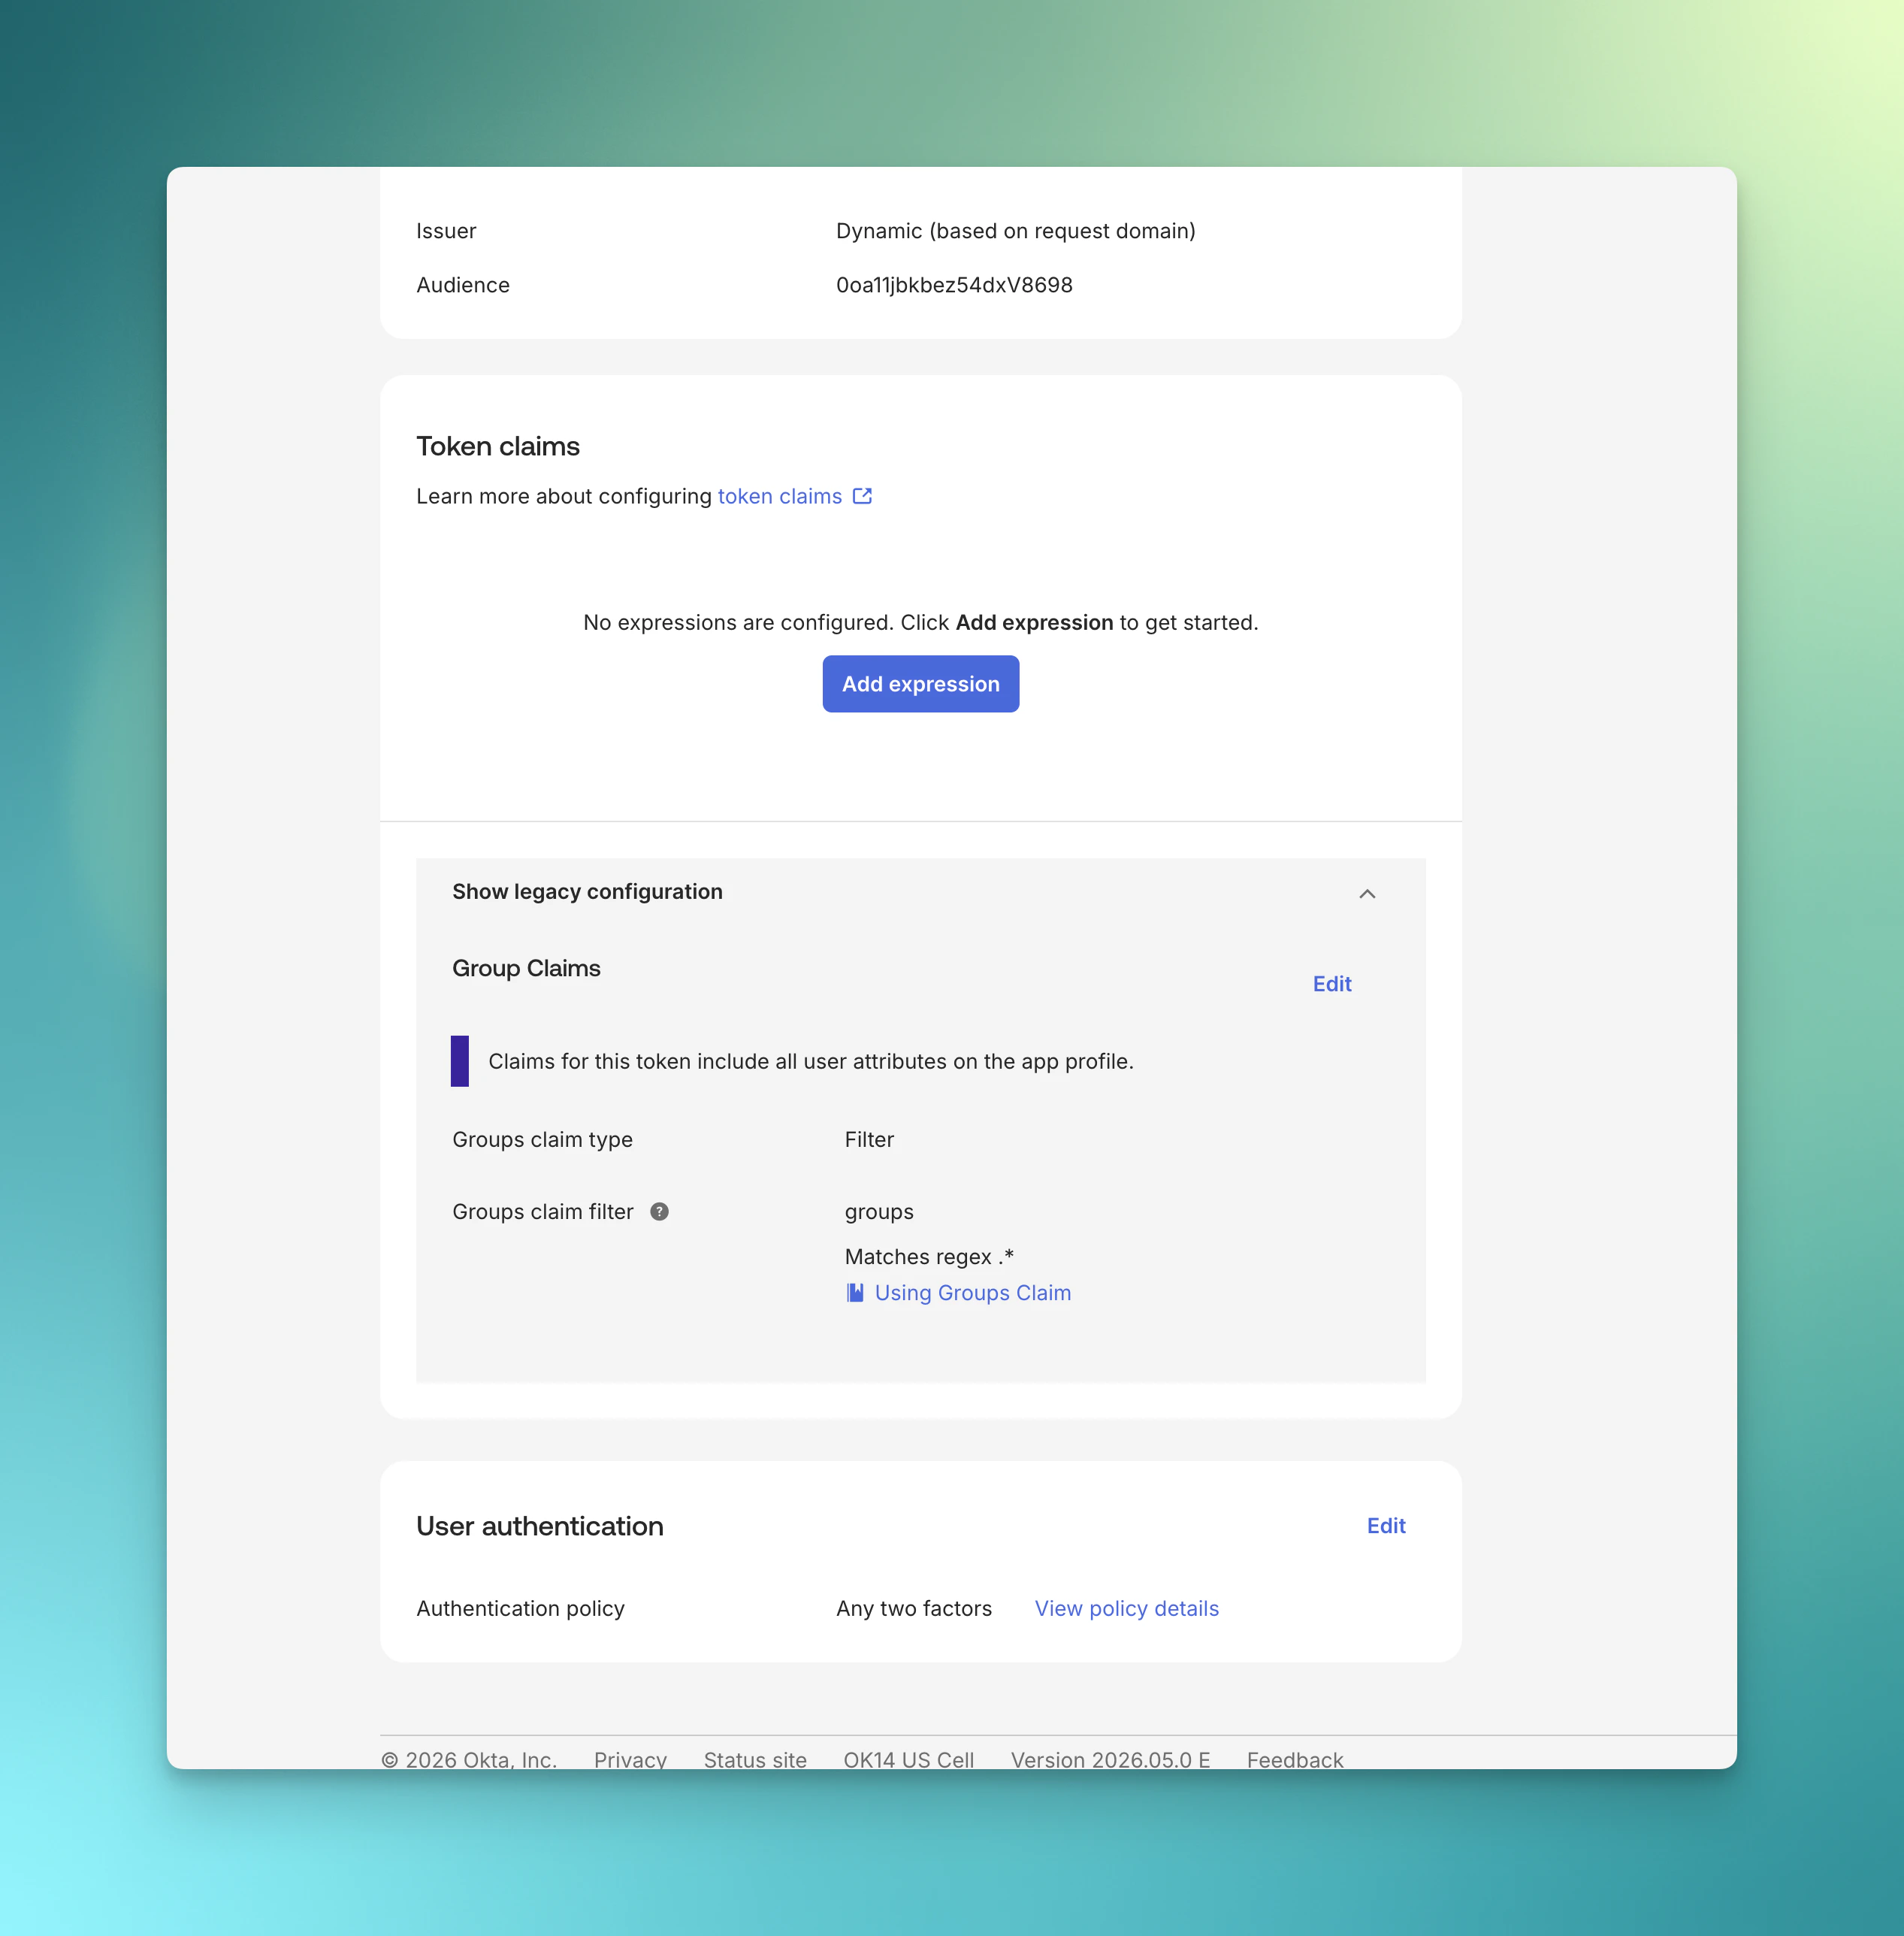
For the Org Authorization Server, assign the relevant Okta groups to the Bifrost application. Custom Authorization Servers do not emit app-level Sign On Group Claims.
Custom Authorization Server: Authorization Server Claim
Use this path when Bifrost is configured with Custom Authorization Server. This approach adds the groups claim through your authorization server, providing more flexibility for complex configurations.- Navigate to Security → API → Authorization Servers
- Select your authorization server (e.g., default)
- Go to the Claims tab
- Click Add Claim
| Field | Value |
|---|---|
| Name | groups |
| Include in token type | ID Token, Always |
| Value type | Groups |
| Filter | Matches regex: .* (or specify a prefix like bifrost-.*) |
| Include in | Any scope |
- Click Create
Step 6: Assign Users to the Application
- Navigate to your application’s Assignments tab
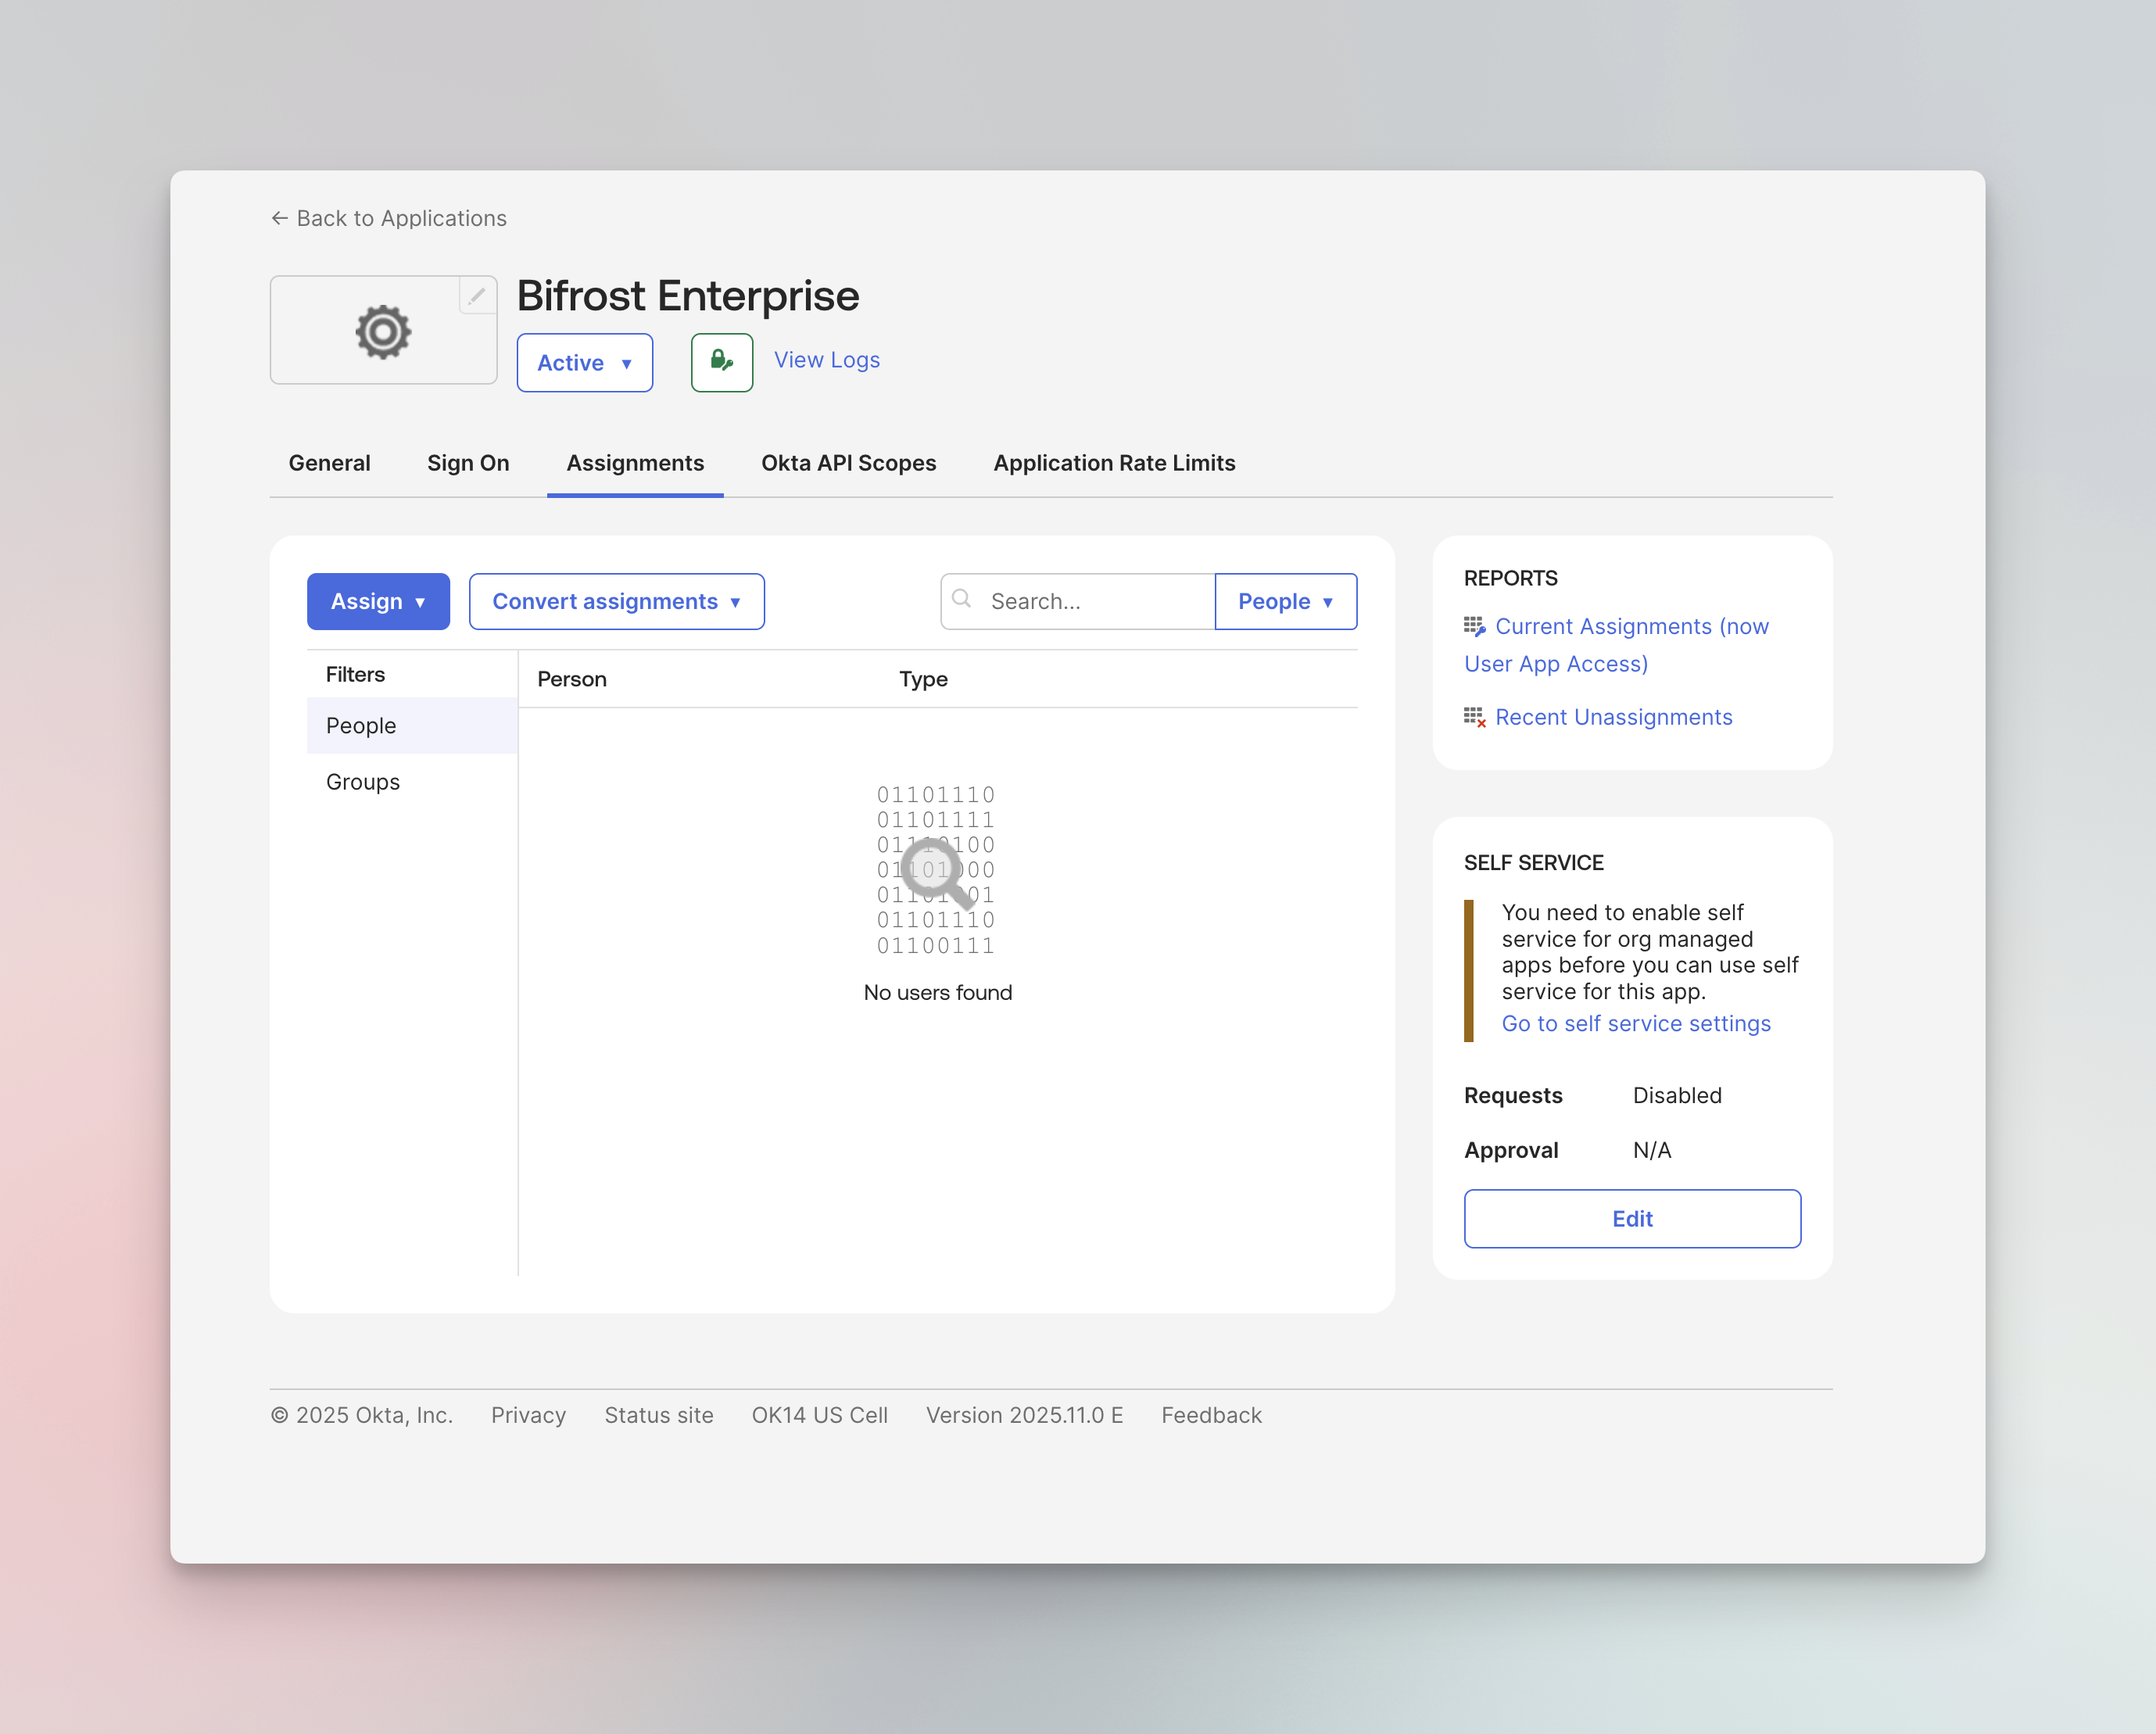
- Click Assign → Assign to People or Assign to Groups
For Assigning Roles (If step 3 and step 4 are followed)
For each user, set their bifrostRole (if you are planning to do role-level mapping):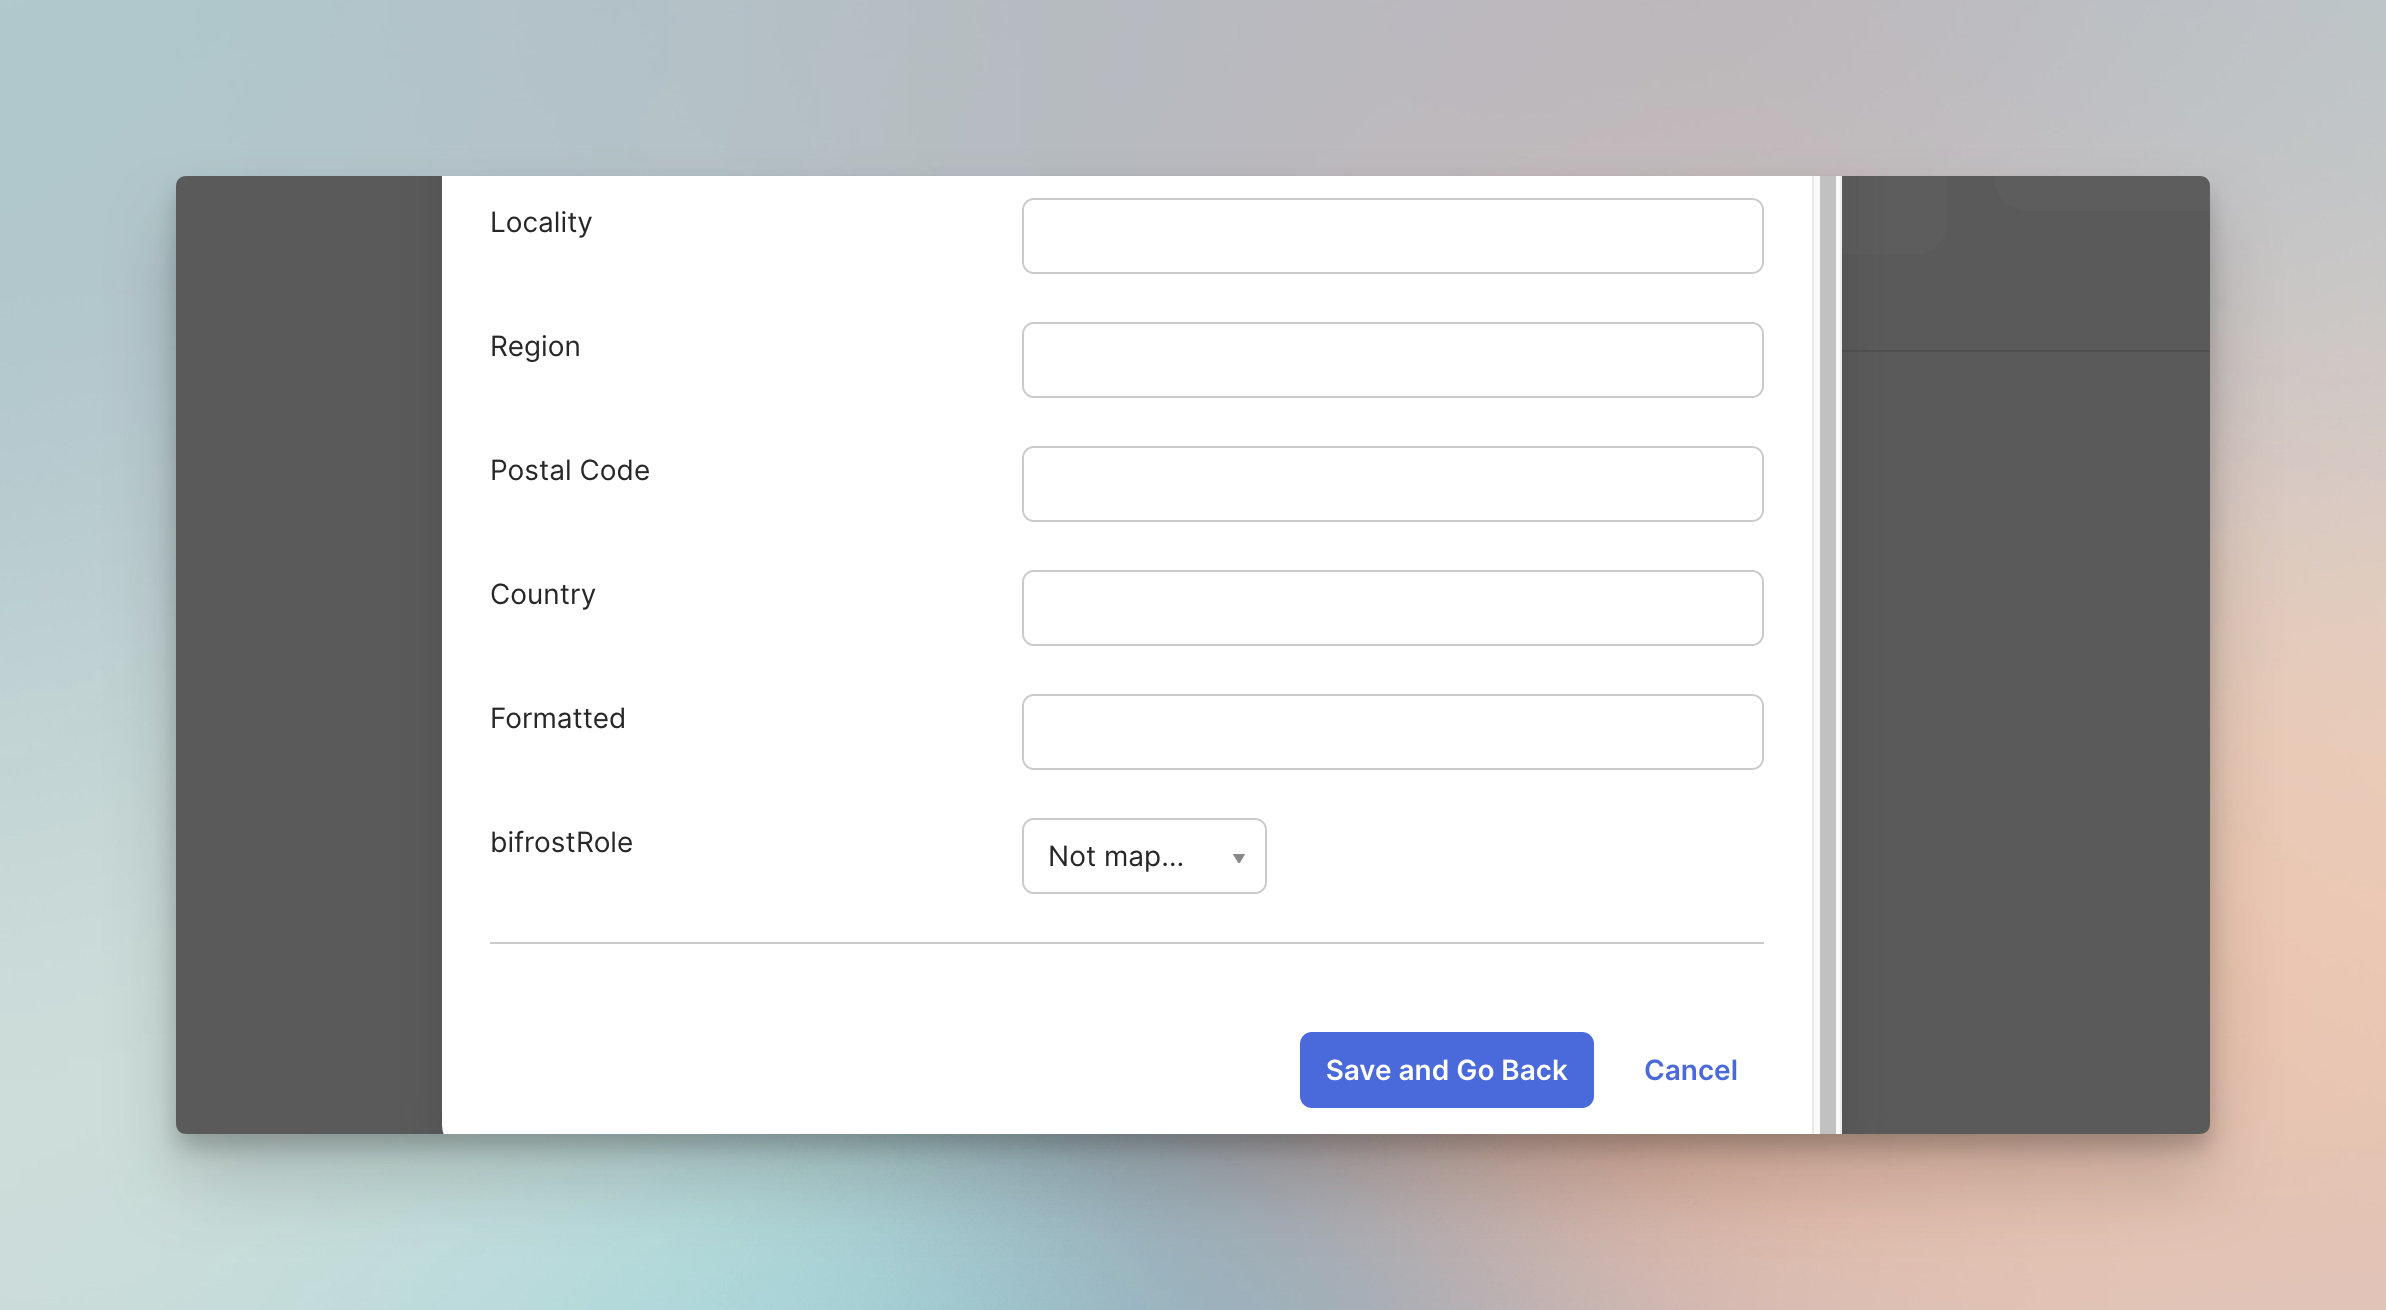
- Click Save and Go Back
Step 7: Create API token for bulk user and team sync
This step is optional if you plan to rely solely on SCIM push (Step 9) for real-time sync. Note that SCIM push and background sync are complementary — the API token enables the 24-hour background reconciliation that catches anything SCIM push may have missed. To create an API token, navigate to Security → API → Tokens.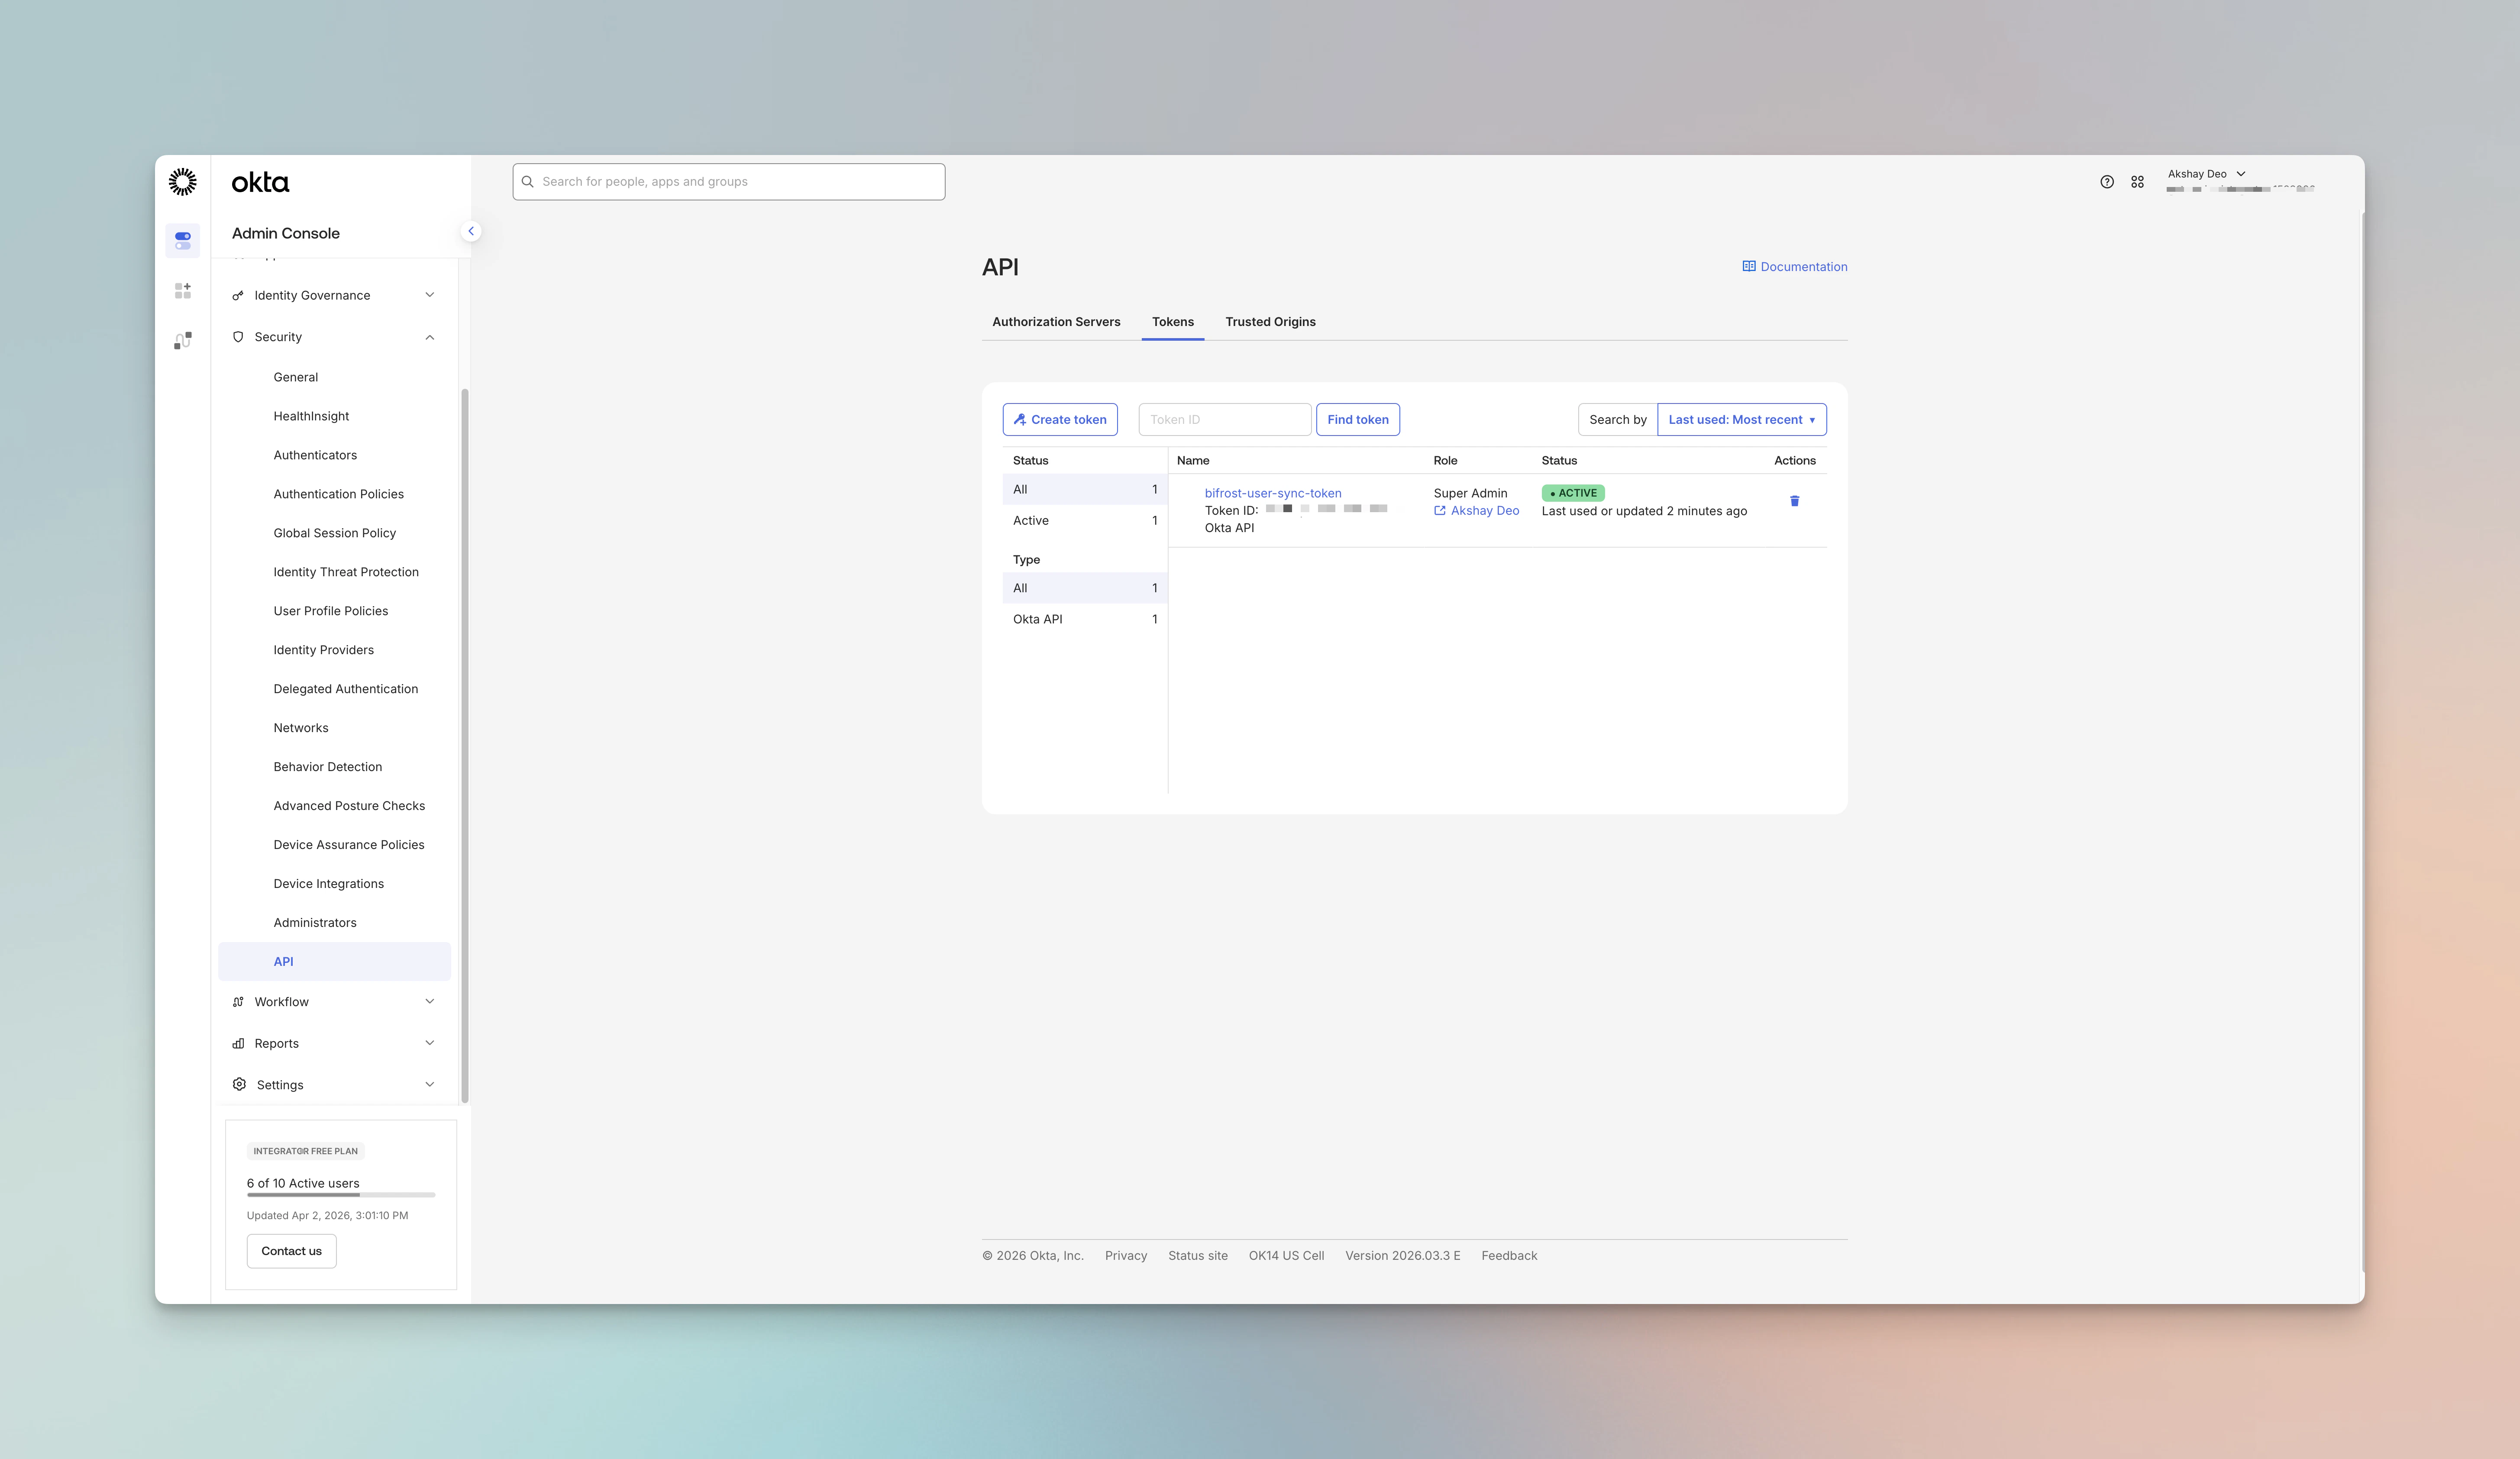
- Click on “Create token”
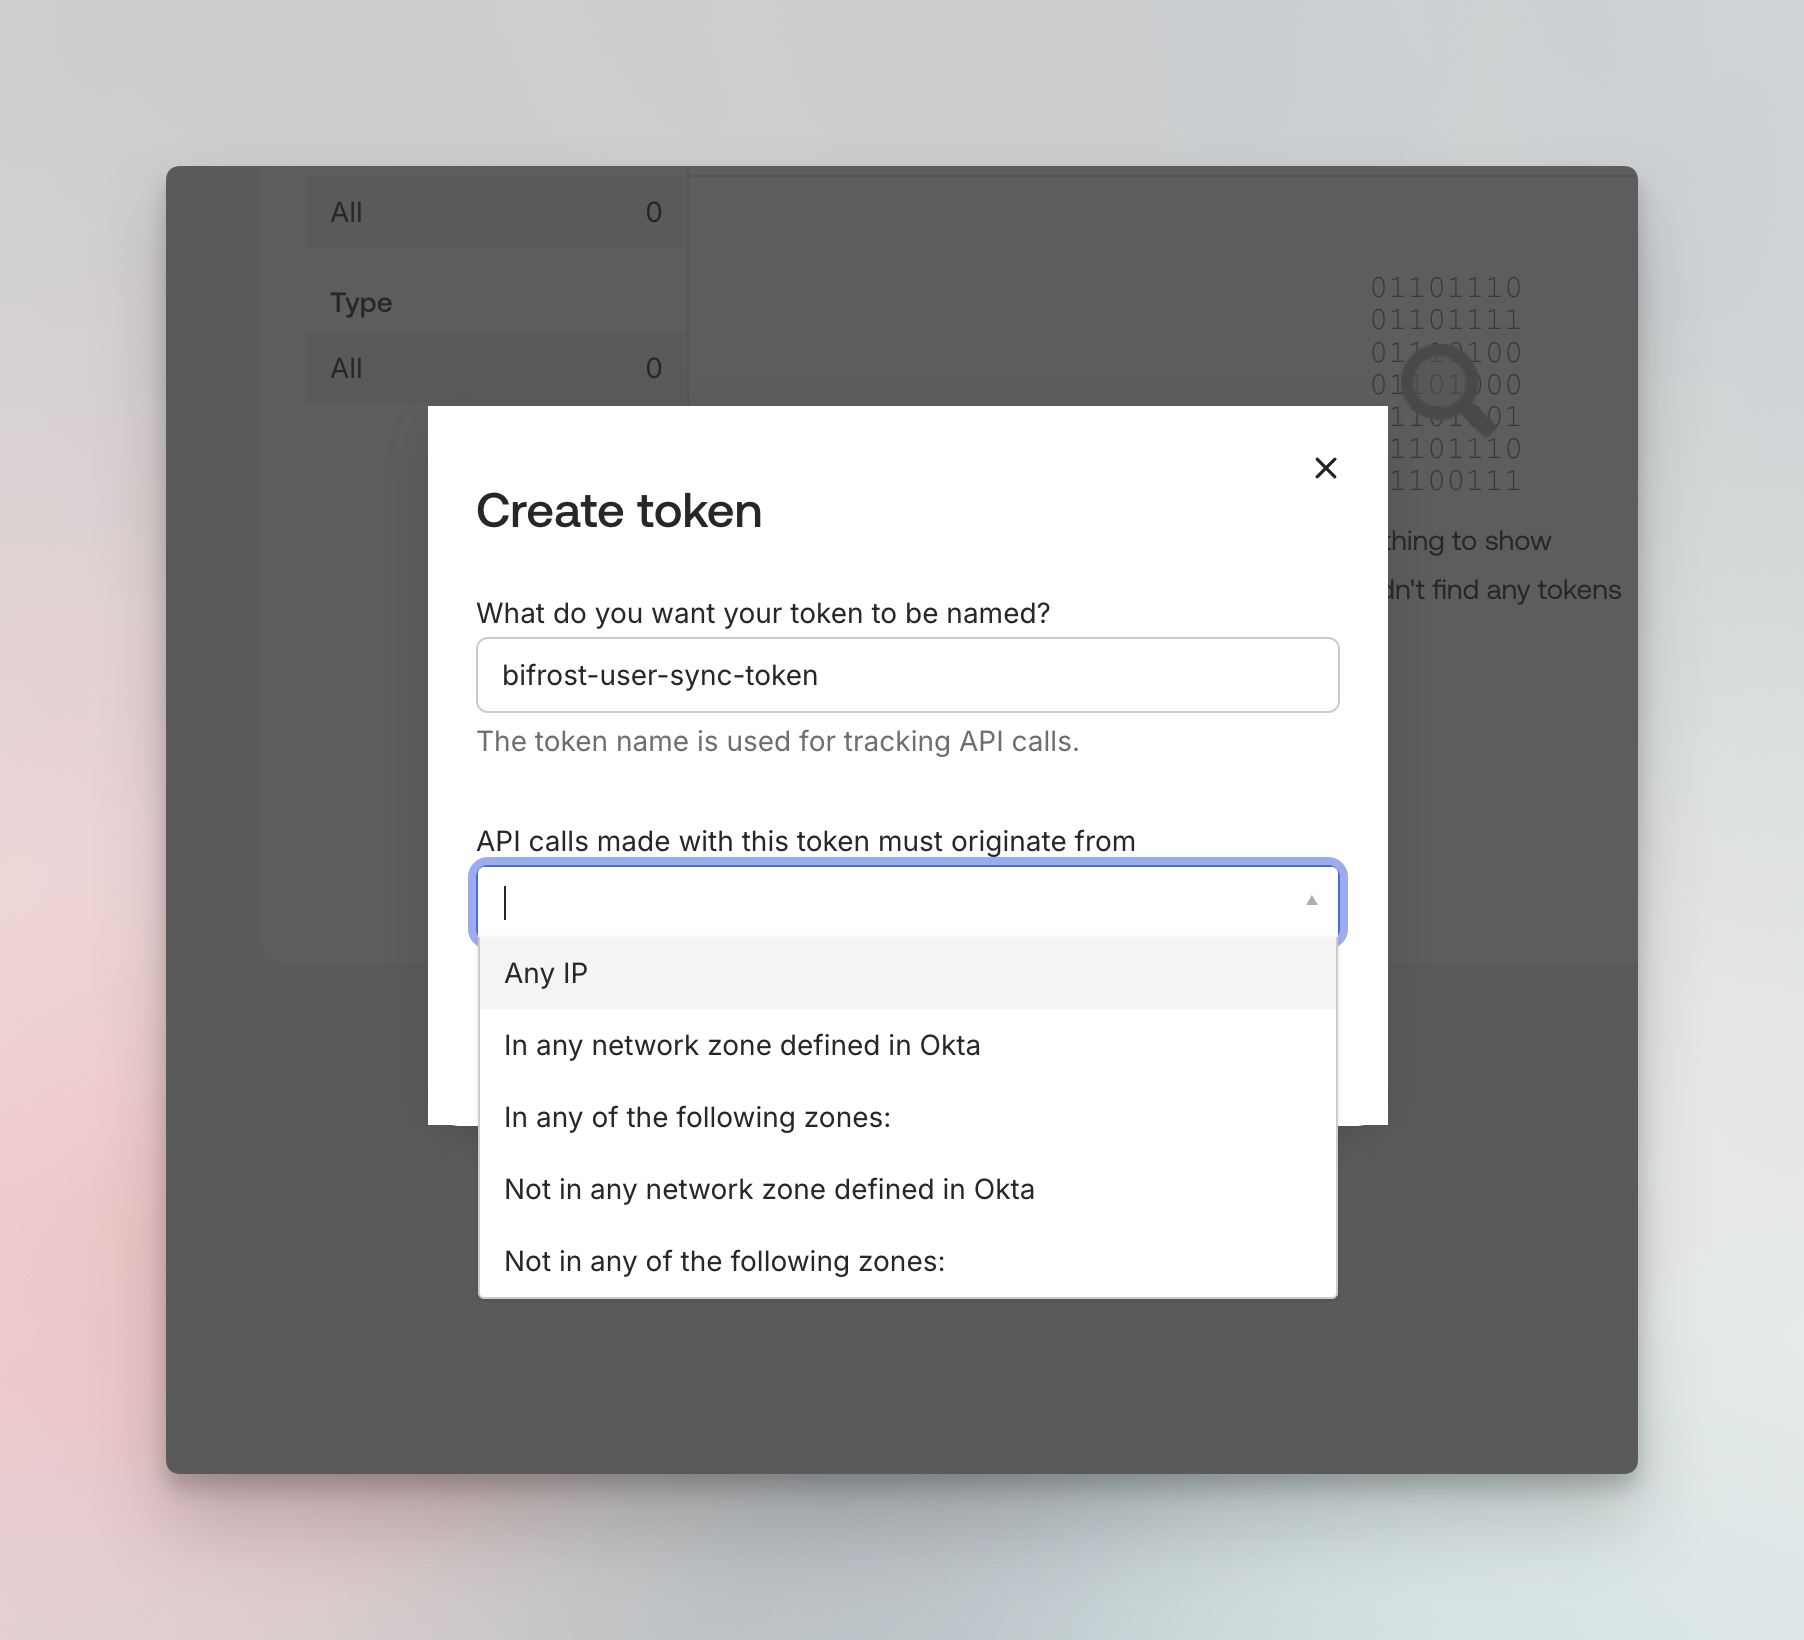
- Copy token to be used in the next step.
Step 8: Understand Okta user sync
Bifrost supports two complementary sync mechanisms for Okta users: Background reconciliation (always on): Bifrost uses the API token from Step 7 to sync users in the background every 24 hours. During that sync, Bifrost reconciles imported users, role mappings, team mappings, and business-unit mappings from Okta. Every 15 minutes, Bifrost also refreshes active OIDC sessions. If a session cannot be refreshed, Bifrost checks with Okta whether the user is still active; if Okta reports the user is inactive, Bifrost decommissions that user locally. Inbound SCIM push (optional, real-time): Bifrost exposes a SCIM 2.0 endpoint that Okta can push user and group changes to in real time — without waiting for the next 24-hour reconciliation.Step 9: Configure Okta SCIM push (optional)
Okta does not support SCIM provisioning on a custom OIDC app. You need to create a separate SCIM app in Okta alongside your existing OIDC application.
Create a SCIM app in Okta
- In the Okta Admin Console, go to Applications → Applications and click Browse App Catalog.
- Search for SCIM 2.0 Test App (Header Auth) and add it.
- Give it a recognizable name, e.g. Bifrost SCIM.
Connect it to Bifrost
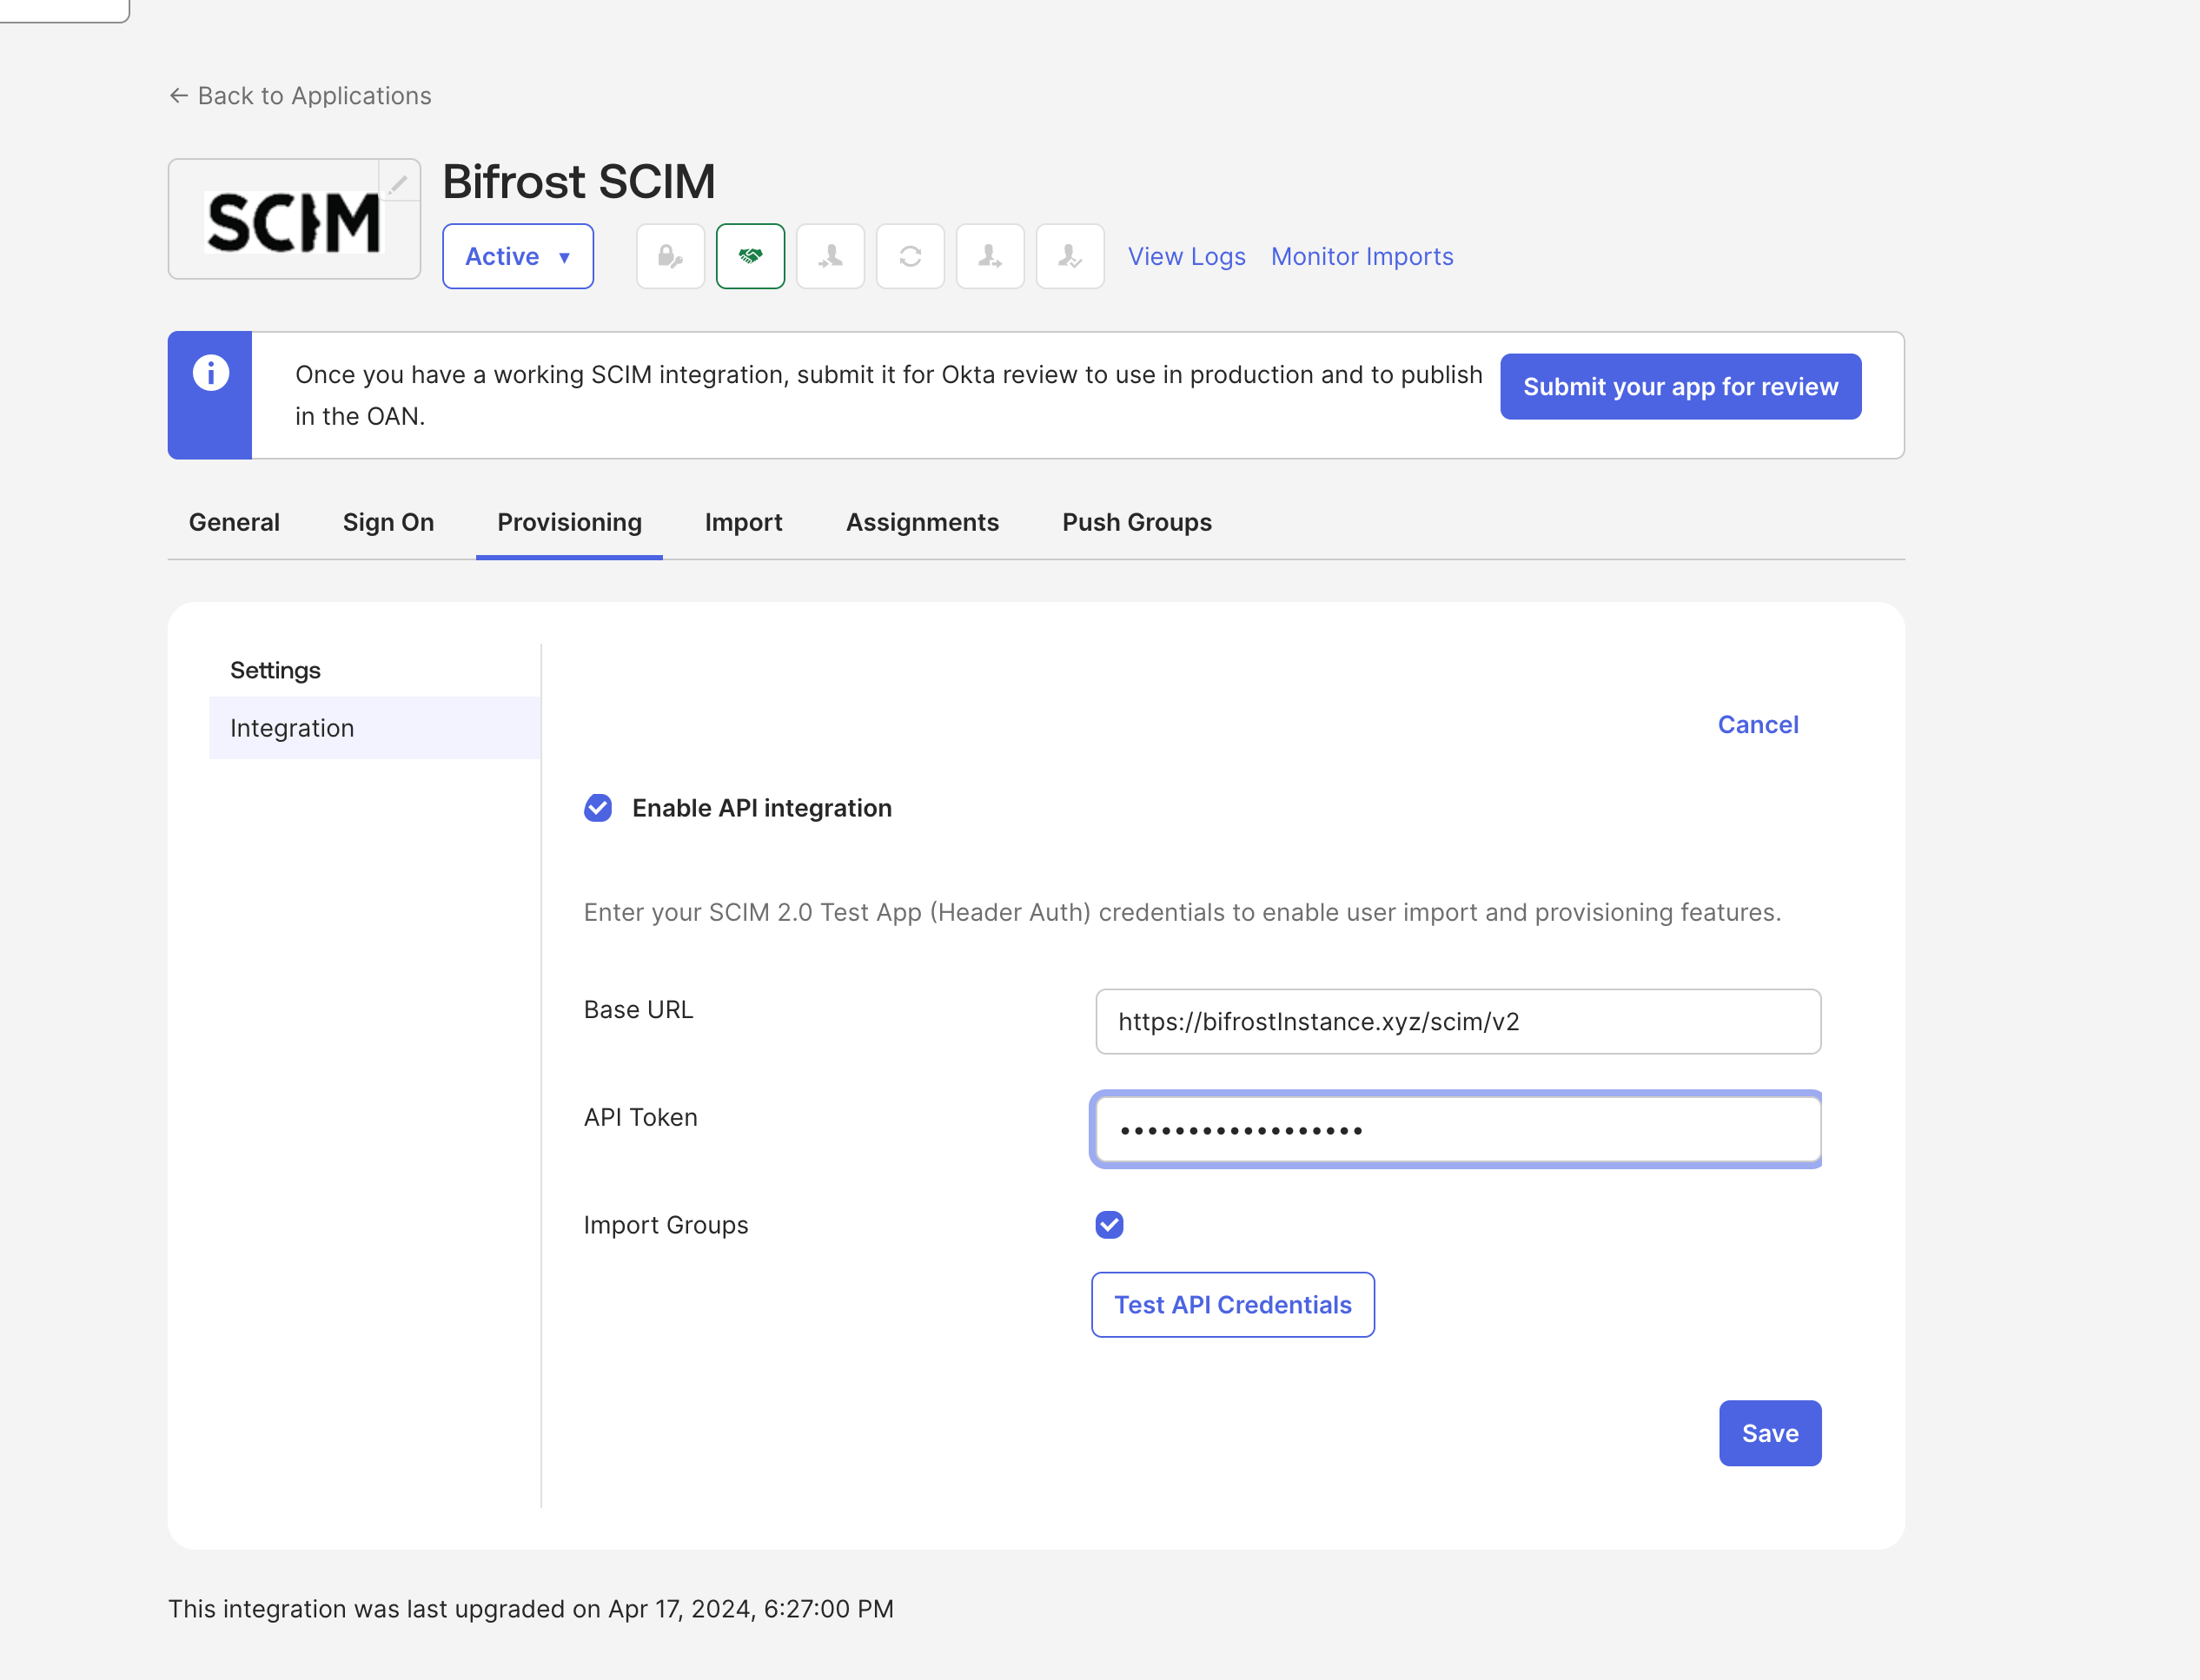
- Open the new SCIM app and go to Provisioning → Configure API Integration.
- Check Enable API Integration and enter:
- SCIM 2.0 Base URL:
https://your-bifrost-domain.com/scim/v2(can be found under Governance → User Provisioning → SCIM Settings) - API Token: the provisioning token from Bifrost (generate it under Governance → User Provisioning → SCIM Settings → Rotate Provisioning Token)
- SCIM 2.0 Base URL:
- Click Test API Credentials to verify the connection, then Save.
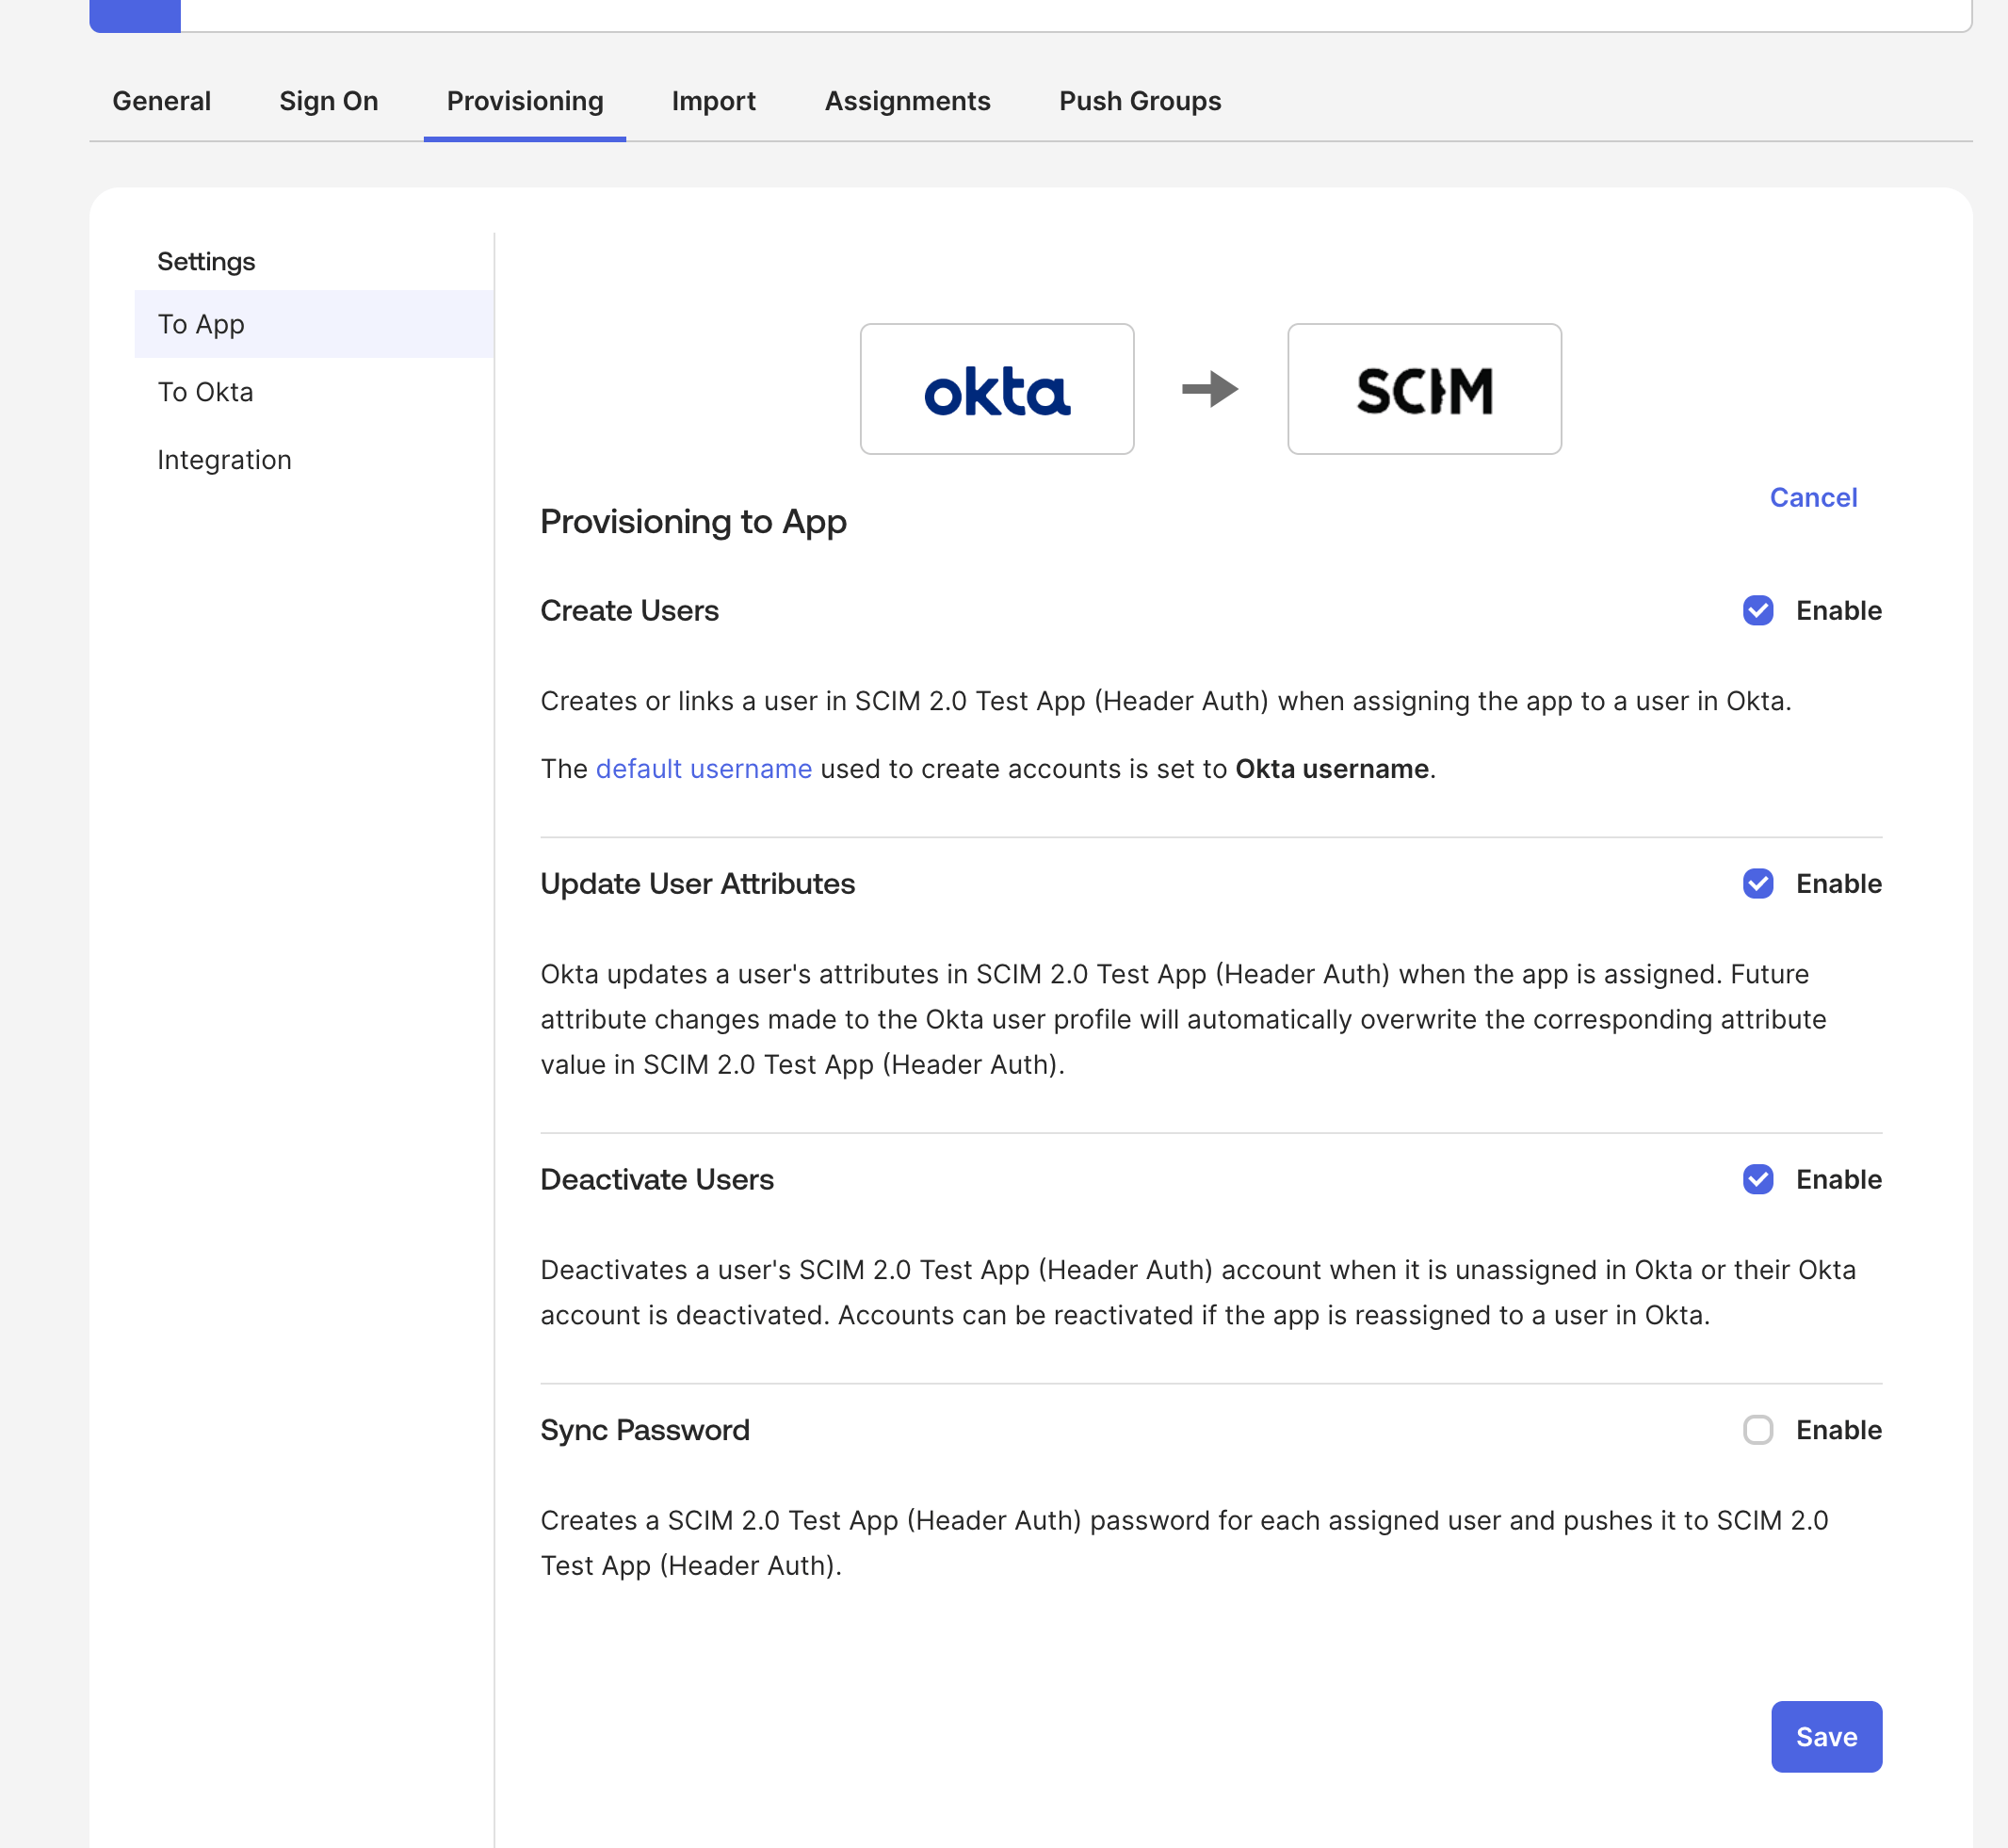
Enable provisioning actions
- Still under Provisioning → To App, enable:
- Create Users
- Update User Attributes
- Deactivate Users
- Click Save.
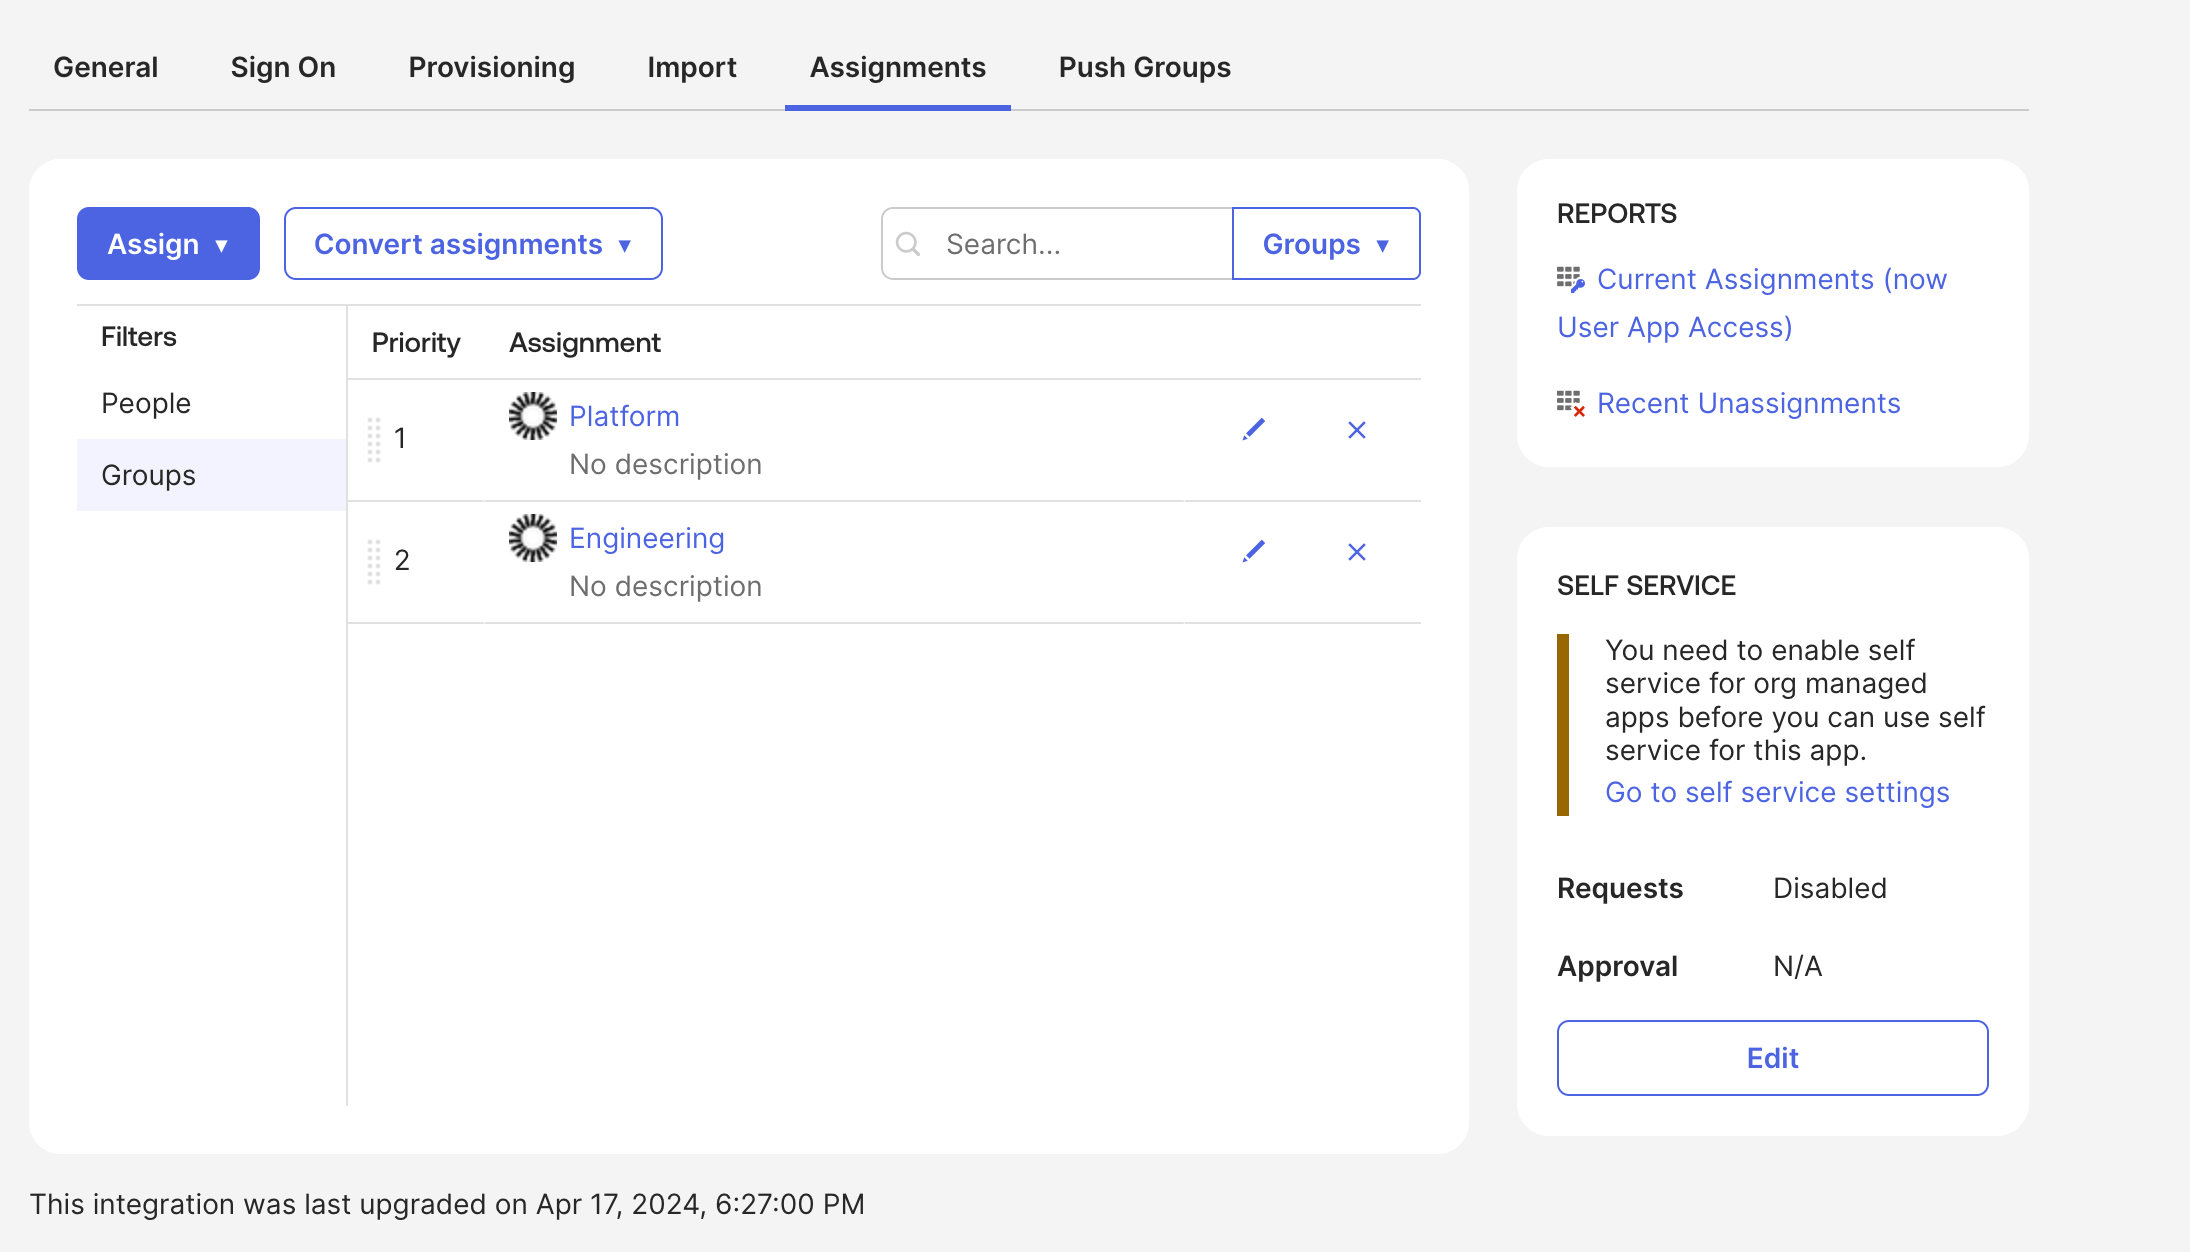
Assign users and groups
- Go to the Assignments tab and assign the users or groups you want to keep in sync with Bifrost.
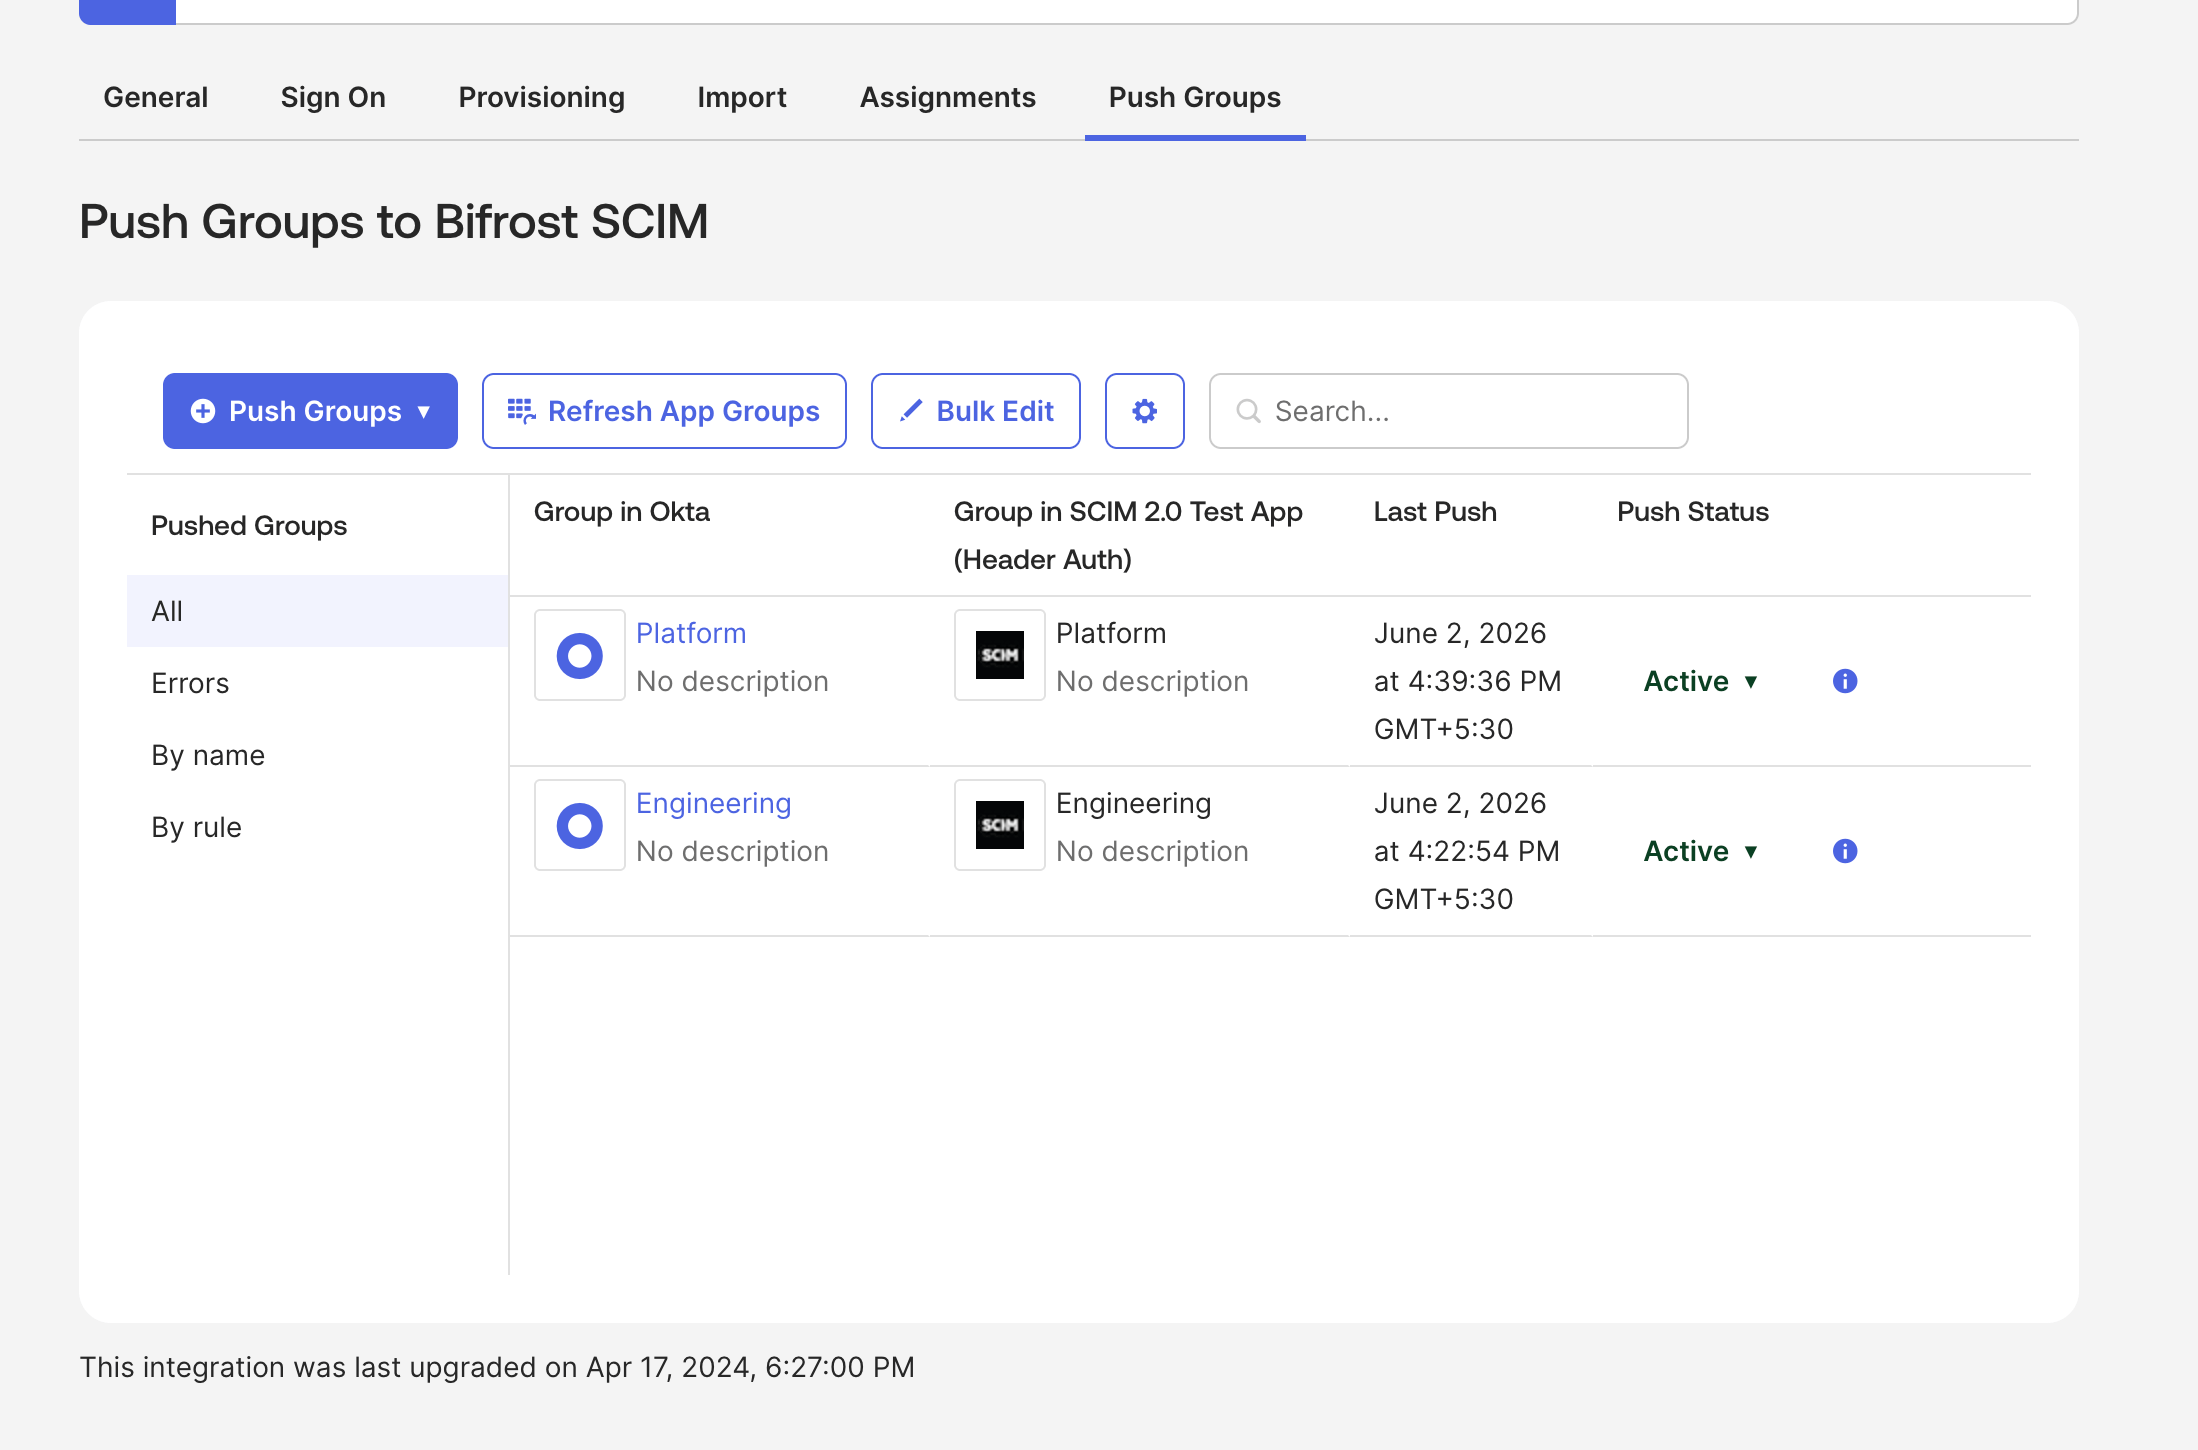
Push Groups (for group-based team/BU mapping)
User sync covers individual user attributes. To also sync group membership so that Bifrost can assign teams or business units based on Okta group names, you need to configure Push Groups:- Go to the Push Groups tab in the SCIM app.
- Click Push Groups → Find groups by name and add the Okta groups you want to push to Bifrost.
attributeType: "group" mappings in Bifrost to assign teams or business units based on the group displayName:
attribute and value drive the OIDC flow — Bifrost checks the groups JWT claim for the value platform-team. attributeType: "group" and attributeValue drive the SCIM flow — attributeValue specifies which field of the pushed SCIM Group to match against (displayName is the supported value).
Map custom attributes to SCIM (for SCIM attribute-based mappings)
If you want Bifrost to assign roles, teams, or business units based on Okta user profile attributes (e.g.department, costCenter, or any custom field), you need to wire up two things in Okta: declare the attribute on the SCIM app’s schema, then map an Okta user value to it.
1. Add the attribute to the SCIM app schema
- Navigate to Directory → Profile Editor and select the Bifrost SCIM app profile (not the Okta User profile).
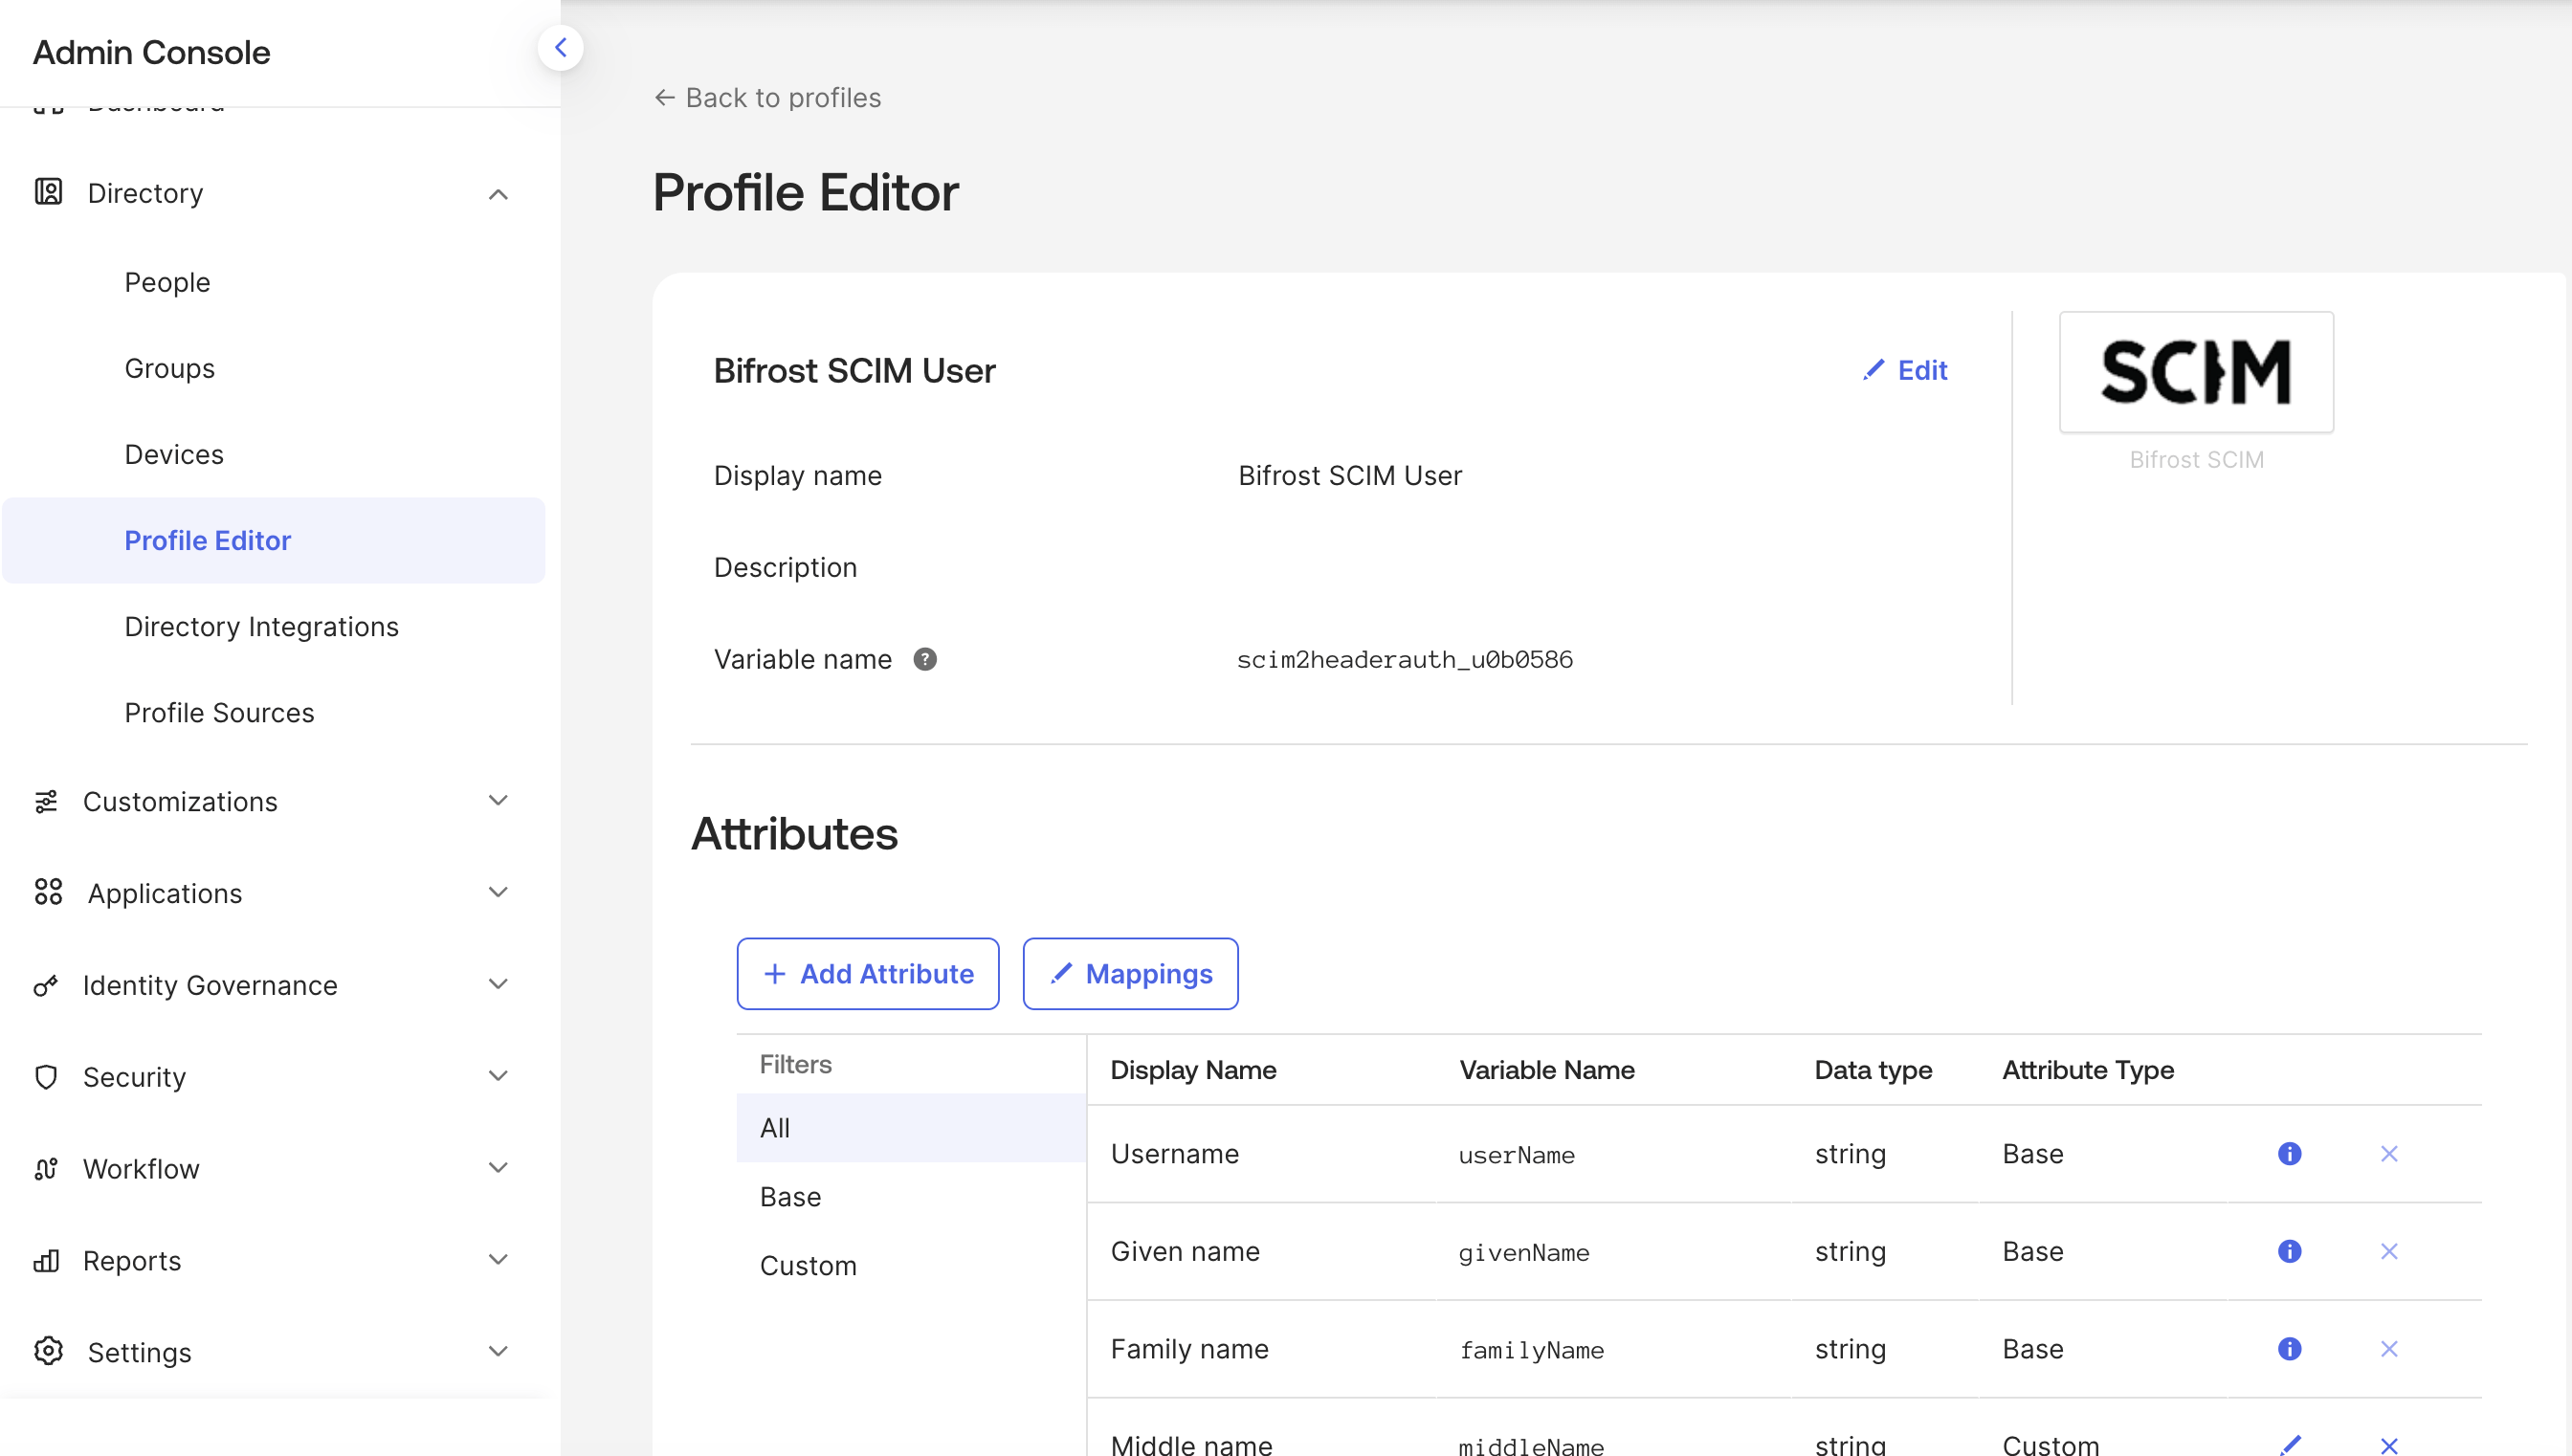
- Click Add Attribute.
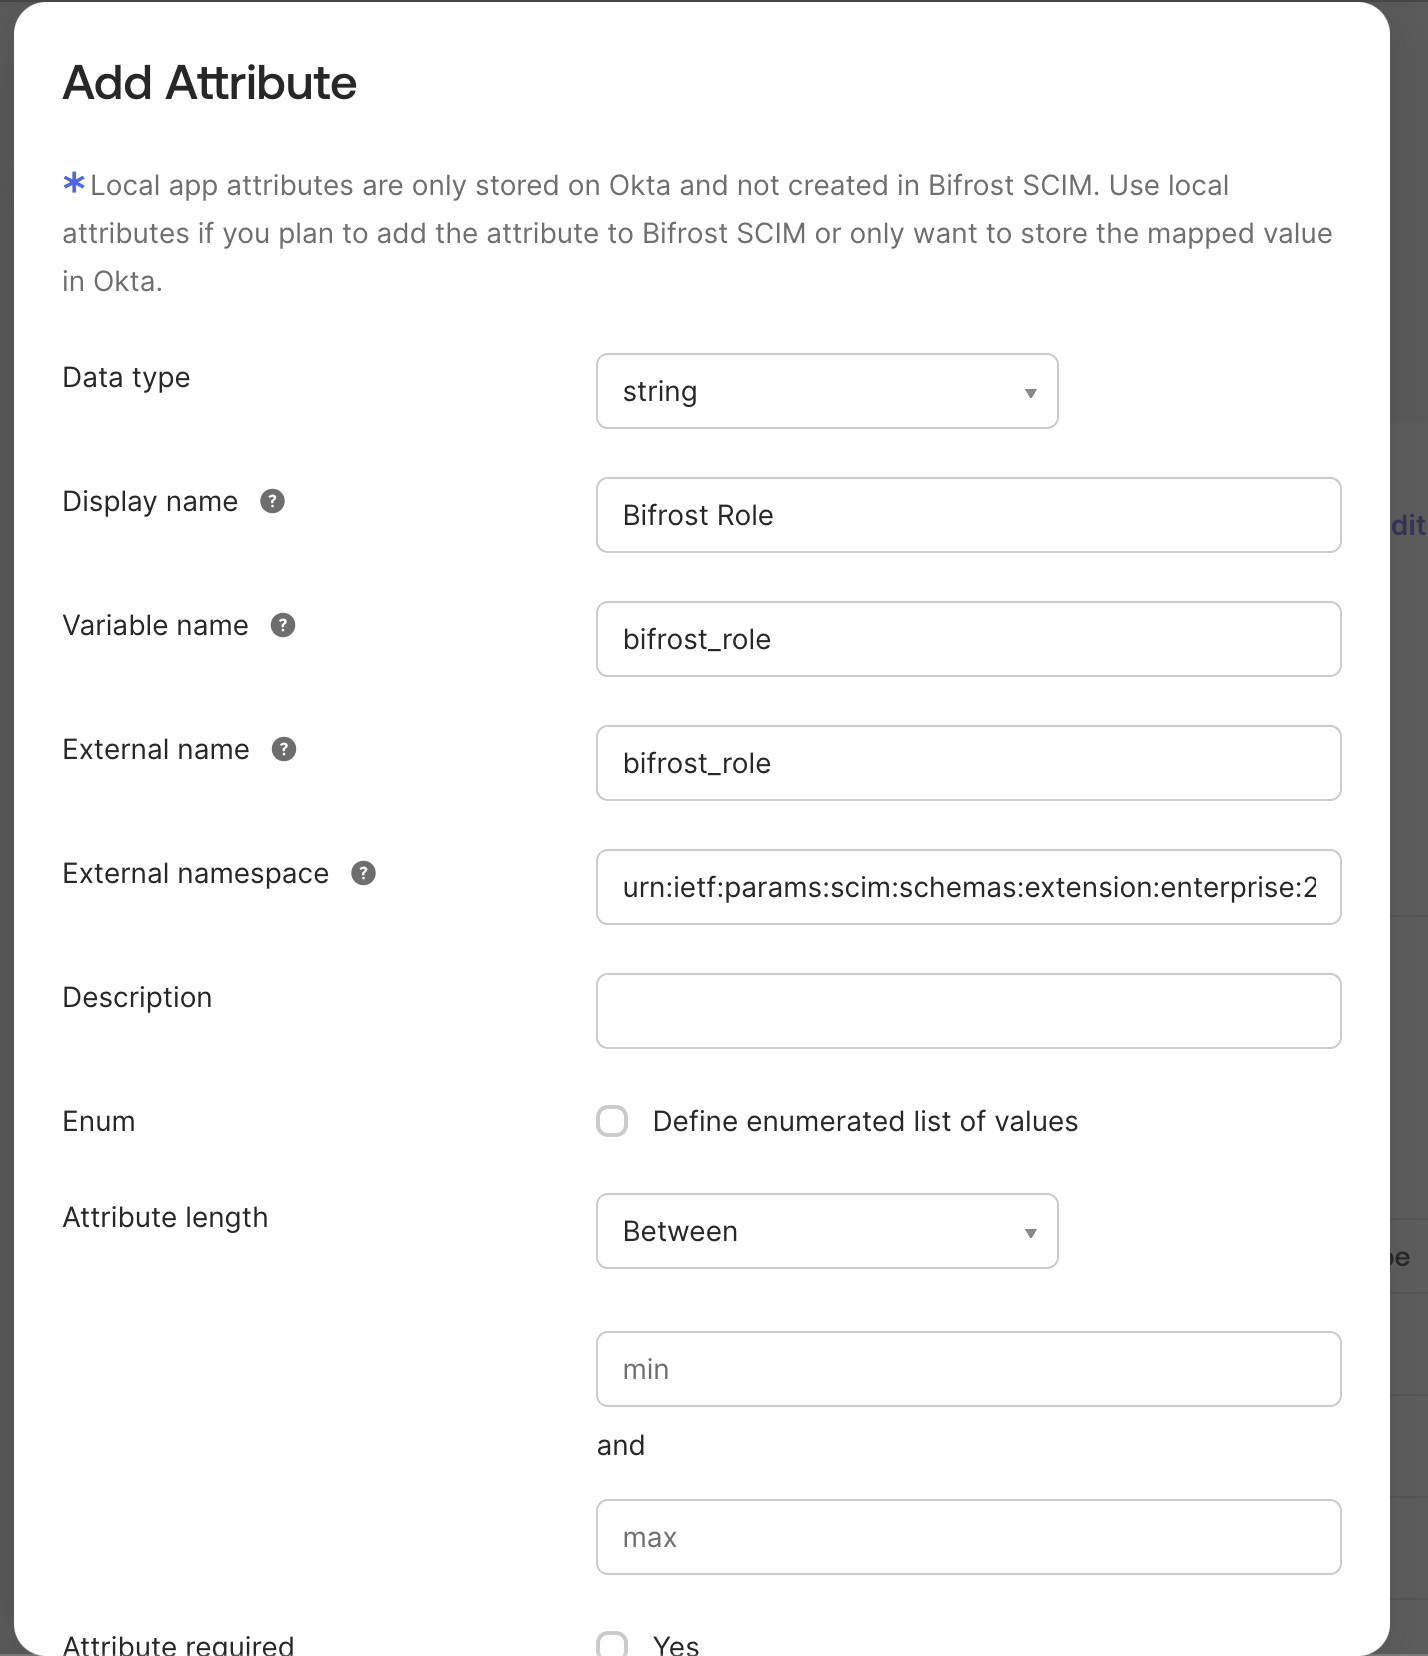
- Configure it:
| Field | Value |
|---|---|
| Data type | string (or appropriate type) |
| Display name | e.g. Bifrost Role |
| Variable name | e.g. bifrost_role |
| External name | Must match the SCIM attribute name exactly, e.g. bifrost_role |
| External namespace | urn:ietf:params:scim:schemas:extension:enterprise:2.0:User for custom attributes |
- Click Save.
2. Map an Okta user value to the attribute
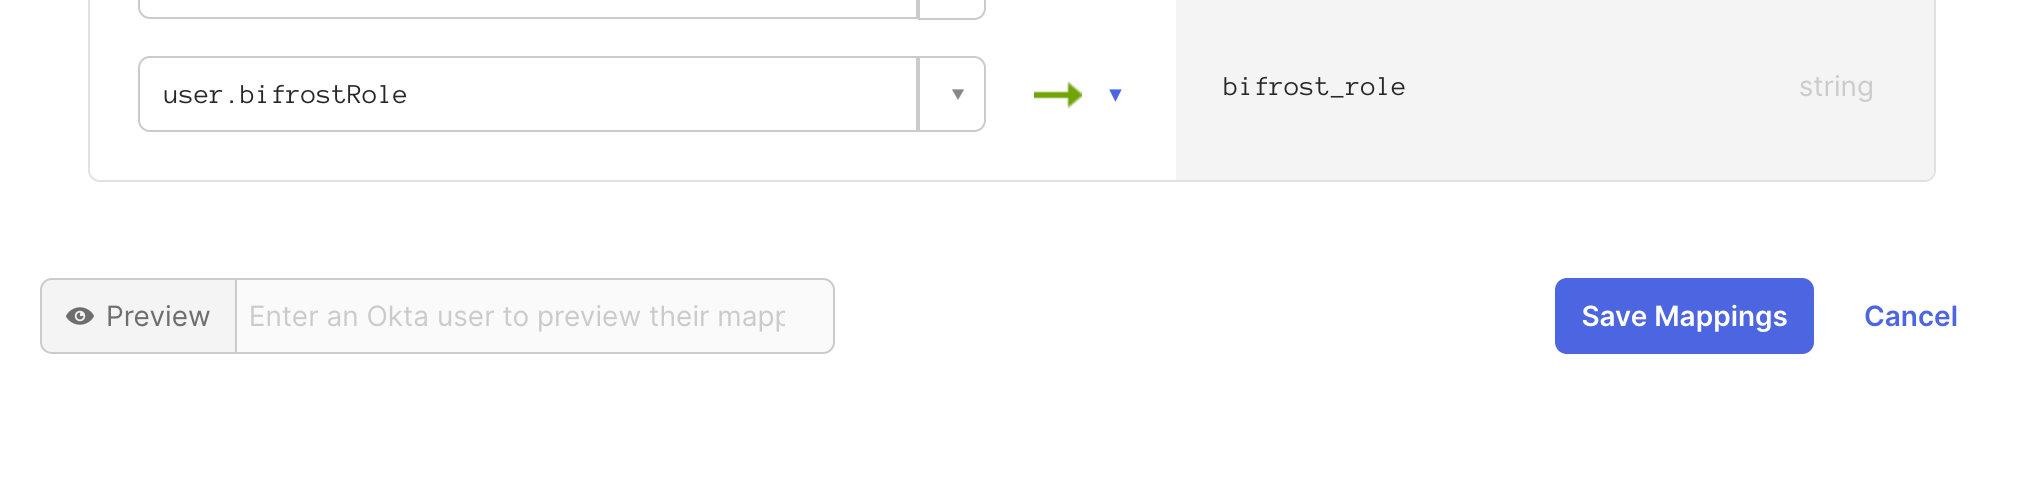
- Still in Profile Editor, click Mappings on the SCIM app profile.
- Select the Okta User to Bifrost SCIM direction.
- Find the attribute you just added and set its source. This can be any Okta user profile attribute or expression — for example:
- A built-in attribute: e.g.
user.department - A custom attribute: e.g.
user.bifrostRole - An expression: e.g.
user.bifrostRole != null ? user.bifrostRole : "member"
- A built-in attribute: e.g.
- Click Save Mappings.
OIDC and SCIM are independent flows. If you have SCIM enabled,
attributeValue is required on each mapping — set it to match the external_name of the SCIM attribute Okta sends so Bifrost can look up the value from the SCIM profile.SCIM push and the 24-hour background sync are complementary. SCIM push gives real-time updates; background sync catches anything the SCIM connector may have missed — but only if an API token is configured (Step 7).
Step 10: Configure Bifrost
Now configure Bifrost to use Okta as the identity provider.Using the Bifrost UI

- Navigate to Governance → User Provisioning in your Bifrost dashboard
- Select Okta as the OIDC Provider
- Enter the following configuration:
| Field | Value |
|---|---|
| Client ID | Your Okta application Client ID |
| Issuer URL | Your Okta issuer URL |
| Authorization Server | Select Org Authorization Server or Custom Authorization Server |
| Audience | Your API audience (required only for Custom Authorization Server) |
| Client Secret | Your Okta application Client Secret (optional, for token revocation) |
| API Token | Okta API token used for bulk import and 24-hour background sync |
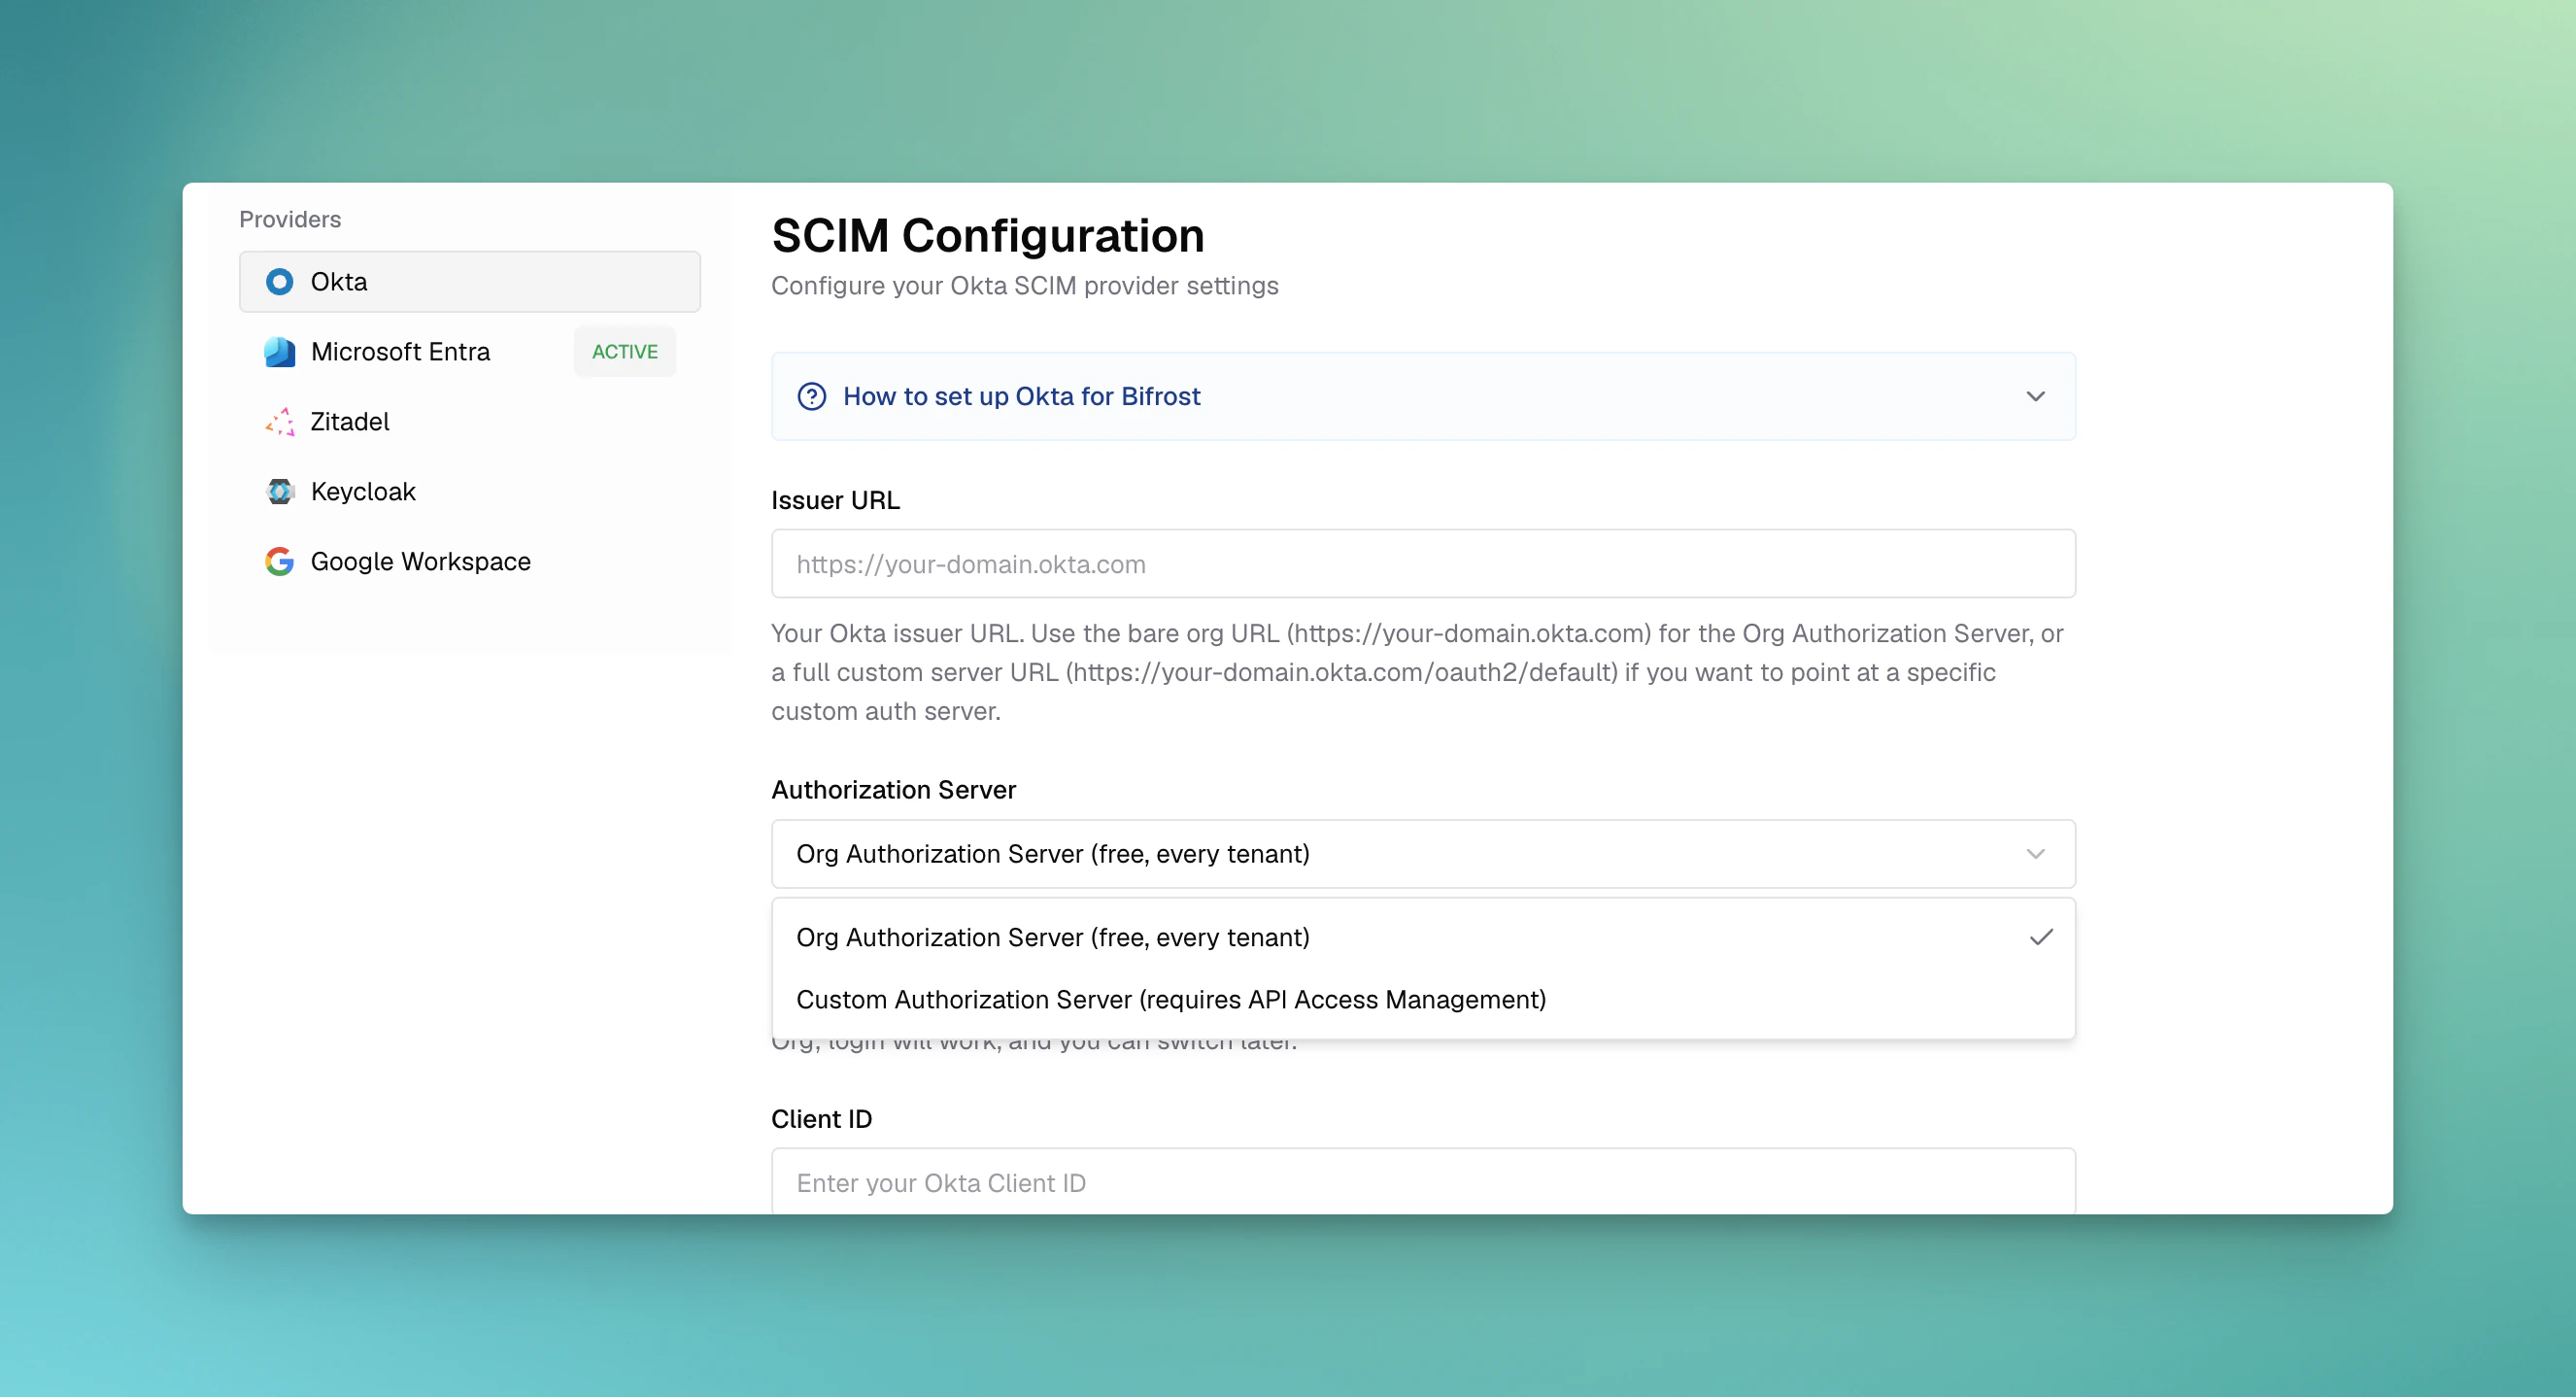
| Option | When to use | Issuer URL format |
|---|---|---|
| Org Authorization Server (free, every tenant) | Recommended default. Use this if you do not need Okta claim expressions or a custom audience. Supports group-based mappings through app-level Group Claims. | https://your-domain.okta.com |
| Custom Authorization Server (requires API Access Management) | Use this only if your Okta plan includes API Access Management and you need claim expressions, custom claims, or a custom audience. | https://your-domain.okta.com/oauth2/default |
If you are unsure, select Org Authorization Server. For Org Authorization Server, leave Audience empty because Bifrost validates the ID token audience against the Okta app Client ID. For Custom Authorization Server, set Audience to the API audience configured on that authorization server.
- Verify configuration and see if you get any errors. Make sure you get no errors/warnings.
- Toggle Enabled to activate the provider
- Click Save Configuration
Attribute Mappings
Attribute mappings let you translate Okta claim values into Bifrost roles, teams, or business units without restructuring your Okta claims. Bifrost supports three mapping types:attributeRoleMappings: map a claim value to a Bifrost role (Admin, Developer, Viewer, or a custom role)attributeTeamMappings: map a claim value to a Bifrost teamattributeBusinessUnitMappings: map a claim value to a Bifrost business unit
groups claim from Step 5, the custom role claim from Step 4, or any other claim your authorization server includes in the token (e.g., department, organization).
To configure attribute mappings:
- In the User Provisioning configuration, scroll down to Attribute Mappings
- Click Add Mapping under the relevant mapping type (Role, Team, or Business Unit)
- Enter the Attribute (the claim name from the token), the Value to match, and the target Role, Team, or Business Unit
- Repeat for each rule you need
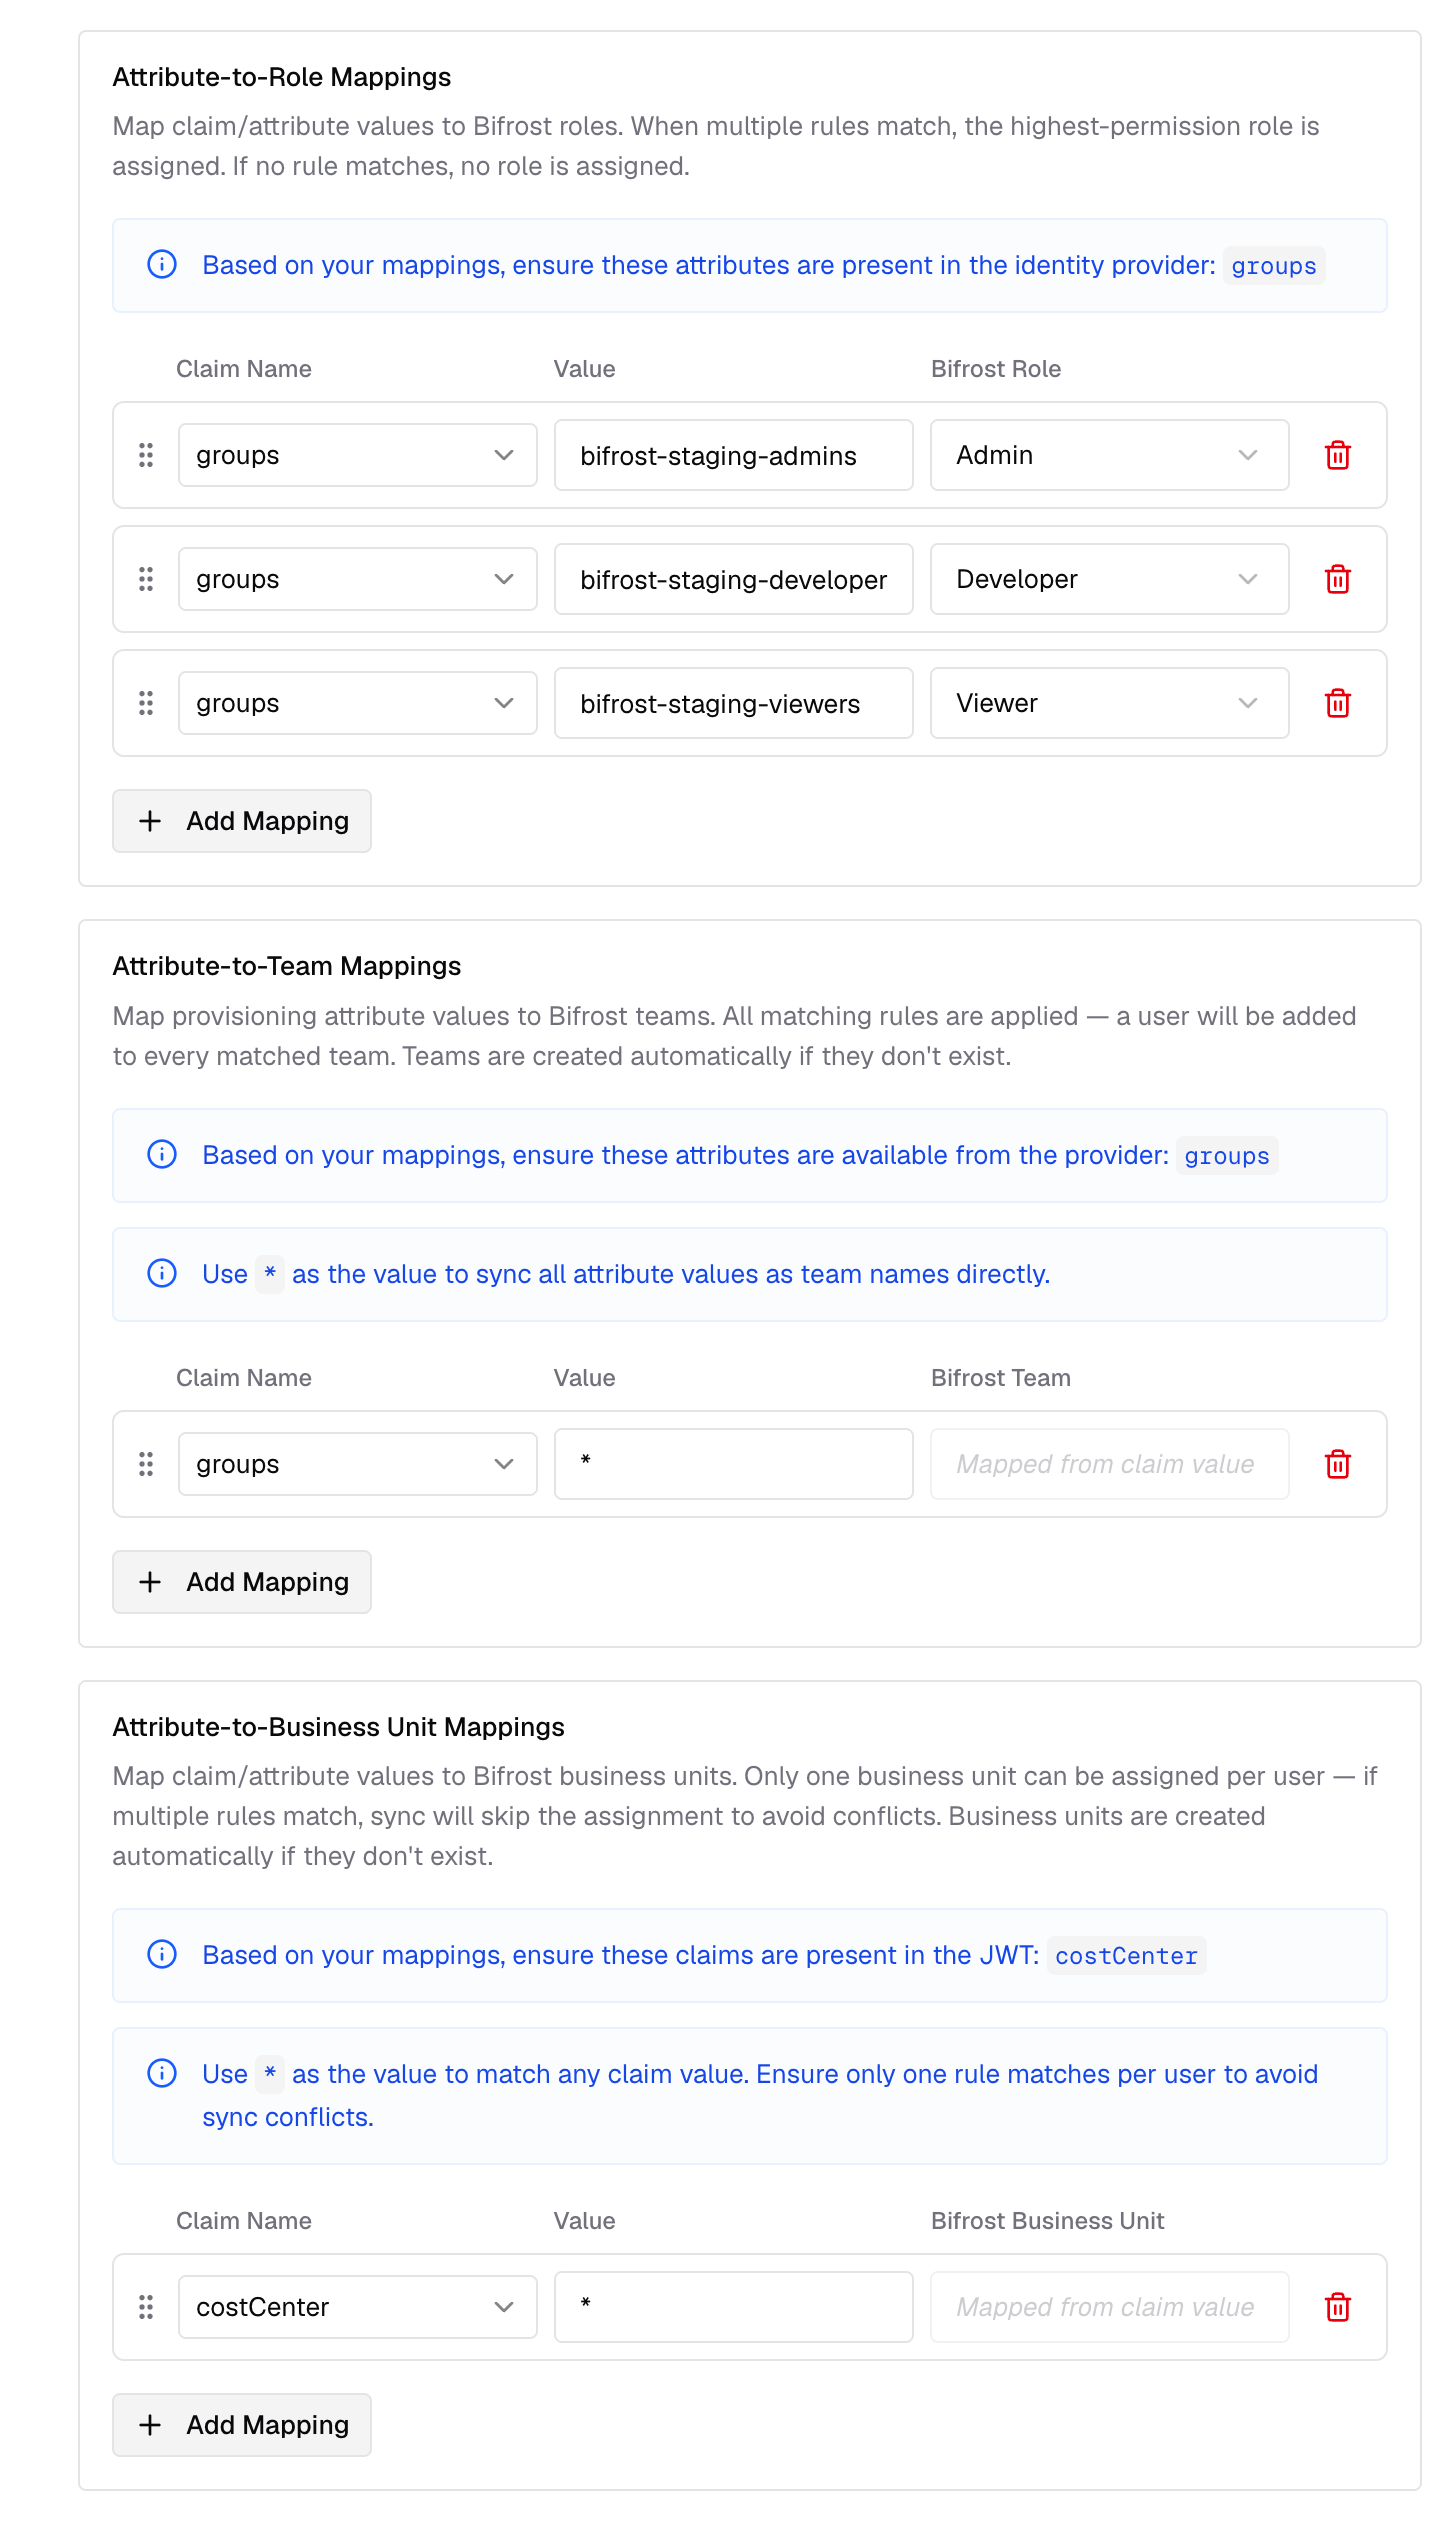
When you mark value as ”*” - the claim value is mapped as is to the entity name. Values comparisons are case-insensitive.
Custom attribute mapping
You can also map any custom attributes to any entity (role, team or business unit). Make sure these are configured to send back to Bifrost in token configuration.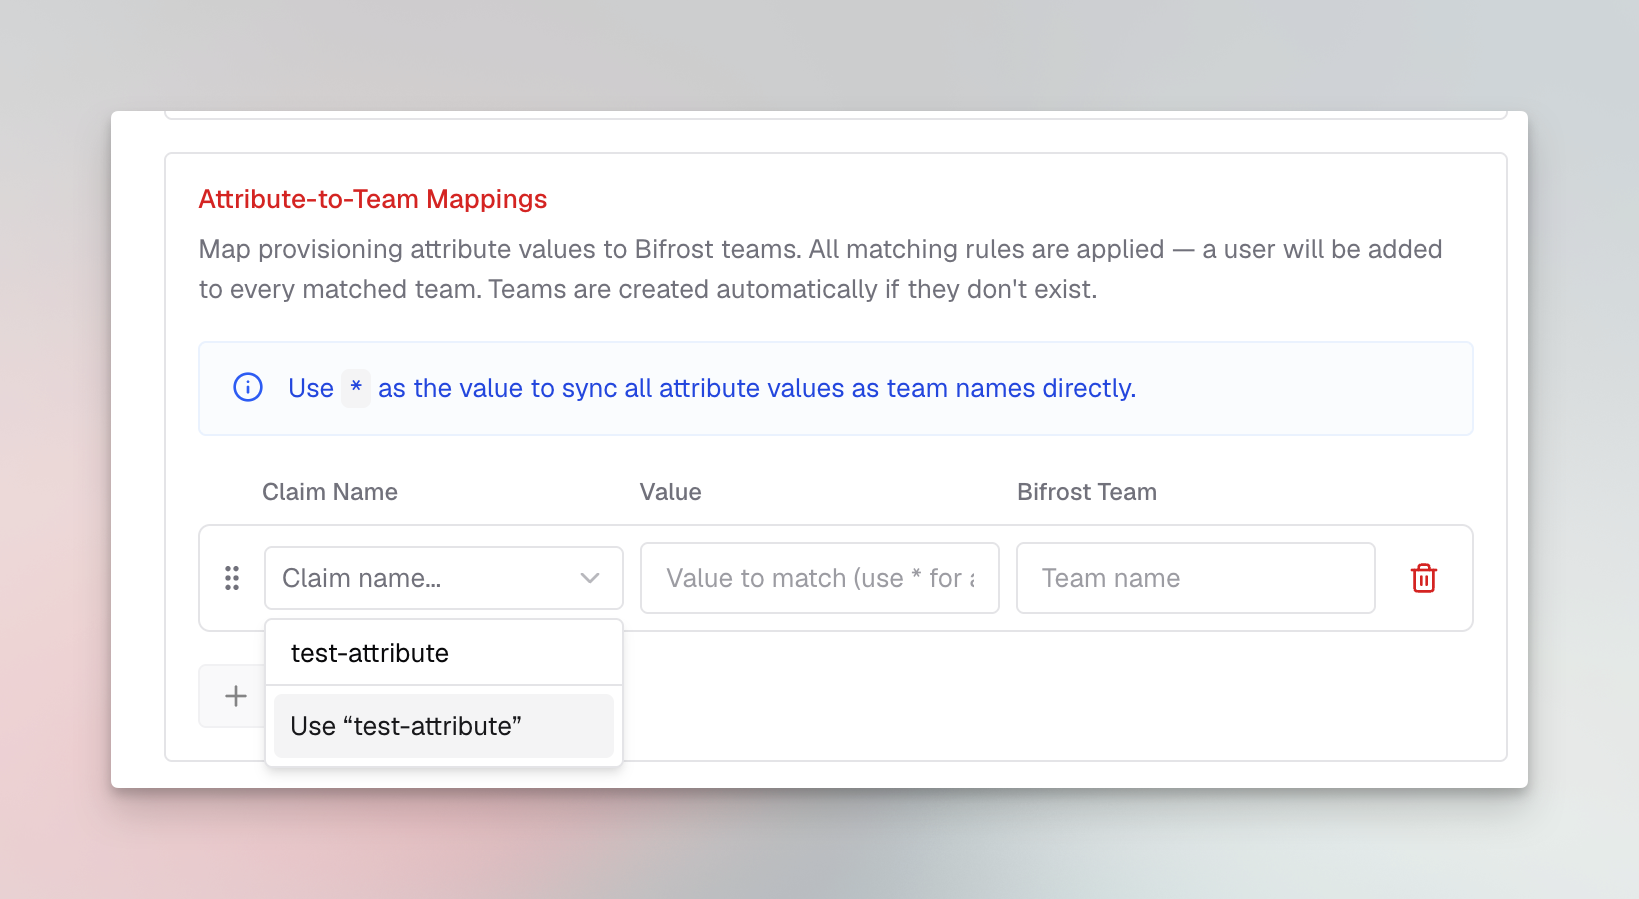
Evaluation rules
- Role mappings: Ordered, first match wins. If a user matches multiple role mapping rules, the highest privilege role is assigned. If no mapping matches, the user is not allowed to log in.
- Team and business unit mappings: All matching rules apply - users can be placed on multiple teams and business units simultaneously.
- Claim values: Can be strings, arrays, or nested objects. Bifrost resolves dotted paths (e.g.,
realm_access.roles).
Configuration Reference
| Field | Required | Description |
|---|---|---|
issuerUrl | Yes | Okta issuer URL. Use a bare org URL for Org Authorization Server or /oauth2/<id> for Custom Authorization Server. |
authServerType | Yes | org for Org Authorization Server or custom for Custom Authorization Server. Defaults to org for new configs. |
clientId | Yes | Application Client ID from Okta |
clientSecret | Yes | Application Client Secret (enables token revocation) |
audience | Custom only | API audience identifier from your Custom Authorization Server. Leave empty for Org Authorization Server. |
apiToken | No | Okta API token for bulk import and 24-hour background sync. |
provisioningToken | No | Bearer token for inbound SCIM push from Okta. Rotate via the dashboard or POST /api/scim/providers/{name}/provisioning-token/rotate. |
attributeRoleMappings | Yes | Ordered list of { attribute, value, role } mappings. First match wins. |
attributeTeamMappings | No | List of { attribute, value, team, attributeType, attributeValue } mappings. All matches apply. |
attributeBusinessUnitMappings | No | List of { attribute, value, businessUnit, attributeType, attributeValue } mappings. All matches apply. |
Testing the Integration
- Open your Bifrost dashboard in a new browser or incognito window
- You should be redirected to Okta for authentication
- Log in with an assigned user
- After successful authentication, you’ll be redirected back to Bifrost
- Verify the user appears in the Bifrost users list with the correct role
Troubleshooting
User not redirected to Okta
- Verify the OIDC provider is enabled in Bifrost
- Check that the Bifrost server was restarted after configuration
- Ensure the Issuer URL is correct and accessible
Attribute mapping is not working
- Verify that token configuration includes all the attributes used for mapping.
Token refresh failing
- Ensure the Refresh Token grant type is enabled for your application
- Verify the
offline_accessscope is included in your authorization requests
Next Steps
- User Provisioning (OIDC) - Overview of OIDC user provisioning in Bifrost and alternative identity providers
- Advanced Governance - Learn about user budgets and compliance features
- Role-Based Access Control - Understand the Admin, Developer, Viewer hierarchy
- Audit Logs - Monitor user authentication and activity