Front Bifrost Enterprise with Cloudflare Access (Zero Trust) as an identity-aware proxy that authenticates every request before it reaches Bifrost.
An identity-aware proxy (IAP) sits in front of Bifrost and authenticates the user before the request ever reaches it. The proxy validates identity, then injects a signed token header on every request. Bifrost verifies that token against the proxy’s own keys and authenticates the user from its claims - no interactive login redirect happens at Bifrost itself.This guide covers Cloudflare Access (part of Cloudflare’s Zero Trust / ZTNA platform). Cloudflare authenticates users against your identity provider and forwards a signed Cf-Access-Jwt-Assertion header (an RS256 JWT) to Bifrost. Bifrost validates it against your Cloudflare team domain’s JWKS and binds it to your application’s audience (AUD) tag.
The auth proxy fronts an existing identity provider already configured in Bifrost. Set up your IdP first (Okta, Entra, Generic OIDC, etc.), then enable the Identity-Aware Proxy on that same provider.
A user requests a Bifrost URL protected by a Cloudflare Access application.
Cloudflare authenticates the user against your configured identity provider and enforces your Access policies.
Cloudflare forwards the request to Bifrost with the Cf-Access-Jwt-Assertion header - a short-lived RS256 JWT signed by your team domain.
Bifrost validates the token’s signature against https://<team>.cloudflareaccess.com/cdn-cgi/access/certs, checks the audience (AUD) tag, and resolves the user from the token’s identity claim (email by default).
Because Bifrost validates the proxy’s token (not the IdP’s), both the dashboard and the inference APIs are protected by the same upstream authentication layer.
When the proxy header is absent, Bifrost falls back to the IDP login - so if Bifrost is reachable directly (bypassing Cloudflare), a client can skip your Access policies and will fallback to the configured IDP on Bifrost.
Validates identity and authenticates an already-provisioned user (looked up by the configured identity claim, email by default). No role, team, or business unit is derived from the token. The user’s existing role (e.g. from SCIM) governs dashboard access.
You provision users and roles via SCIM or interactive OIDC login, and only want the proxy to handle authentication.
Full
Validates the token and runs attribute → role / team / business-unit mapping from its claims, exactly like an interactive login.
You want role and team assignments derived from the proxy token itself.
Login-only never creates users and rejects an identity that isn’t already provisioned. A user without a role can’t sign in to the dashboard but remains a valid authenticated identity for inference endpoints.
Full mode requires the IdP claims used for mapping (e.g. groups) to be passed through into the Cloudflare Access token. If those claims aren’t present in the proxy token, role and team mapping will not match and login will be denied. Configure claim pass-through in your Cloudflare Access application before using full mode.
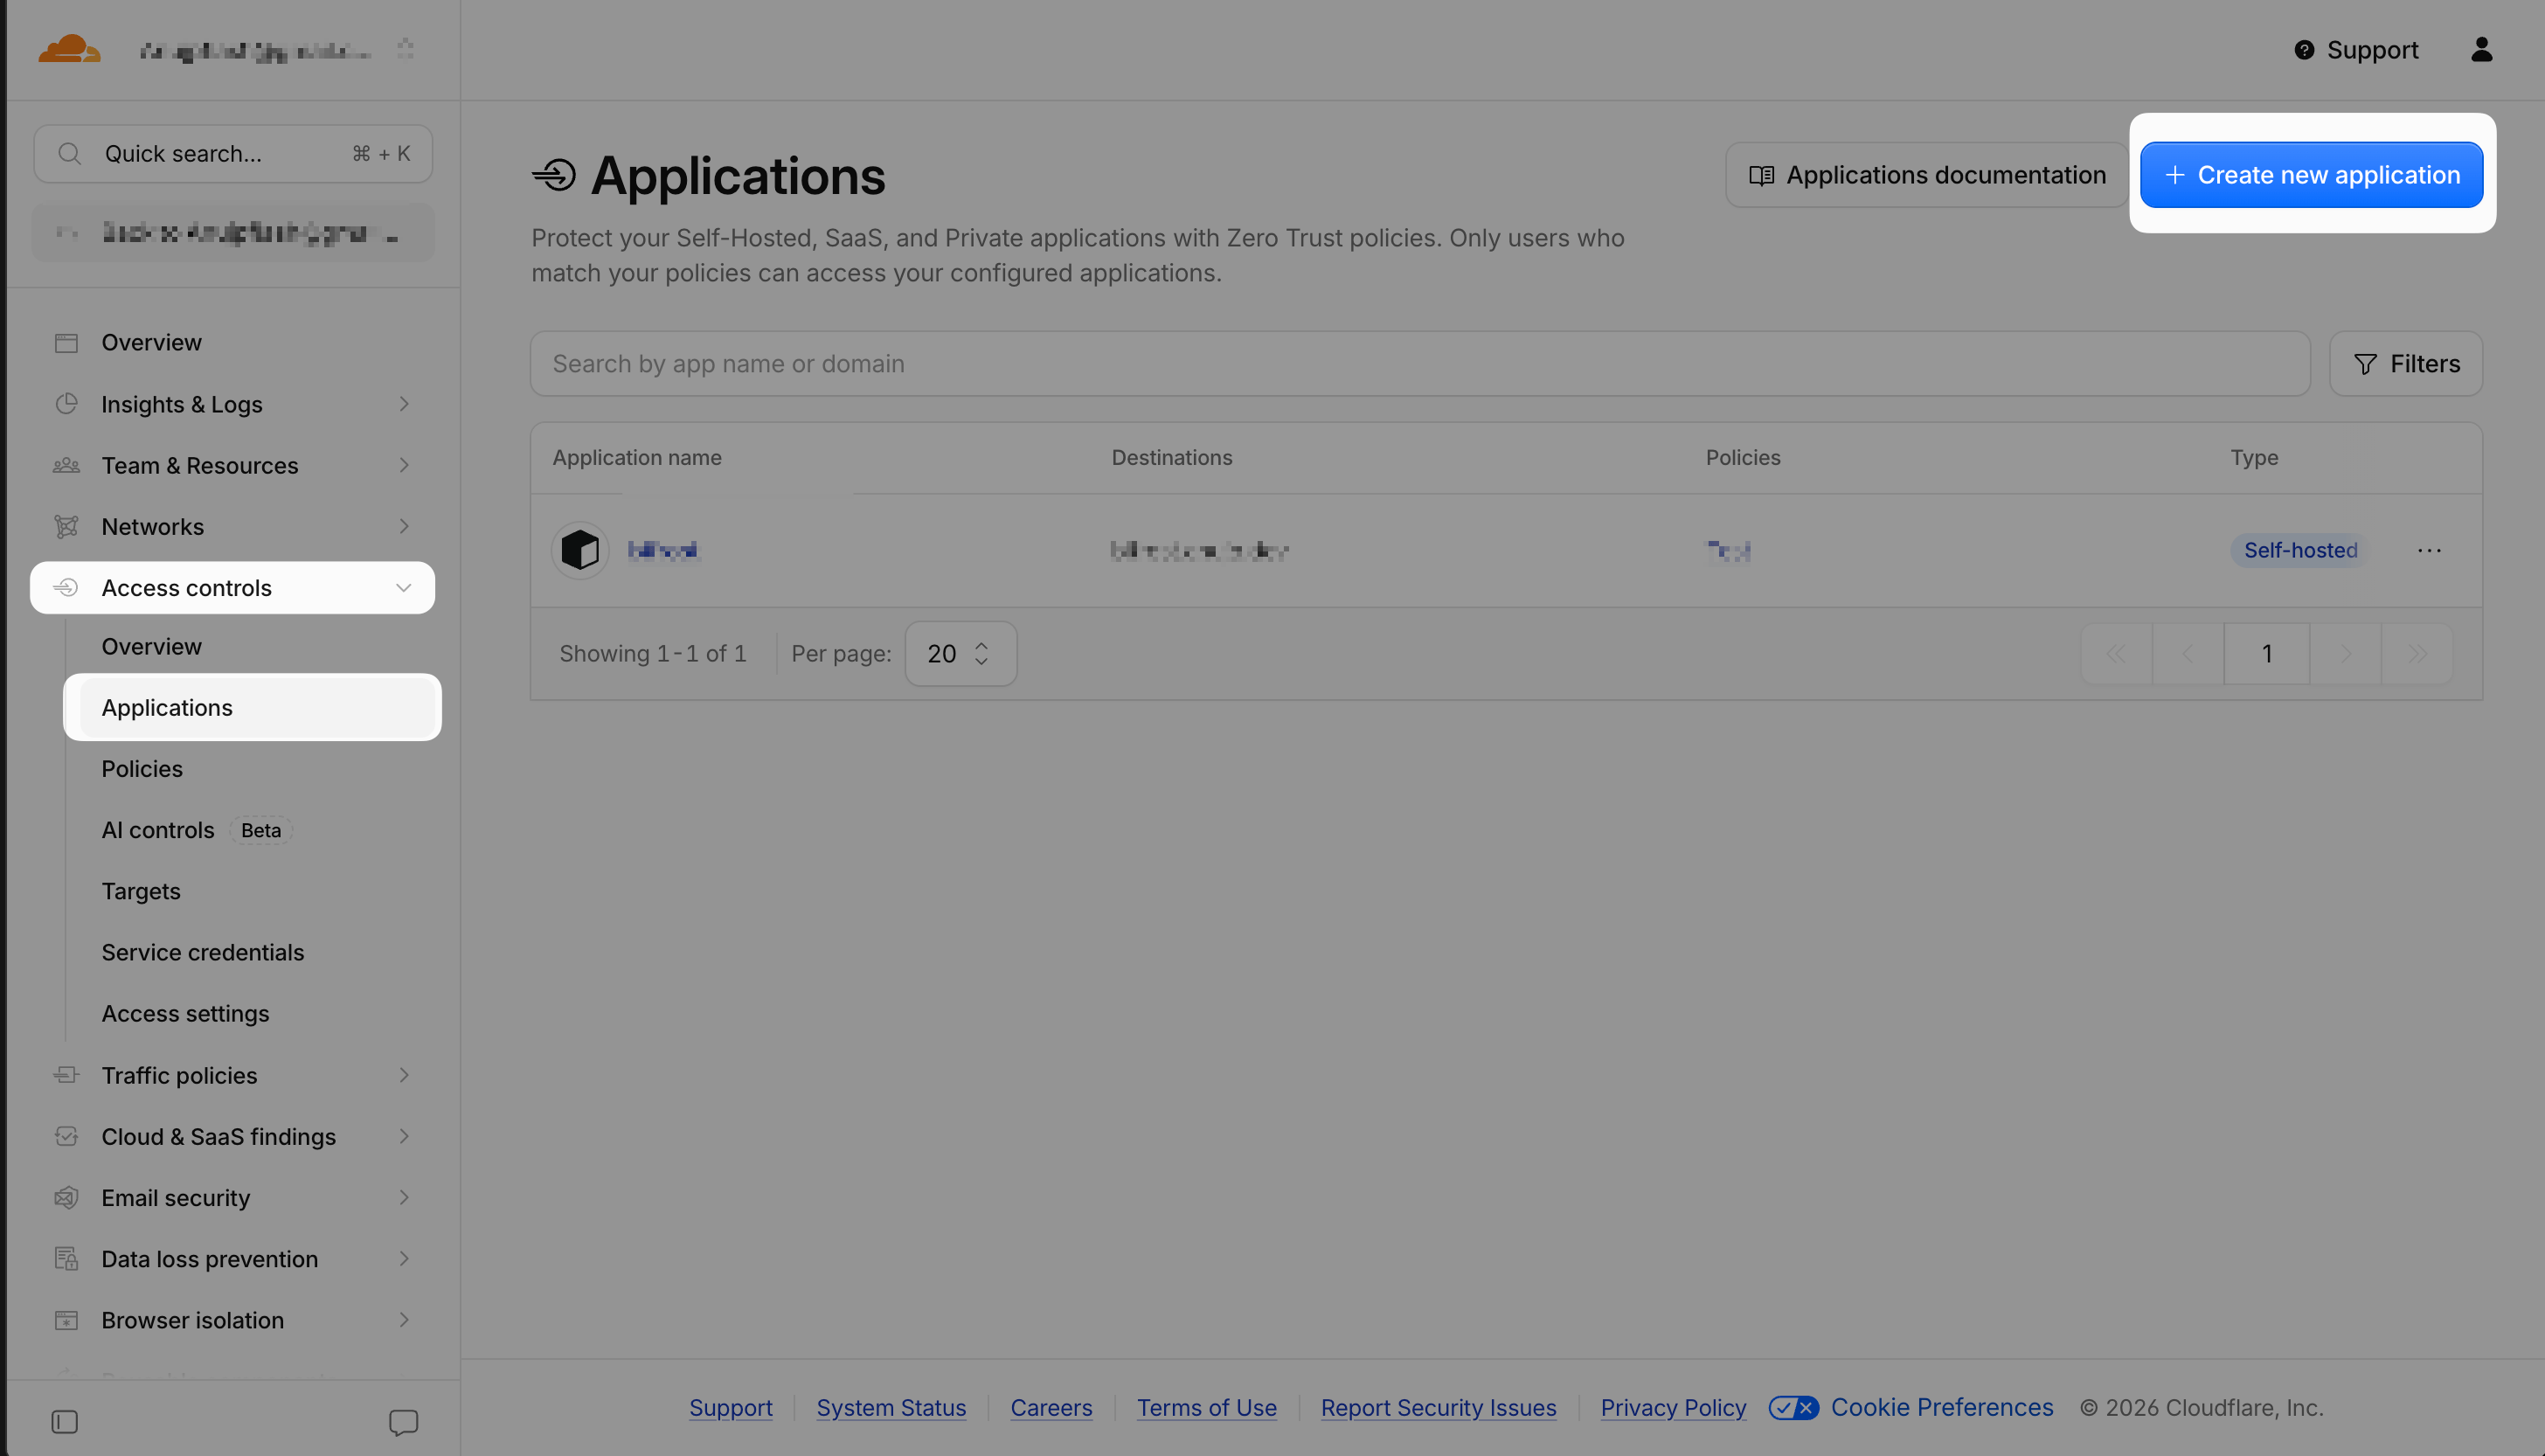
In the Cloudflare Zero Trust dashboard, go to Access controls → Applications, click Create new application, and choose Self-hosted.Set the application domain to your Bifrost hostname (e.g. bifrost.yourcompany.com) so Access protects the entire dashboard and API surface.
From Access controls → Applications, click Create new application and choose Self-hosted.
2
Attach your identity provider and access policies
Under the application’s Authentication settings, select the identity provider(s) Cloudflare should use to authenticate users. Add Access policies that decide who is allowed through (by email domain, group, IdP claim, etc.).Only users who pass your Cloudflare Access policies will ever reach Bifrost.
3
Copy the team domain and Application Audience (AUD) tag
You need two values from Cloudflare:
Value
Where to find it
Team domain (issuer)
Your Zero Trust team domain, e.g. https://<team>.cloudflareaccess.com. This is your team’s account URL.
Application Audience (AUD) tag
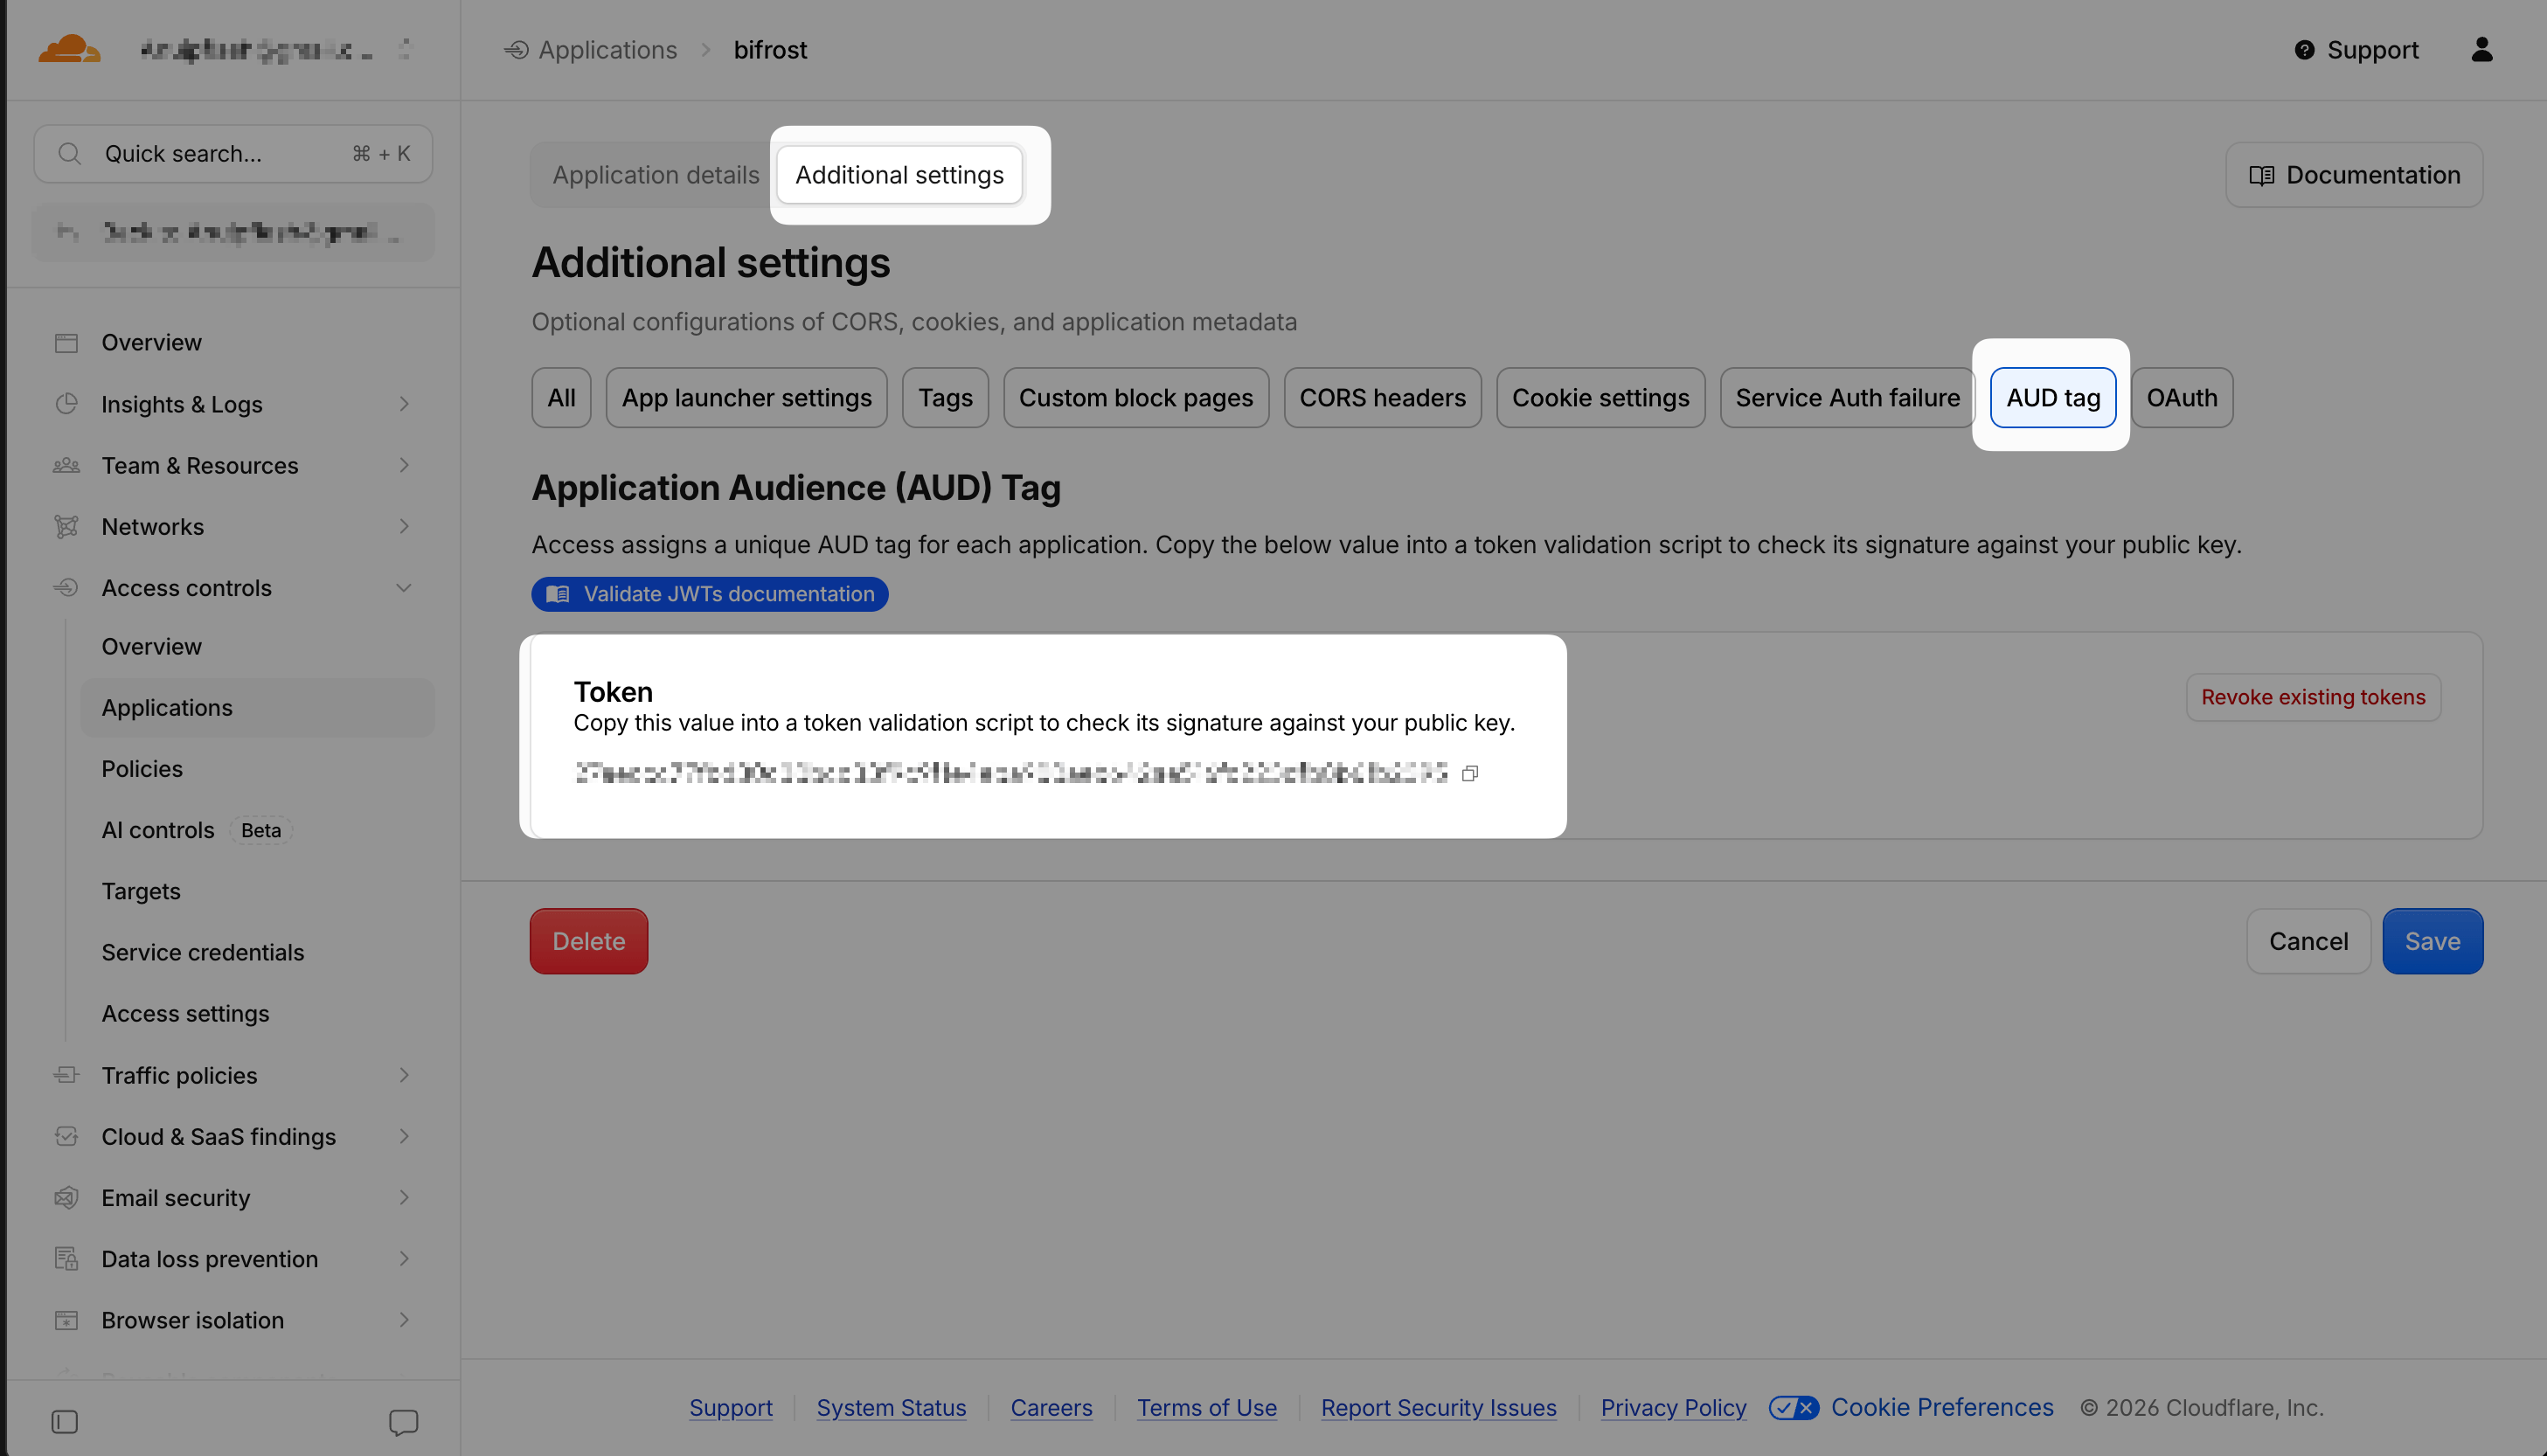
Open your application, go to the Additional settings tab, and select AUD tag. Copy the Token value - a long hex string that uniquely identifies this application.
Copy the Application Audience (AUD) tag from the application's Additional settings → AUD tag tab.
Skip this step if you’re using login-only mode.For full mode, the IdP attributes you map on (groups, roles, department, etc.) must be present in the Cloudflare Access token. In your Cloudflare Access identity provider settings, enable the relevant OIDC / SAML claims and confirm the group or role claim is included in the token Cloudflare issues.
Any claim Cloudflare includes in the Cf-Access-Jwt-Assertion token becomes available for attribute mapping in Bifrost.
Step 3: Enable the Identity-Aware Proxy in Bifrost
1
Open your provider's configuration
In the Bifrost dashboard, go to Governance → User Provisioning and open the identity provider you want to front with Cloudflare Access. Continue to the Provider Configuration step, where the Identity-Aware Proxy (IAP) section appears.
2
Enable the proxy and select Cloudflare Access
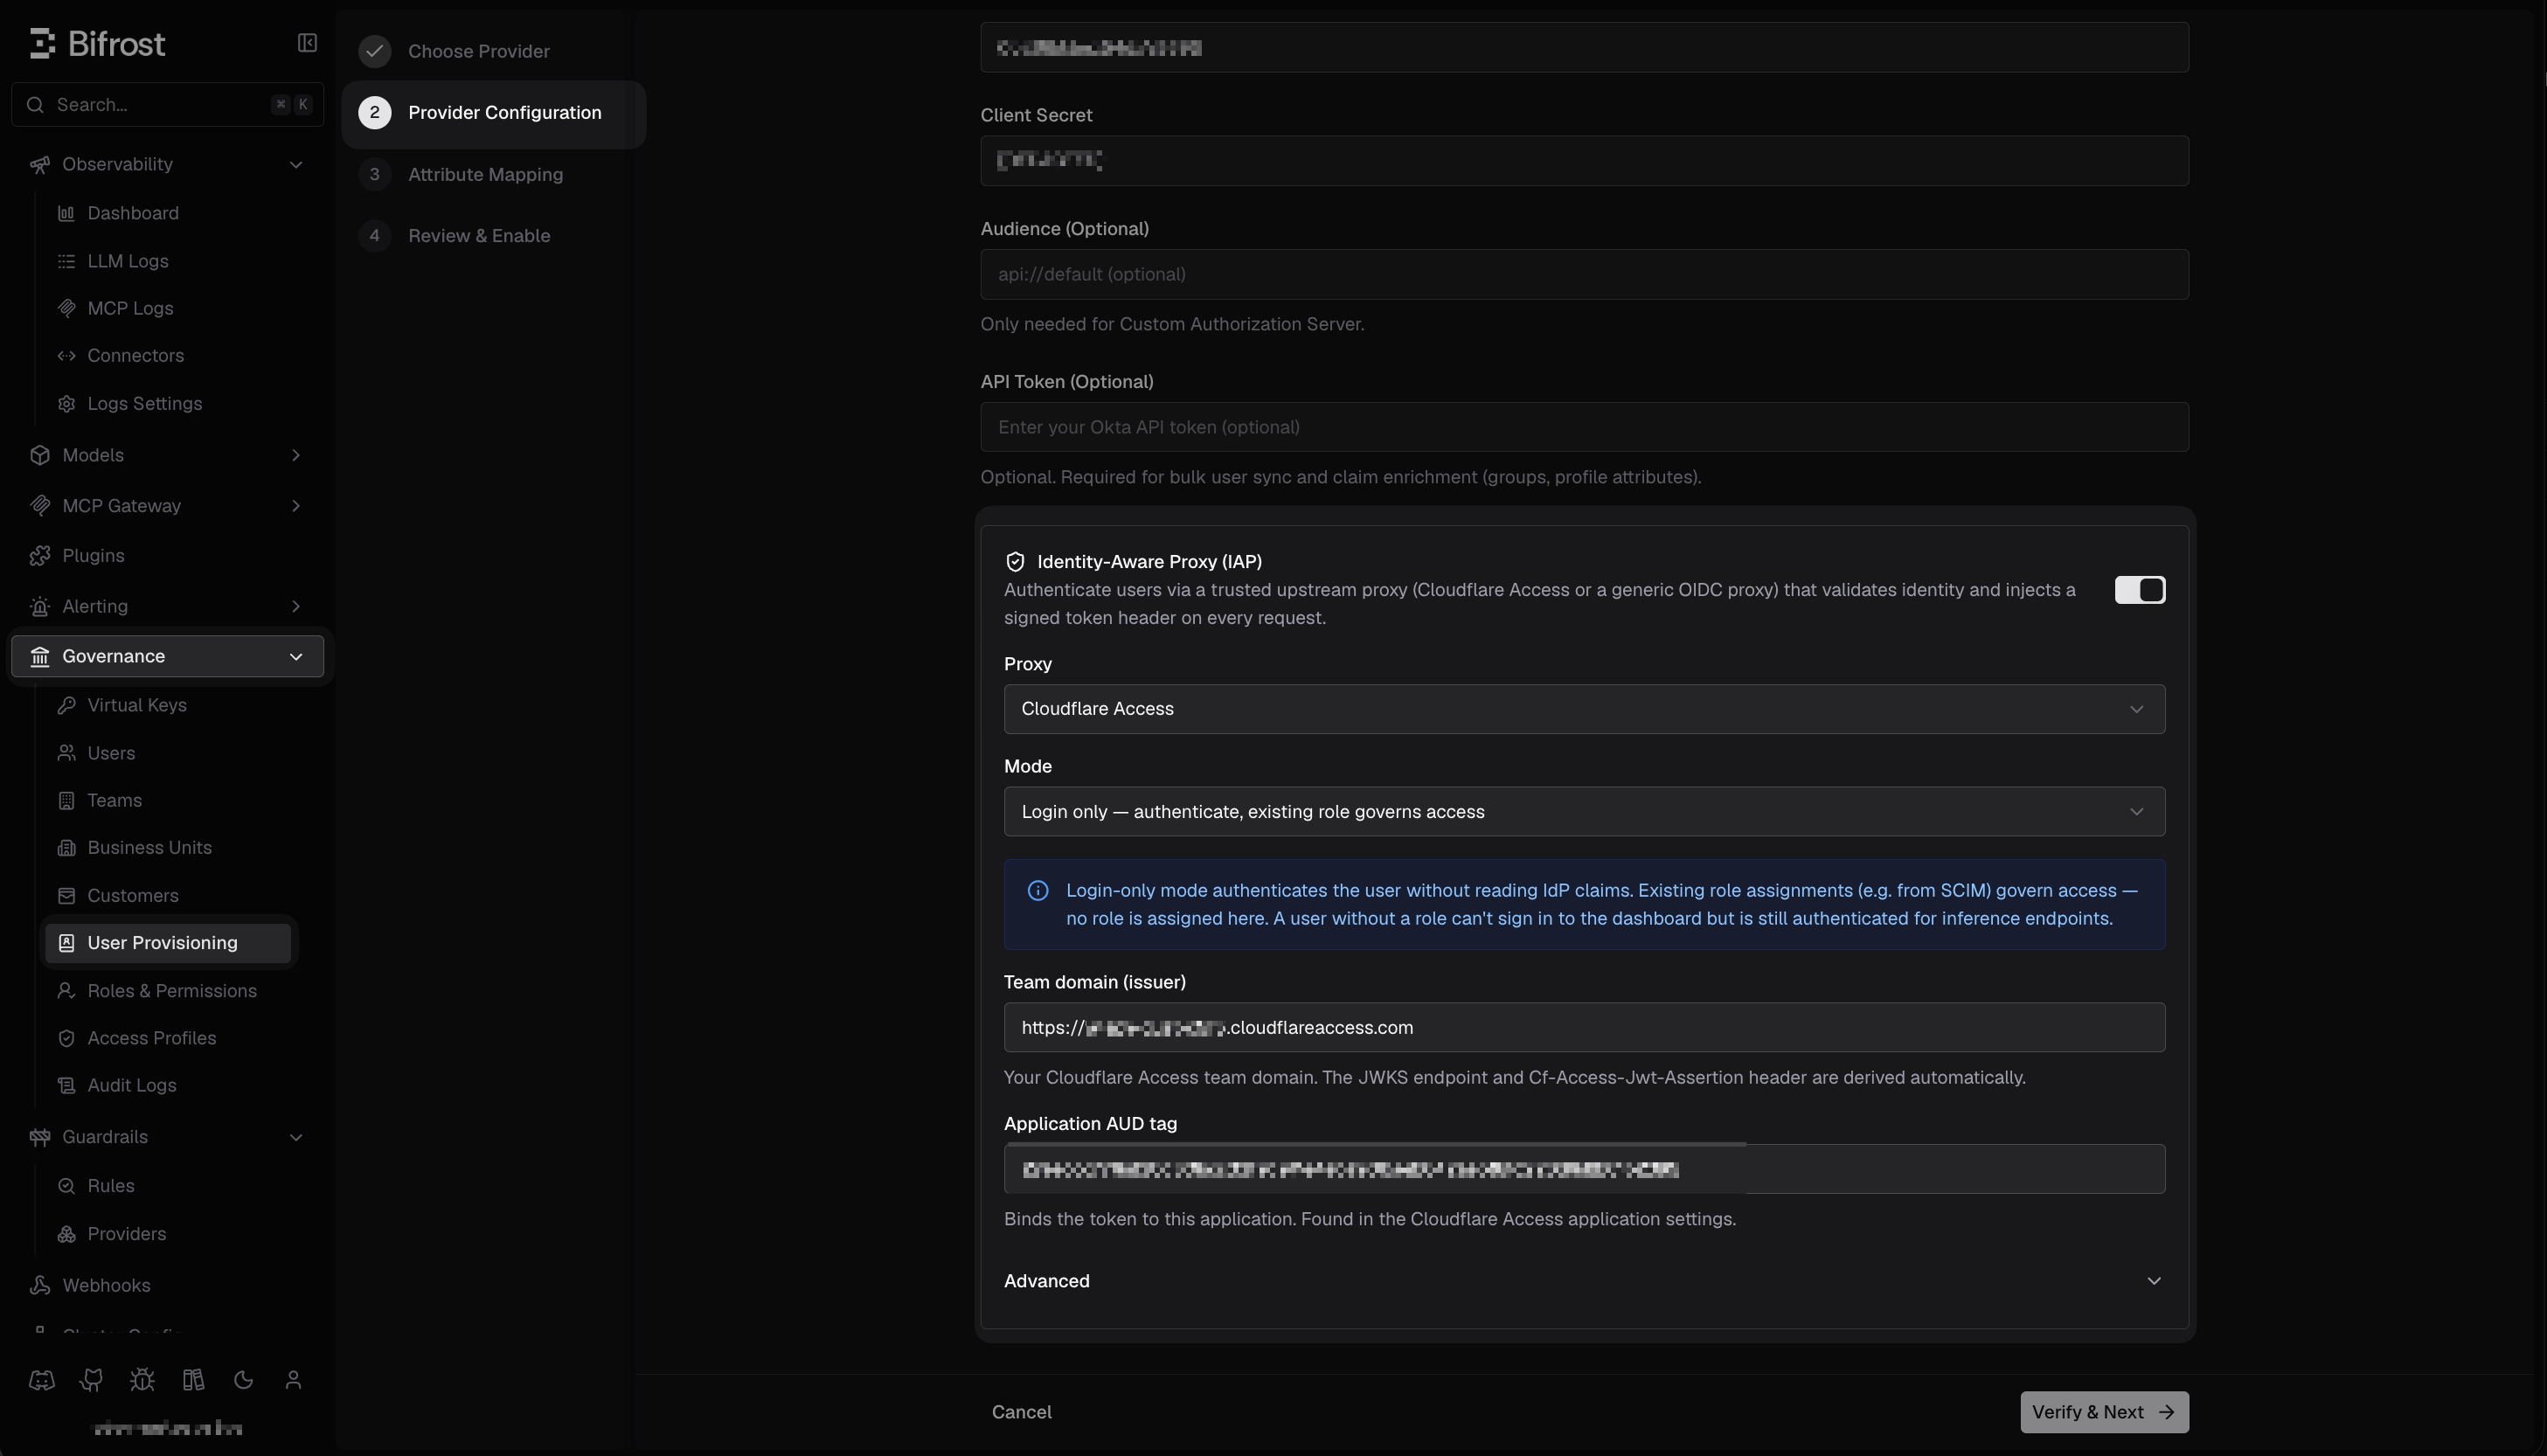
Toggle Identity-Aware Proxy (IAP) on, then set Proxy to Cloudflare Access. The Team domain (issuer) and Application AUD tag fields appear below, along with the Mode selector.
Enable the Identity-Aware Proxy section, choose Cloudflare Access, and fill in the team domain and AUD tag.
3
Choose a mode
Select Login only (authenticate against existing roles) or Full (map roles and teams from the token). See Modes above.
4
Fill in the Cloudflare fields
Field
Value
Team domain (issuer)
Your Cloudflare team domain, e.g. https://<team>.cloudflareaccess.com. Bifrost derives the JWKS endpoint and the Cf-Access-Jwt-Assertion header automatically.
Application AUD tag
The Audience tag from your Access application, binding the token to this application.
The Advanced section lets you override the request header, supply an explicit JWKS URL, or change the identity claim - all optional for Cloudflare Access.
5
Save
Save the provider configuration. Click Verify & Next and complete the wizard.Identity-Aware Proxy changes on an already-enabled provider - turning IAP on or off, switching the proxy type, or editing the team domain, AUD tag, JWKS, or mode - are hot-reloaded and take effect immediately (and are propagated to peer nodes in a cluster).
The Identity-Aware Proxy is stored as an authProxy block on the SSO provider’s configuration. Fields marked string (secret) below accept a plain-text value, an env.VAR_NAME reference, or a vault.path/to/secret reference; enabled, provider, mode, and allowedAudiences are plain values.The authProxy block lives inside your SSO provider’s config under the top-level scim_config, alongside that provider’s own fields:
Cause: The token signature or audience check failed.
Fix: Confirm the Team domain (issuer) exactly matches your Cloudflare team URL and that the Application AUD tag matches the value on the Access application’s Overview tab. Both must be for the same application.
Users get 403 “not provisioned” in login-only mode
Cause: Login-only mode never creates users; the identity isn’t in Bifrost yet.
Fix: Provision the user first via SCIM or a one-time interactive login, or switch the provider to Full mode so users are provisioned from the token.
Cause: The mapping claims (e.g. groups) aren’t present in the Cloudflare Access token.
Fix: Enable claim pass-through in your Cloudflare Access identity provider settings (see Step 2).