> ## Documentation Index
> Fetch the complete documentation index at: https://docs.getbifrost.ai/llms.txt
> Use this file to discover all available pages before exploring further.
# Provider Configuration
> Configure multiple AI providers for custom concurrency, queue sizes, proxy settings, and more.
## Multi-Provider Setup
Configure multiple providers to seamlessly switch between them. This example shows how to configure OpenAI, Anthropic, and Mistral providers.
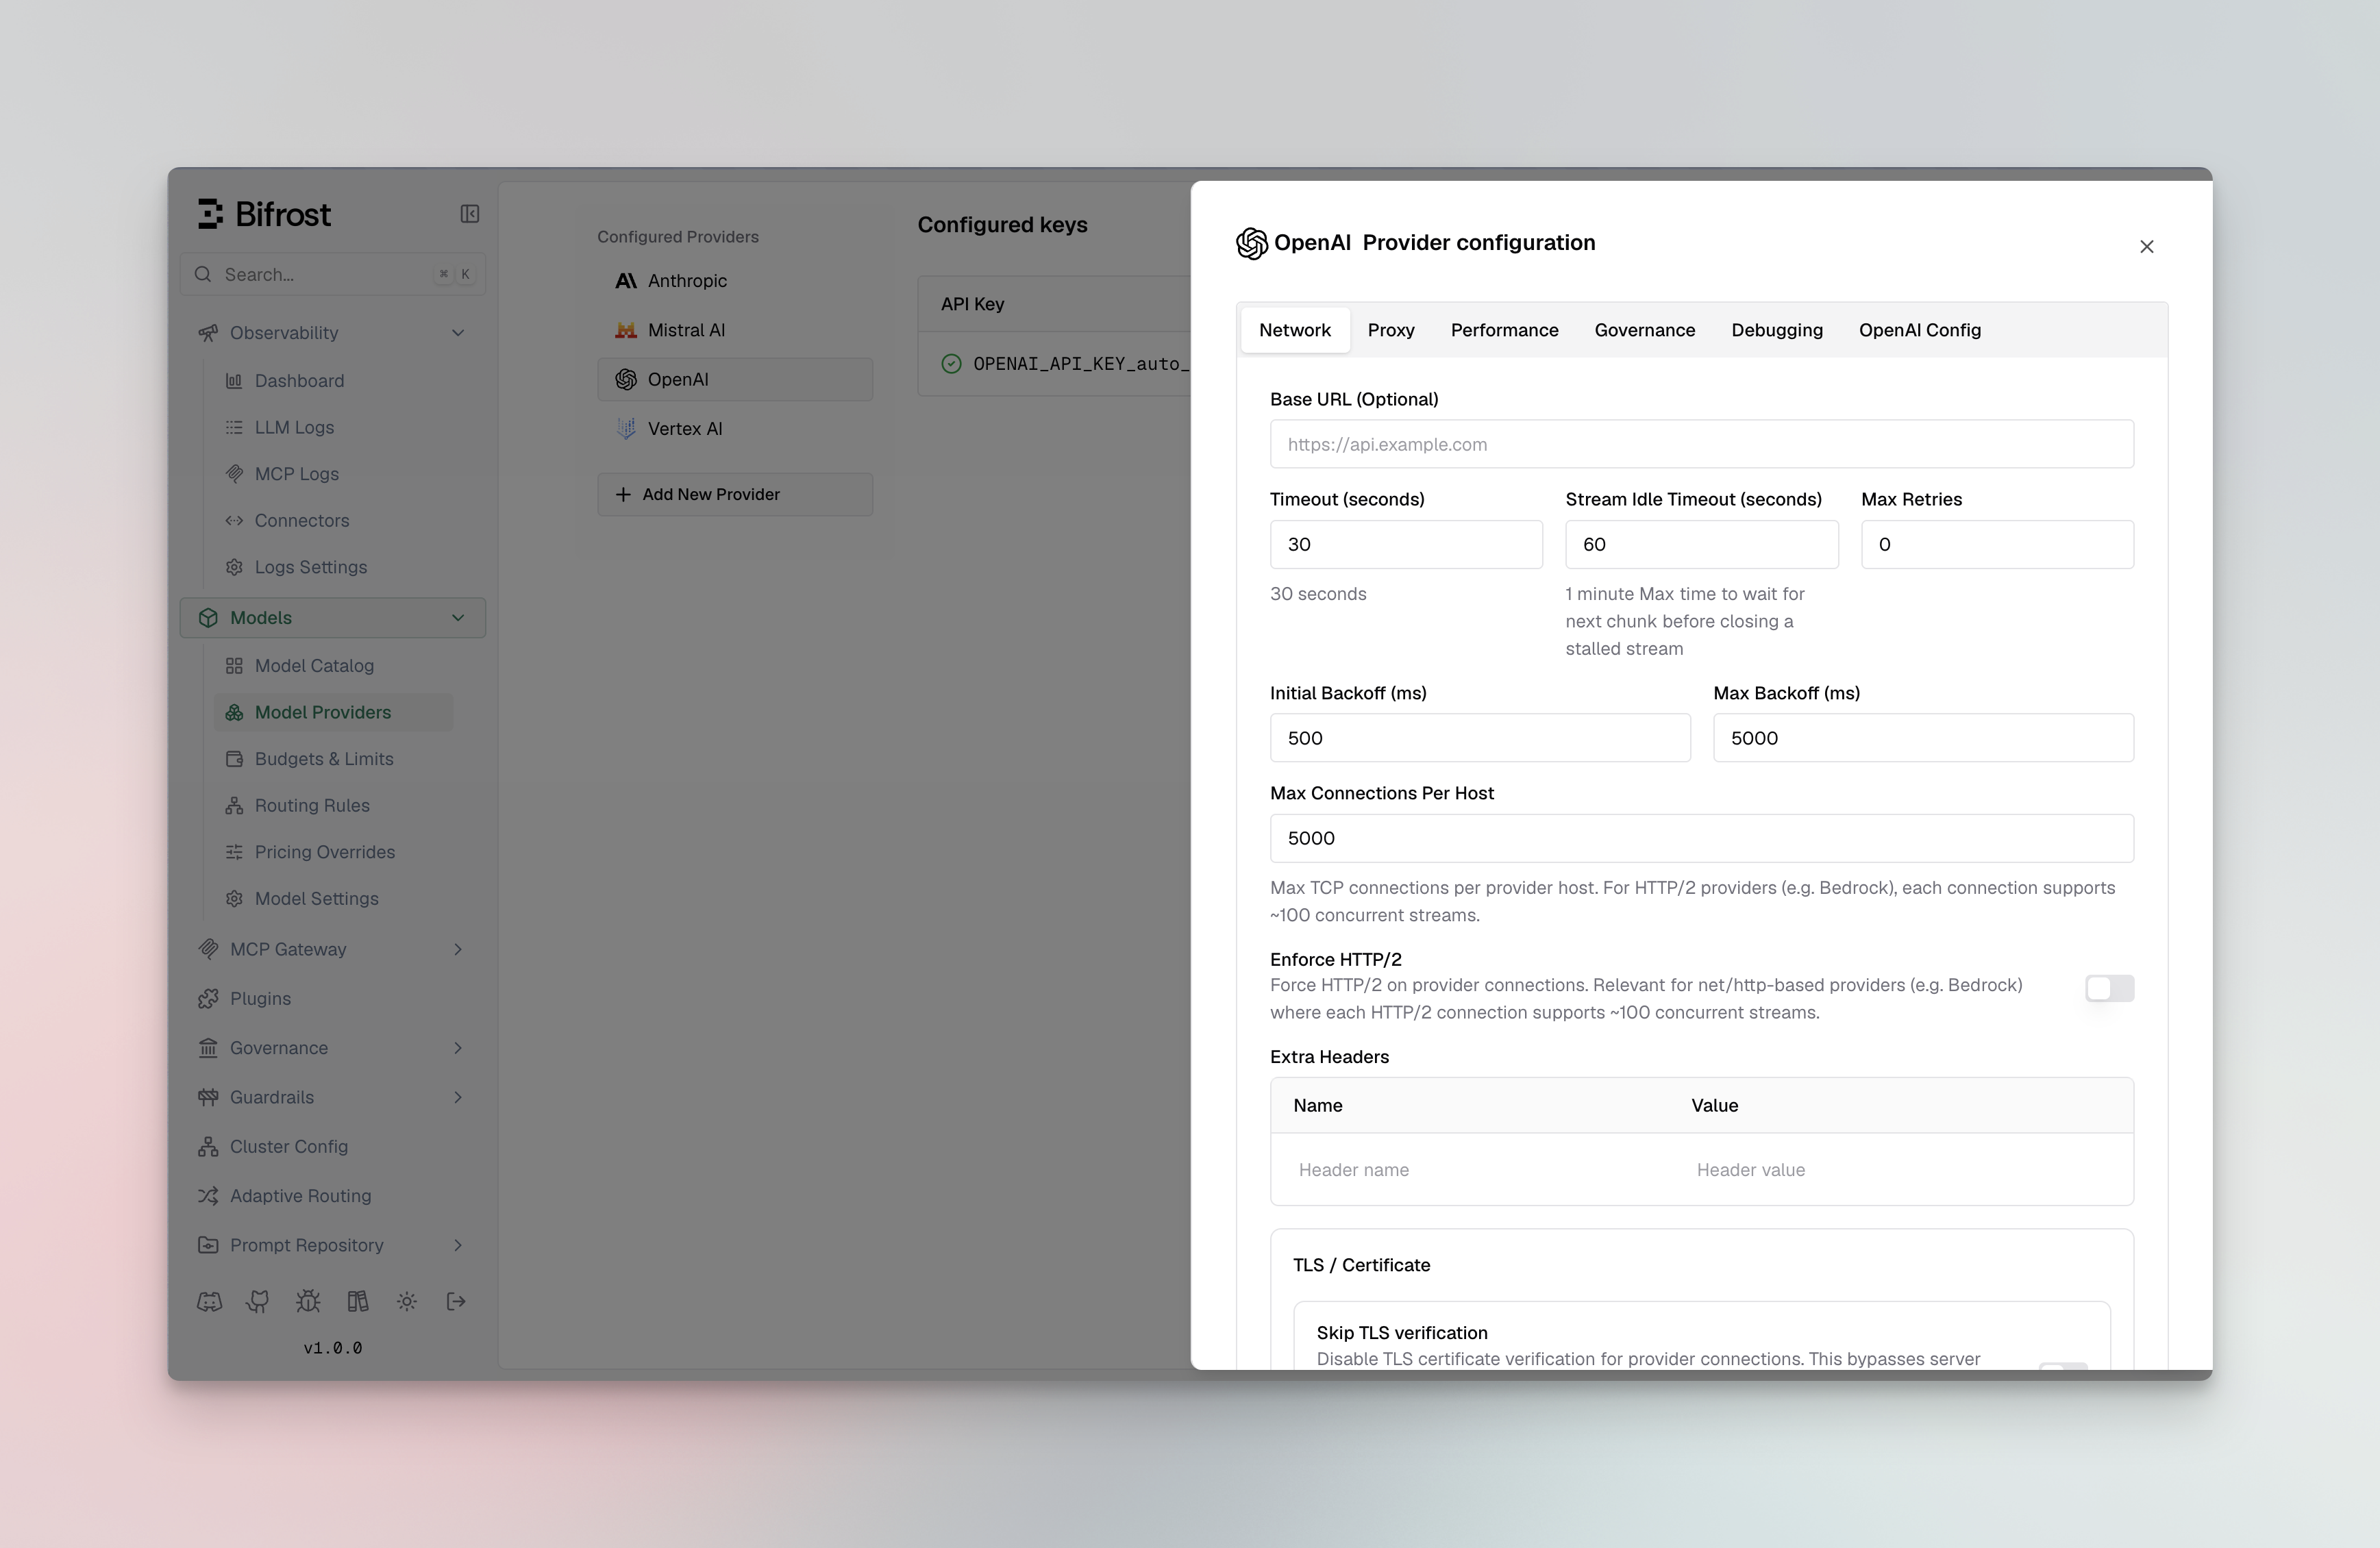 1. Go to **[http://localhost:8080](http://localhost:8080)**
2. Navigate to **"Model Providers"** in the sidebar
3. Select provider and configure keys
```bash theme={null}
# Add OpenAI provider
curl --location 'http://localhost:8080/api/providers' \
--header 'Content-Type: application/json' \
--data '{
"provider": "openai",
"keys": [
{
"name": "openai-key-1",
"value": "env.OPENAI_API_KEY",
"models": ["*"],
"weight": 1.0
}
]
}'
# Add Anthropic provider
curl --location 'http://localhost:8080/api/providers' \
--header 'Content-Type: application/json' \
--data '{
"provider": "anthropic",
"keys": [
{
"name": "anthropic-key-1",
"value": "env.ANTHROPIC_API_KEY",
"models": ["*"],
"weight": 1.0
}
]
}'
# Add vLLM (self-hosted OpenAI-compatible server)
curl --location 'http://localhost:8080/api/providers' \
--header 'Content-Type: application/json' \
--data '{
"provider": "vllm-local",
"keys": [
{
"name": "vllm-key-1",
"value": "dummy",
"models": ["*"],
"weight": 1.0
}
],
"network_config": {
"base_url": "http://vllm-endpoint:8000",
"default_request_timeout_in_seconds": 60
},
"custom_provider_config": {
"base_provider_type": "openai",
"allowed_requests": {
"chat_completion": true,
"chat_completion_stream": true
}
}
}'
```
Each key in a provider needs to have a unique name.
```json theme={null}
{
"providers": {
"openai": {
"keys": [
{
"name": "openai-key",
"value": "env.OPENAI_API_KEY",
"models": ["*"],
"weight": 1.0
}
]
},
"anthropic": {
"keys": [
{
"name": "anthropic-key",
"value": "env.ANTHROPIC_API_KEY",
"models": ["*"],
"weight": 1.0
}
]
},
"vllm-local": {
"keys": [
{
"name": "vllm-key",
"value": "dummy",
"models": ["*"],
"weight": 1.0
}
],
"network_config": {
"base_url": "http://vllm-endpoint:8000",
"default_request_timeout_in_seconds": 60
},
"custom_provider_config": {
"base_provider_type": "openai",
"allowed_requests": {
"chat_completion": true,
"chat_completion_stream": true
}
}
}
}
}
```
**Kubernetes DNS (only for custom endpoint):** When running in Kubernetes, use fully qualified domain names (FQDN) like `http://..svc.cluster.local:8000` for cross-namespace custom endpoints. Short names like `http://:8000` only work within the same namespace.
**Air-gapped or self-signed certificates:** If your custom provider uses HTTPS
with a self-signed or internal CA certificate, add `"insecure_skip_verify":
true` or `"ca_cert_pem": "-----BEGIN CERTIFICATE-----\n...\n-----END
CERTIFICATE-----"` to `network_config`. See [Custom Providers -
TLS](../../providers/custom-providers#tls-for-self-signed-or-internal-certificates)
for details.
## Making Requests
Once providers are configured, you can make requests to any specific provider. This example shows how to send a request directly to OpenAI's GPT-4o Mini model. Bifrost handles the provider-specific API formatting automatically.
```bash theme={null}
curl --location 'http://localhost:8080/v1/chat/completions' \
--header 'Content-Type: application/json' \
--data '{
"model": "openai/gpt-4o-mini",
"messages": [
{"role": "user", "content": "Hello!"}
]
}'
```
## Environment Variables
Set up your API keys for the providers you want to use. Bifrost supports both direct key values and environment variable references with the `env.` prefix:
```bash theme={null}
export OPENAI_API_KEY="your-openai-api-key"
export ANTHROPIC_API_KEY="your-anthropic-api-key"
export MISTRAL_API_KEY="your-mistral-api-key"
export CEREBRAS_API_KEY="your-cerebras-api-key"
export DEEPSEEK_API_KEY="your-deepseek-api-key"
export GROQ_API_KEY="your-groq-api-key"
export COHERE_API_KEY="your-cohere-api-key"
```
**Environment Variable Handling:**
* Use `"value": "env.VARIABLE_NAME"` to reference environment variables
* Use `"value": "sk-proj-xxxxxxxxx"` to pass keys directly
* All sensitive data is automatically redacted in GET requests and UI responses for security
## Advanced Configuration
### Weighted Load Balancing
Distribute requests across multiple API keys or providers based on custom weights. This example shows how to split traffic 70/30 between two OpenAI keys, useful for managing rate limits or costs across different accounts.
1. Go to **[http://localhost:8080](http://localhost:8080)**
2. Navigate to **"Model Providers"** in the sidebar
3. Select provider and configure keys
```bash theme={null}
# Add OpenAI provider
curl --location 'http://localhost:8080/api/providers' \
--header 'Content-Type: application/json' \
--data '{
"provider": "openai",
"keys": [
{
"name": "openai-key-1",
"value": "env.OPENAI_API_KEY",
"models": ["*"],
"weight": 1.0
}
]
}'
# Add Anthropic provider
curl --location 'http://localhost:8080/api/providers' \
--header 'Content-Type: application/json' \
--data '{
"provider": "anthropic",
"keys": [
{
"name": "anthropic-key-1",
"value": "env.ANTHROPIC_API_KEY",
"models": ["*"],
"weight": 1.0
}
]
}'
# Add vLLM (self-hosted OpenAI-compatible server)
curl --location 'http://localhost:8080/api/providers' \
--header 'Content-Type: application/json' \
--data '{
"provider": "vllm-local",
"keys": [
{
"name": "vllm-key-1",
"value": "dummy",
"models": ["*"],
"weight": 1.0
}
],
"network_config": {
"base_url": "http://vllm-endpoint:8000",
"default_request_timeout_in_seconds": 60
},
"custom_provider_config": {
"base_provider_type": "openai",
"allowed_requests": {
"chat_completion": true,
"chat_completion_stream": true
}
}
}'
```
Each key in a provider needs to have a unique name.
```json theme={null}
{
"providers": {
"openai": {
"keys": [
{
"name": "openai-key",
"value": "env.OPENAI_API_KEY",
"models": ["*"],
"weight": 1.0
}
]
},
"anthropic": {
"keys": [
{
"name": "anthropic-key",
"value": "env.ANTHROPIC_API_KEY",
"models": ["*"],
"weight": 1.0
}
]
},
"vllm-local": {
"keys": [
{
"name": "vllm-key",
"value": "dummy",
"models": ["*"],
"weight": 1.0
}
],
"network_config": {
"base_url": "http://vllm-endpoint:8000",
"default_request_timeout_in_seconds": 60
},
"custom_provider_config": {
"base_provider_type": "openai",
"allowed_requests": {
"chat_completion": true,
"chat_completion_stream": true
}
}
}
}
}
```
**Kubernetes DNS (only for custom endpoint):** When running in Kubernetes, use fully qualified domain names (FQDN) like `http://..svc.cluster.local:8000` for cross-namespace custom endpoints. Short names like `http://:8000` only work within the same namespace.
**Air-gapped or self-signed certificates:** If your custom provider uses HTTPS
with a self-signed or internal CA certificate, add `"insecure_skip_verify":
true` or `"ca_cert_pem": "-----BEGIN CERTIFICATE-----\n...\n-----END
CERTIFICATE-----"` to `network_config`. See [Custom Providers -
TLS](../../providers/custom-providers#tls-for-self-signed-or-internal-certificates)
for details.
## Making Requests
Once providers are configured, you can make requests to any specific provider. This example shows how to send a request directly to OpenAI's GPT-4o Mini model. Bifrost handles the provider-specific API formatting automatically.
```bash theme={null}
curl --location 'http://localhost:8080/v1/chat/completions' \
--header 'Content-Type: application/json' \
--data '{
"model": "openai/gpt-4o-mini",
"messages": [
{"role": "user", "content": "Hello!"}
]
}'
```
## Environment Variables
Set up your API keys for the providers you want to use. Bifrost supports both direct key values and environment variable references with the `env.` prefix:
```bash theme={null}
export OPENAI_API_KEY="your-openai-api-key"
export ANTHROPIC_API_KEY="your-anthropic-api-key"
export MISTRAL_API_KEY="your-mistral-api-key"
export CEREBRAS_API_KEY="your-cerebras-api-key"
export DEEPSEEK_API_KEY="your-deepseek-api-key"
export GROQ_API_KEY="your-groq-api-key"
export COHERE_API_KEY="your-cohere-api-key"
```
**Environment Variable Handling:**
* Use `"value": "env.VARIABLE_NAME"` to reference environment variables
* Use `"value": "sk-proj-xxxxxxxxx"` to pass keys directly
* All sensitive data is automatically redacted in GET requests and UI responses for security
## Advanced Configuration
### Weighted Load Balancing
Distribute requests across multiple API keys or providers based on custom weights. This example shows how to split traffic 70/30 between two OpenAI keys, useful for managing rate limits or costs across different accounts.
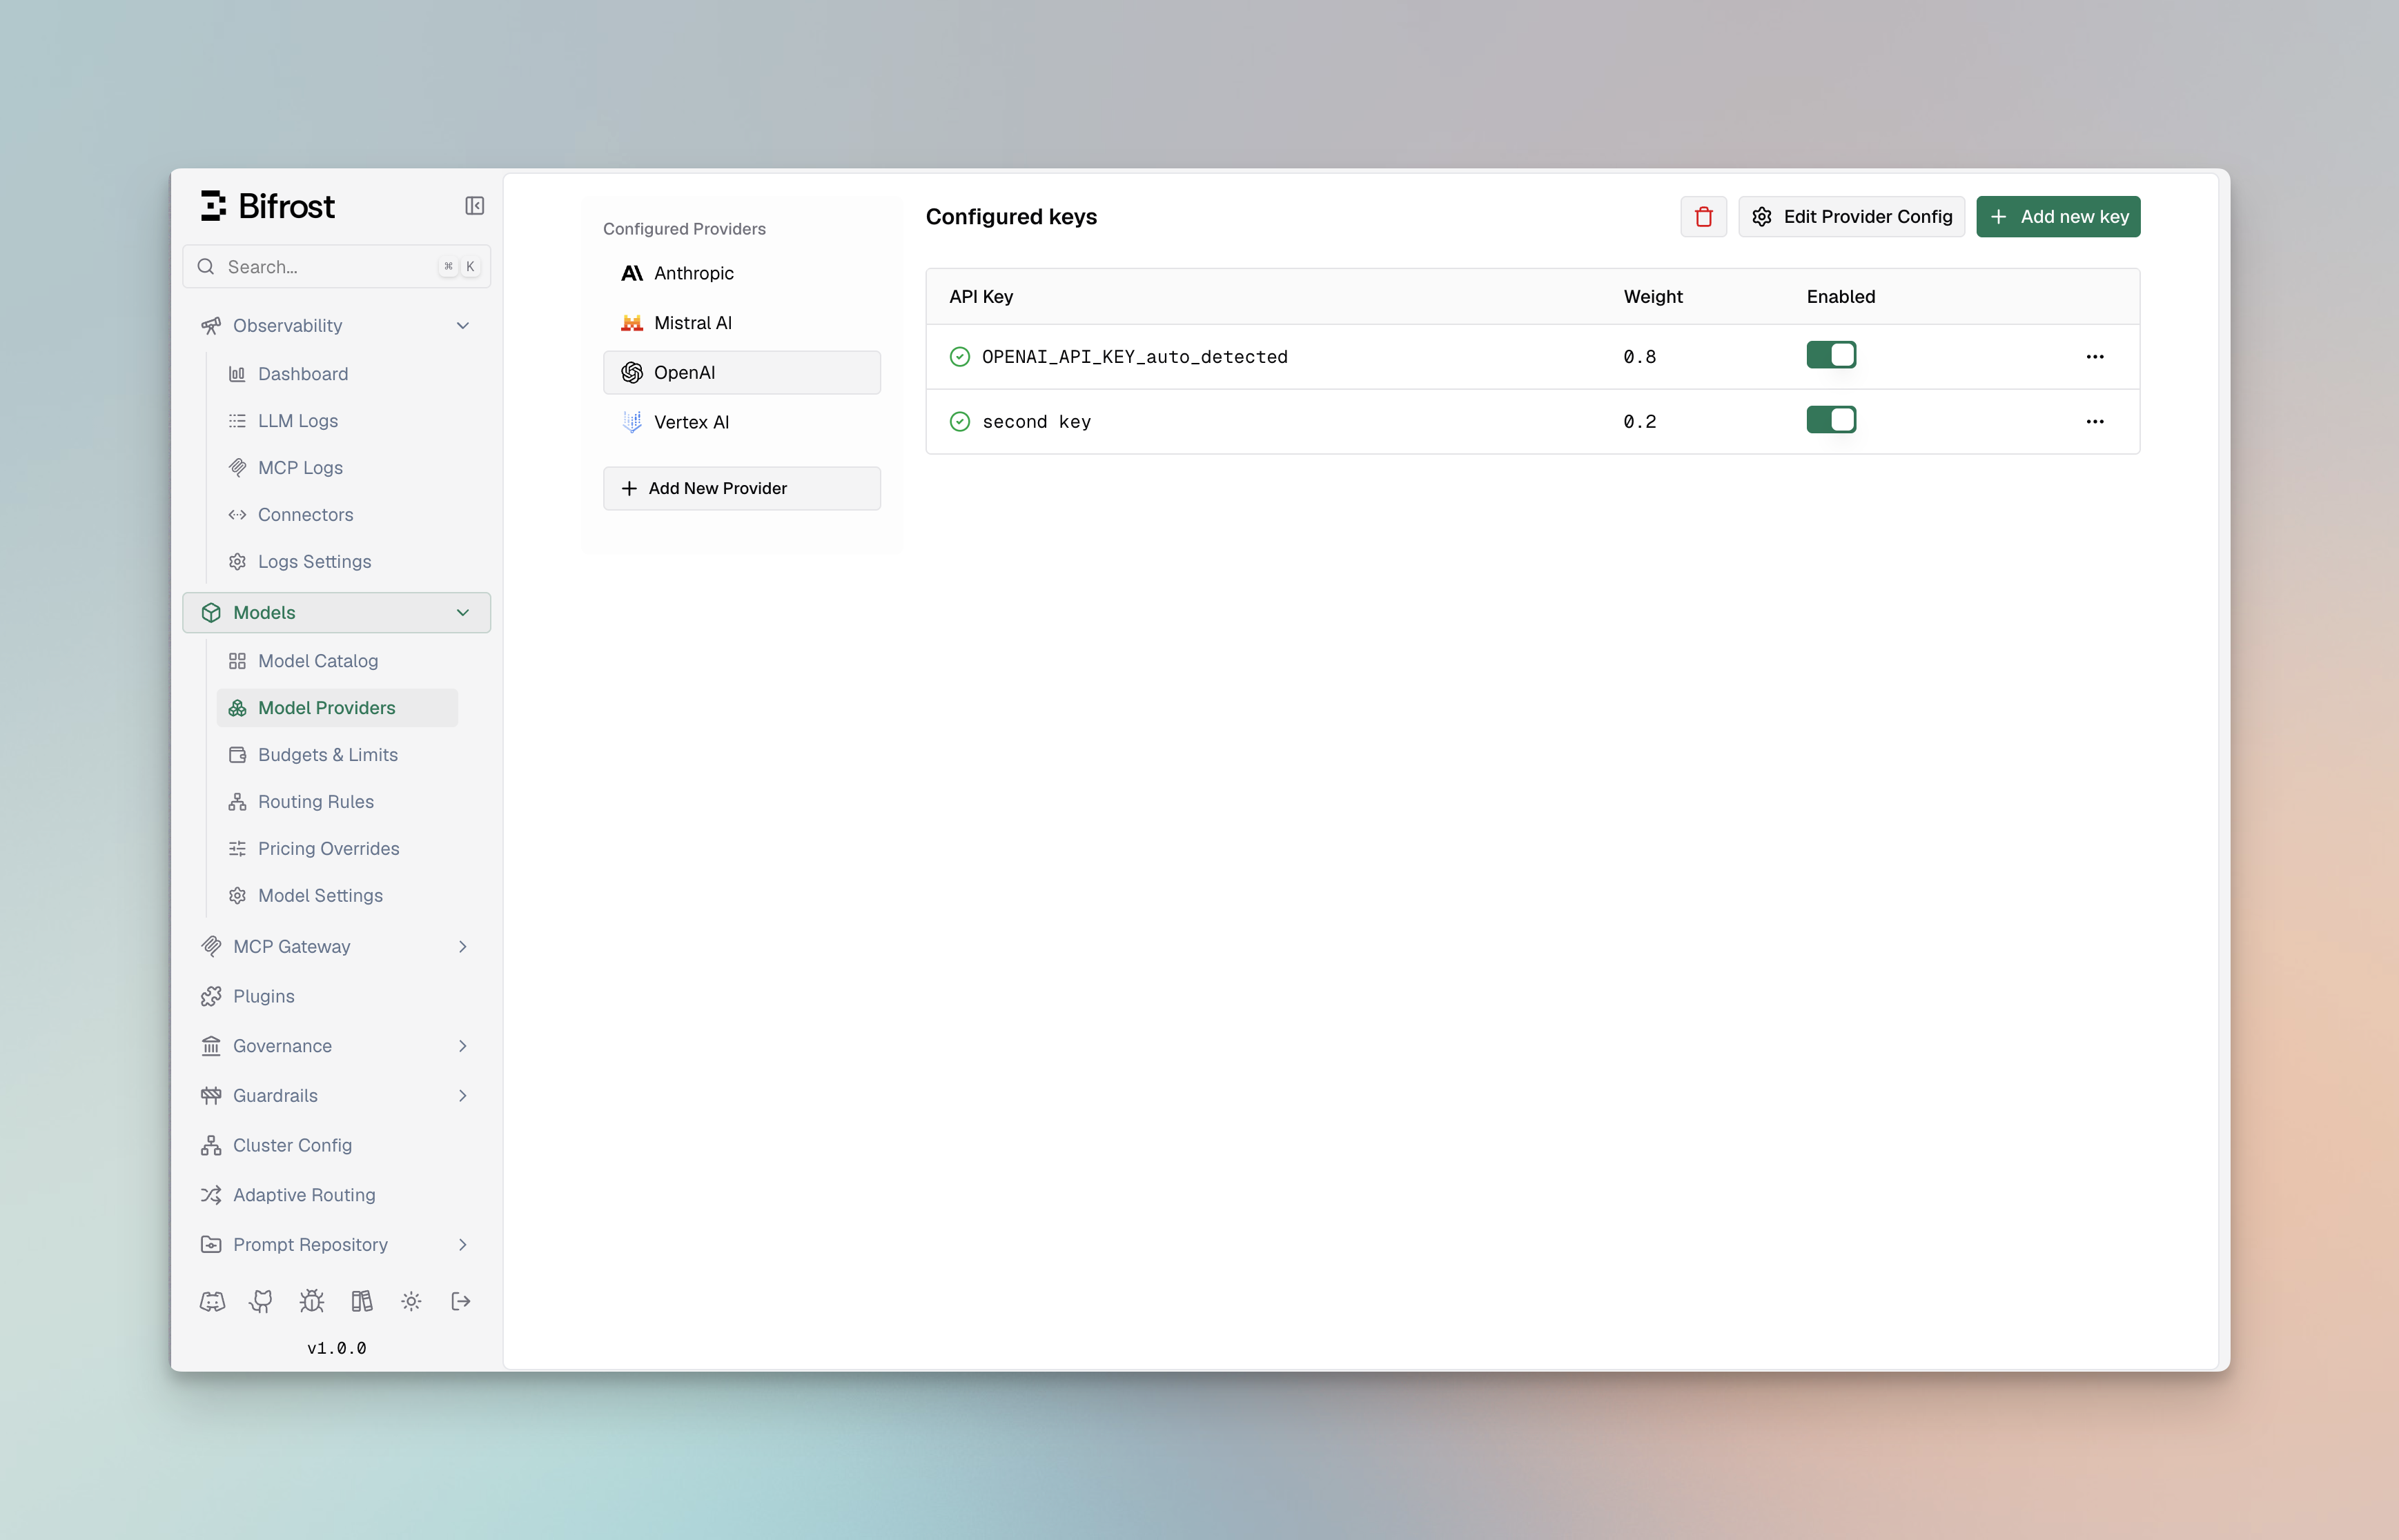 1. Navigate to **"Model Providers"** → **"Configurations"** → **"OpenAI"**
2. Click **"Add Key"** to add multiple keys
3. Set weight values (0.7 and 0.3)
4. Save configuration
```bash theme={null}
curl --location 'http://localhost:8080/api/providers' \
--header 'Content-Type: application/json' \
--data '{
"provider": "openai",
"keys": [
{
"name": "openai-key-1",
"value": "env.OPENAI_API_KEY_1",
"models": ["*"],
"weight": 0.7
},
{
"name": "openai-key-2",
"value": "env.OPENAI_API_KEY_2",
"models": ["*"],
"weight": 0.3
}
]
}'
```
```json theme={null}
{
"providers": {
"openai": {
"keys": [
{
"name": "openai-key-1",
"value": "env.OPENAI_API_KEY_1",
"models": ["*"],
"weight": 0.7
},
{
"name": "openai-key-2",
"value": "env.OPENAI_API_KEY_2",
"models": ["*"],
"weight": 0.3
}
]
}
}
}
```
### Model-Specific Keys
Use different API keys for specific models, allowing you to manage access controls and billing separately. This example uses a premium key for advanced reasoning models (o1-preview, o1-mini) and a standard key for regular GPT models.
1. Navigate to **"Model Providers"** → **"Configurations"** → **"OpenAI"**
2. Add first key with models: `["gpt-4o", "gpt-4o-mini"]`
3. Add premium key with models: `["o1-preview", "o1-mini"]`
4. Save configuration
```bash theme={null}
curl --location 'http://localhost:8080/api/providers' \
--header 'Content-Type: application/json' \
--data '{
"provider": "openai",
"keys": [
{
"name": "openai-key-1",
"value": "env.OPENAI_API_KEY",
"models": ["gpt-4o", "gpt-4o-mini"],
"weight": 1.0
},
{
"name": "openai-key-2",
"value": "env.OPENAI_API_KEY_PREMIUM",
"models": ["o1-preview", "o1-mini"],
"weight": 1.0
}
]
}'
```
```json theme={null}
{
"providers": {
"openai": {
"keys": [
{
"name": "openai-key-1",
"value": "env.OPENAI_API_KEY",
"models": ["gpt-4o", "gpt-4o-mini"],
"weight": 1.0
},
{
"name": "openai-key-2",
"value": "env.OPENAI_API_KEY_PREMIUM",
"models": ["o1-preview", "o1-mini"],
"weight": 1.0
}
]
}
}
}
```
### Custom Base URL
Override the default API endpoint for a provider. This is useful for connecting to self-hosted models, local development servers, or OpenAI-compatible APIs like vLLM, Ollama, or LiteLLM.
1. Navigate to **"Model Providers"** → **"Configurations"** → **"OpenAI"** → **"Provider level configuration"** → **"Network config"**
2. Set **Base URL**: `http://localhost:8000/v1`
3. Save configuration
```bash theme={null}
curl --location 'http://localhost:8080/api/providers' \
--header 'Content-Type: application/json' \
--data '{
"provider": "openai",
"keys": [
{
"name": "openai-key-1",
"value": "env.OPENAI_API_KEY",
"models": ["*"],
"weight": 1.0
}
],
"network_config": {
"base_url": "http://localhost:8000/v1"
}
}'
```
```json theme={null}
{
"providers": {
"openai": {
"keys": [
{
"name": "openai-key-1",
"value": "env.OPENAI_API_KEY",
"models": ["*"],
"weight": 1.0
}
],
"network_config": {
"base_url": "http://localhost:8000/v1"
}
}
}
}
```
For self-hosted providers like Ollama and SGL, `base_url` is required. For
standard providers, it's optional and overrides the default endpoint.
### Private Network Access
If your provider runs on a private IP address (e.g. a local vLLM or Ollama instance on `192.168.x.x` or `10.x.x.x`), set `allow_private_network: true` in `network_config`. Link-local addresses (`169.254.x.x`) remain blocked regardless of this setting.
```bash theme={null}
curl --location 'http://localhost:8080/api/providers' \
--header 'Content-Type: application/json' \
--data '{
"provider": "ollama-local",
"keys": [
{
"name": "ollama-key",
"value": "dummy",
"models": ["*"],
"weight": 1.0
}
],
"network_config": {
"base_url": "http://192.168.1.195:8000",
"allow_private_network": true
}
}'
```
```json theme={null}
{
"providers": {
"ollama-local": {
"keys": [
{
"name": "ollama-key",
"value": "dummy",
"models": ["*"],
"weight": 1.0
}
],
"network_config": {
"base_url": "http://192.168.1.195:8000",
"allow_private_network": true
}
}
}
}
```
### Managing Retries
Configure retry behavior for handling temporary failures and rate limits. This example sets up exponential backoff with up to 5 retries, starting with 1ms delay and capping at 10 seconds - ideal for handling transient network issues.
For a full explanation of how retries work, key rotation on rate limits, and
how retries connect with fallbacks, see [Retries &
Fallbacks](/features/retries-and-fallbacks).
1. Navigate to **"Model Providers"** → **"Configurations"** → **"OpenAI"**
2. Click **"Add Key"** to add multiple keys
3. Set weight values (0.7 and 0.3)
4. Save configuration
```bash theme={null}
curl --location 'http://localhost:8080/api/providers' \
--header 'Content-Type: application/json' \
--data '{
"provider": "openai",
"keys": [
{
"name": "openai-key-1",
"value": "env.OPENAI_API_KEY_1",
"models": ["*"],
"weight": 0.7
},
{
"name": "openai-key-2",
"value": "env.OPENAI_API_KEY_2",
"models": ["*"],
"weight": 0.3
}
]
}'
```
```json theme={null}
{
"providers": {
"openai": {
"keys": [
{
"name": "openai-key-1",
"value": "env.OPENAI_API_KEY_1",
"models": ["*"],
"weight": 0.7
},
{
"name": "openai-key-2",
"value": "env.OPENAI_API_KEY_2",
"models": ["*"],
"weight": 0.3
}
]
}
}
}
```
### Model-Specific Keys
Use different API keys for specific models, allowing you to manage access controls and billing separately. This example uses a premium key for advanced reasoning models (o1-preview, o1-mini) and a standard key for regular GPT models.
1. Navigate to **"Model Providers"** → **"Configurations"** → **"OpenAI"**
2. Add first key with models: `["gpt-4o", "gpt-4o-mini"]`
3. Add premium key with models: `["o1-preview", "o1-mini"]`
4. Save configuration
```bash theme={null}
curl --location 'http://localhost:8080/api/providers' \
--header 'Content-Type: application/json' \
--data '{
"provider": "openai",
"keys": [
{
"name": "openai-key-1",
"value": "env.OPENAI_API_KEY",
"models": ["gpt-4o", "gpt-4o-mini"],
"weight": 1.0
},
{
"name": "openai-key-2",
"value": "env.OPENAI_API_KEY_PREMIUM",
"models": ["o1-preview", "o1-mini"],
"weight": 1.0
}
]
}'
```
```json theme={null}
{
"providers": {
"openai": {
"keys": [
{
"name": "openai-key-1",
"value": "env.OPENAI_API_KEY",
"models": ["gpt-4o", "gpt-4o-mini"],
"weight": 1.0
},
{
"name": "openai-key-2",
"value": "env.OPENAI_API_KEY_PREMIUM",
"models": ["o1-preview", "o1-mini"],
"weight": 1.0
}
]
}
}
}
```
### Custom Base URL
Override the default API endpoint for a provider. This is useful for connecting to self-hosted models, local development servers, or OpenAI-compatible APIs like vLLM, Ollama, or LiteLLM.
1. Navigate to **"Model Providers"** → **"Configurations"** → **"OpenAI"** → **"Provider level configuration"** → **"Network config"**
2. Set **Base URL**: `http://localhost:8000/v1`
3. Save configuration
```bash theme={null}
curl --location 'http://localhost:8080/api/providers' \
--header 'Content-Type: application/json' \
--data '{
"provider": "openai",
"keys": [
{
"name": "openai-key-1",
"value": "env.OPENAI_API_KEY",
"models": ["*"],
"weight": 1.0
}
],
"network_config": {
"base_url": "http://localhost:8000/v1"
}
}'
```
```json theme={null}
{
"providers": {
"openai": {
"keys": [
{
"name": "openai-key-1",
"value": "env.OPENAI_API_KEY",
"models": ["*"],
"weight": 1.0
}
],
"network_config": {
"base_url": "http://localhost:8000/v1"
}
}
}
}
```
For self-hosted providers like Ollama and SGL, `base_url` is required. For
standard providers, it's optional and overrides the default endpoint.
### Private Network Access
If your provider runs on a private IP address (e.g. a local vLLM or Ollama instance on `192.168.x.x` or `10.x.x.x`), set `allow_private_network: true` in `network_config`. Link-local addresses (`169.254.x.x`) remain blocked regardless of this setting.
```bash theme={null}
curl --location 'http://localhost:8080/api/providers' \
--header 'Content-Type: application/json' \
--data '{
"provider": "ollama-local",
"keys": [
{
"name": "ollama-key",
"value": "dummy",
"models": ["*"],
"weight": 1.0
}
],
"network_config": {
"base_url": "http://192.168.1.195:8000",
"allow_private_network": true
}
}'
```
```json theme={null}
{
"providers": {
"ollama-local": {
"keys": [
{
"name": "ollama-key",
"value": "dummy",
"models": ["*"],
"weight": 1.0
}
],
"network_config": {
"base_url": "http://192.168.1.195:8000",
"allow_private_network": true
}
}
}
}
```
### Managing Retries
Configure retry behavior for handling temporary failures and rate limits. This example sets up exponential backoff with up to 5 retries, starting with 1ms delay and capping at 10 seconds - ideal for handling transient network issues.
For a full explanation of how retries work, key rotation on rate limits, and
how retries connect with fallbacks, see [Retries &
Fallbacks](/features/retries-and-fallbacks).
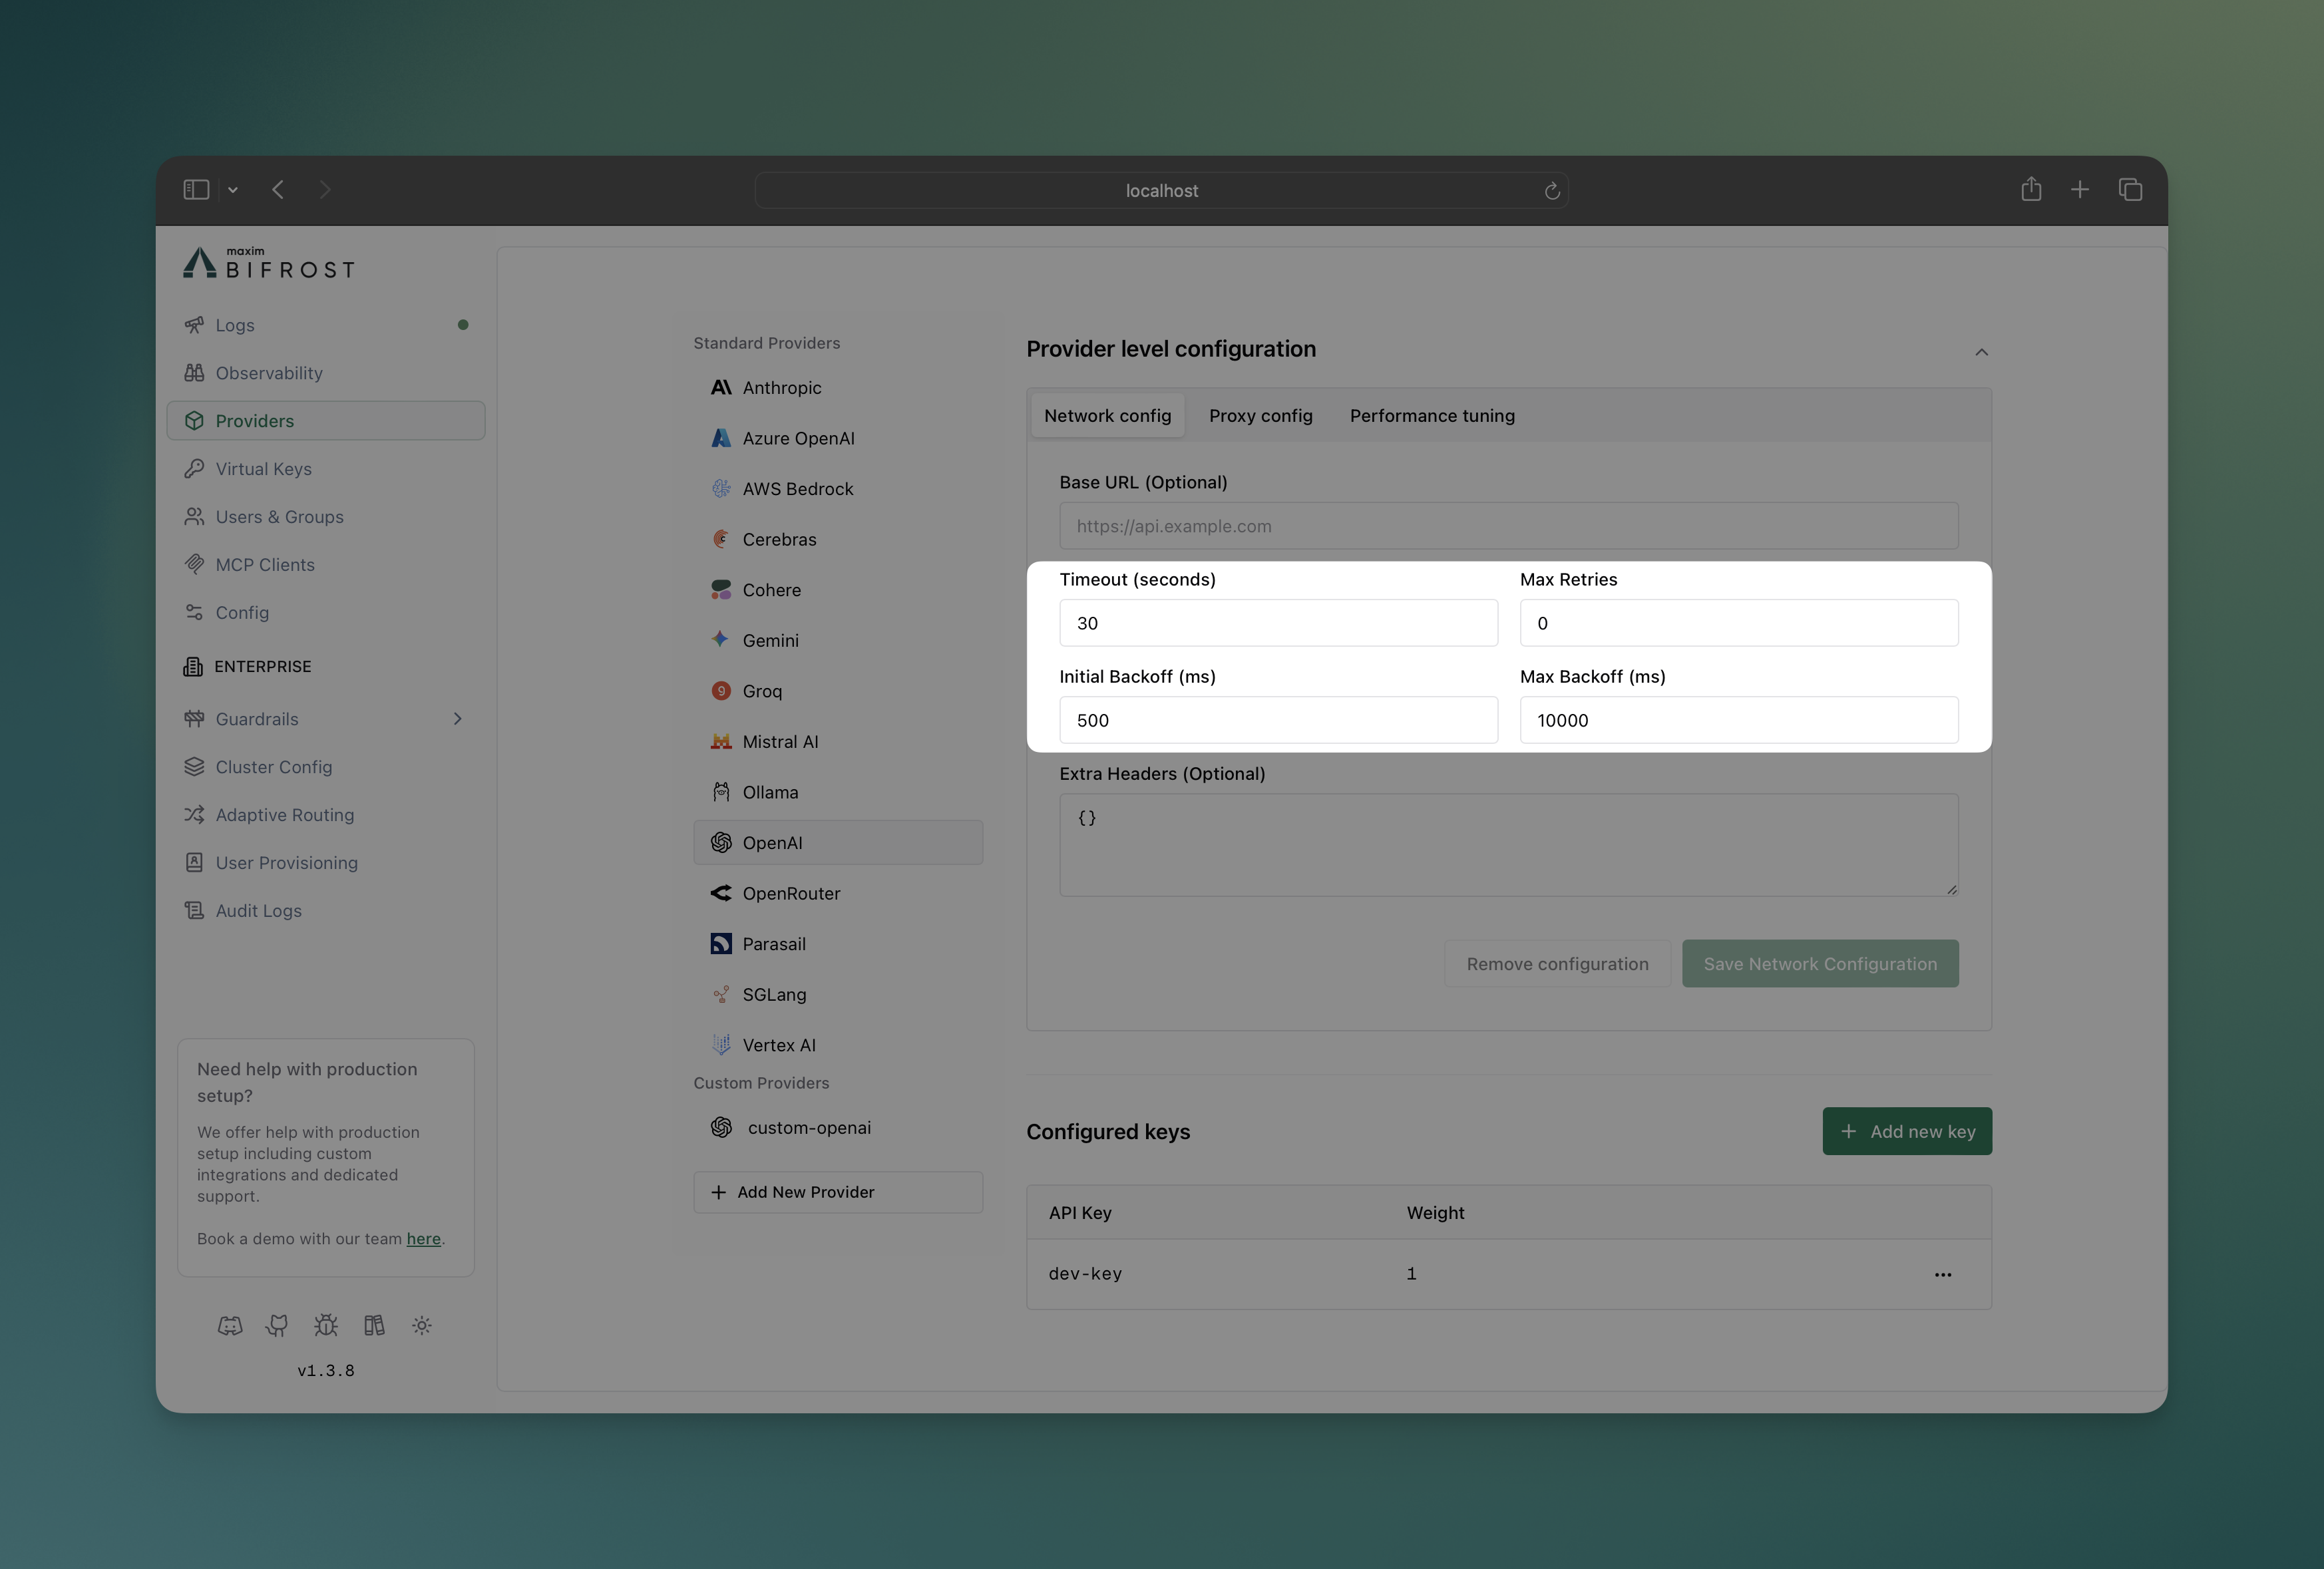 1. Navigate to **"Model Providers"** → **"Configurations"** → **"OpenAI"** → **"Provider level configuration"** → **"Network config"**
2. Set **Max Retries**: `5`
3. Set **Initial Backoff**: `1` ms
4. Set **Max Backoff**: `10000` ms
5. Save configuration
```bash theme={null}
curl --location 'http://localhost:8080/api/providers' \
--header 'Content-Type: application/json' \
--data '{
"provider": "openai",
"keys": [
{
"name": "openai-key-1",
"value": "env.OPENAI_API_KEY",
"models": ["*"],
"weight": 1.0
}
],
"network_config": {
"max_retries": 5,
"retry_backoff_initial": 1,
"retry_backoff_max": 10000
}
}'
```
```json theme={null}
{
"providers": {
"openai": {
"keys": [
{
"name": "openai-key-1",
"value": "env.OPENAI_API_KEY",
"models": ["*"],
"weight": 1.0
}
],
"network_config": {
"max_retries": 5,
"retry_backoff_initial": 1,
"retry_backoff_max": 10000
}
}
}
}
```
### Custom Concurrency and Buffer Size
Fine-tune performance by adjusting worker concurrency and queue sizes per provider (defaults are 1000 workers and 5000 queue size). This example gives OpenAI higher limits (100 workers, 500 queue) for high throughput, while Anthropic gets conservative limits to respect their rate limits.
1. Navigate to **"Model Providers"** → **"Configurations"** → **"OpenAI"** → **"Provider level configuration"** → **"Network config"**
2. Set **Max Retries**: `5`
3. Set **Initial Backoff**: `1` ms
4. Set **Max Backoff**: `10000` ms
5. Save configuration
```bash theme={null}
curl --location 'http://localhost:8080/api/providers' \
--header 'Content-Type: application/json' \
--data '{
"provider": "openai",
"keys": [
{
"name": "openai-key-1",
"value": "env.OPENAI_API_KEY",
"models": ["*"],
"weight": 1.0
}
],
"network_config": {
"max_retries": 5,
"retry_backoff_initial": 1,
"retry_backoff_max": 10000
}
}'
```
```json theme={null}
{
"providers": {
"openai": {
"keys": [
{
"name": "openai-key-1",
"value": "env.OPENAI_API_KEY",
"models": ["*"],
"weight": 1.0
}
],
"network_config": {
"max_retries": 5,
"retry_backoff_initial": 1,
"retry_backoff_max": 10000
}
}
}
}
```
### Custom Concurrency and Buffer Size
Fine-tune performance by adjusting worker concurrency and queue sizes per provider (defaults are 1000 workers and 5000 queue size). This example gives OpenAI higher limits (100 workers, 500 queue) for high throughput, while Anthropic gets conservative limits to respect their rate limits.
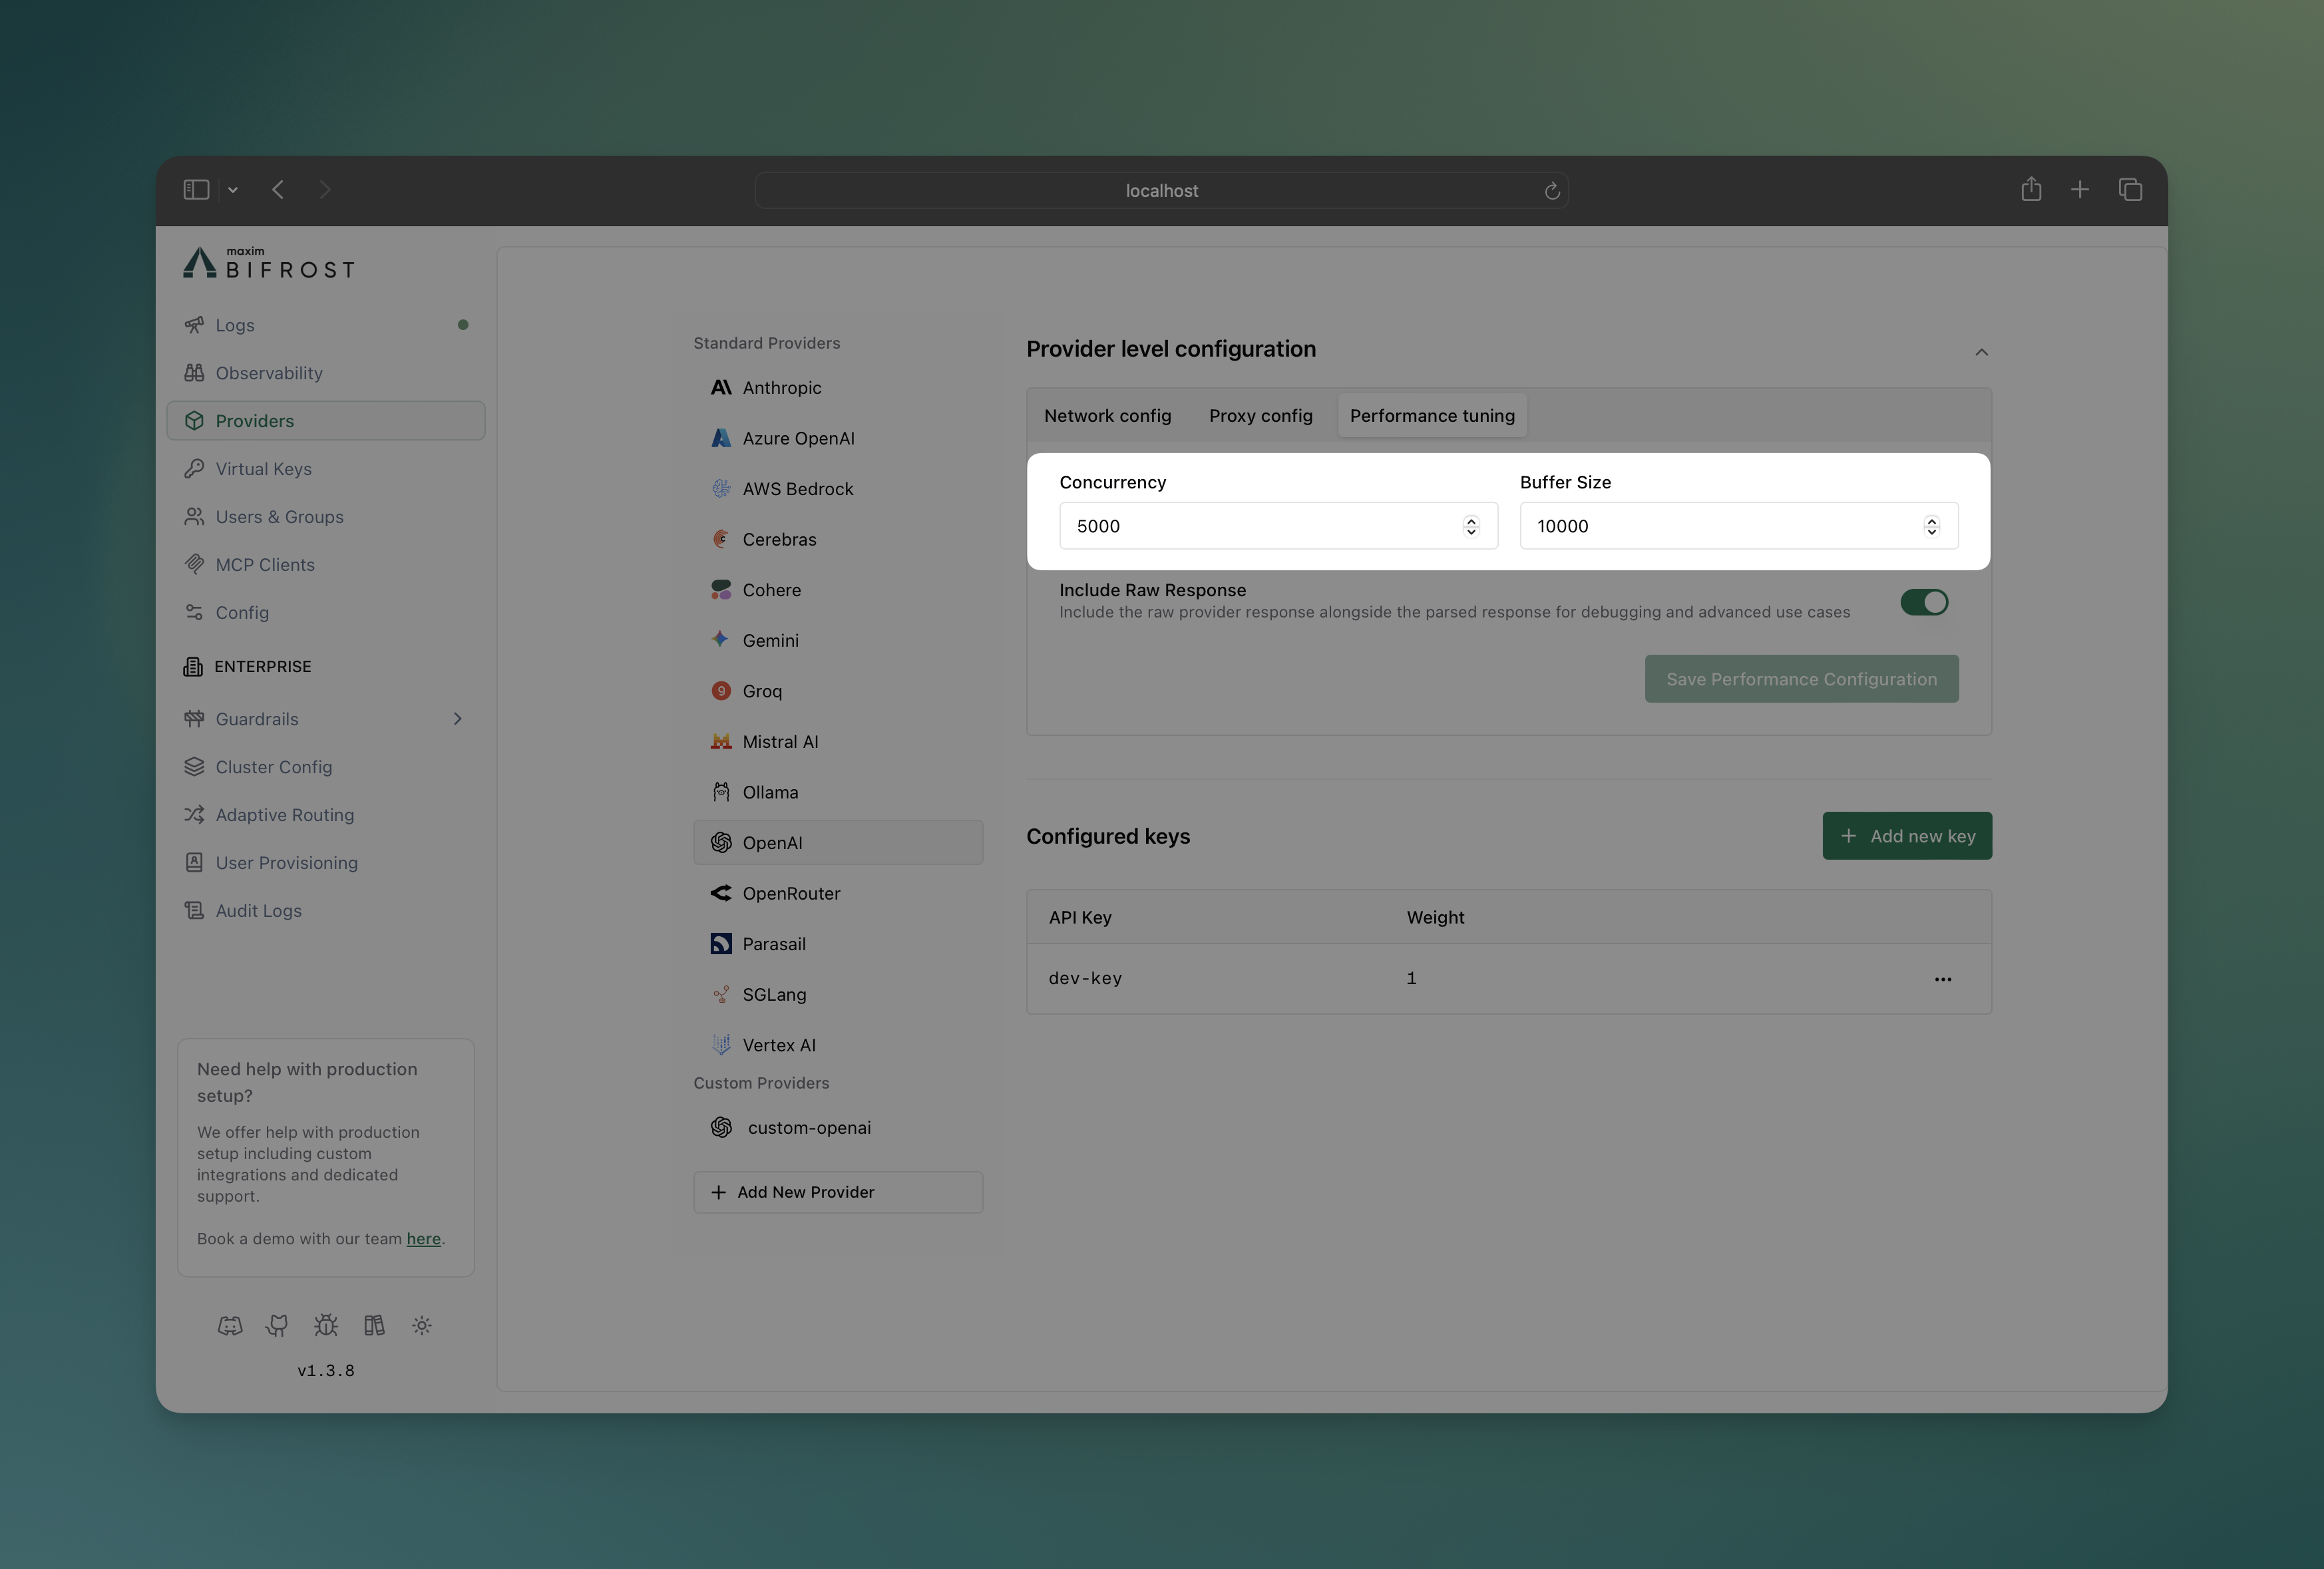 1. Navigate to **"Model Providers"** → **"Configurations"** → **{Provider}** → **"Provider level configuration"** → **"Performance tuning"**
2. Set **Concurrency**: Worker count (100 for OpenAI, 25 for Anthropic)
3. Set **Buffer Size**: Queue size (500 for OpenAI, 100 for Anthropic)
4. Save configuration
```bash theme={null}
# OpenAI with high throughput settings
curl --location 'http://localhost:8080/api/providers' \
--header 'Content-Type: application/json' \
--data '{
"provider": "openai",
"keys": [
{
"name": "openai-key-1",
"value": "env.OPENAI_API_KEY",
"models": ["*"],
"weight": 1.0
}
],
"concurrency_and_buffer_size": {
"concurrency": 100,
"buffer_size": 500
}
}'
# Anthropic with conservative settings
curl --location 'http://localhost:8080/api/providers' \
--header 'Content-Type: application/json' \
--data '{
"provider": "anthropic",
"keys": [
{
"name": "openai-key-1",
"value": "env.ANTHROPIC_API_KEY",
"models": ["*"],
"weight": 1.0
}
],
"concurrency_and_buffer_size": {
"concurrency": 25,
"buffer_size": 100
}
}'
```
```json theme={null}
{
"providers": {
"openai": {
"keys": [
{
"name": "openai-key-1",
"value": "env.OPENAI_API_KEY",
"models": ["*"],
"weight": 1.0
}
],
"concurrency_and_buffer_size": {
"concurrency": 100,
"buffer_size": 500
}
},
"anthropic": {
"keys": [
{
"name": "anthropic-key-1",
"value": "env.ANTHROPIC_API_KEY",
"models": ["*"],
"weight": 1.0
}
],
"concurrency_and_buffer_size": {
"concurrency": 25,
"buffer_size": 100
}
}
}
}
```
### Custom Headers
Bifrost supports two ways to add custom headers to provider requests: **static headers** configured at the provider level, and **dynamic headers** passed per-request.
#### Static Headers (Provider Level)
Configure headers that are automatically included in every request to a specific provider. This is useful for provider-specific requirements, API versioning, or organizational metadata.
1. Navigate to **"Model Providers"** → **"Configurations"** → **{Provider}** → **"Provider level configuration"** → **"Performance tuning"**
2. Set **Concurrency**: Worker count (100 for OpenAI, 25 for Anthropic)
3. Set **Buffer Size**: Queue size (500 for OpenAI, 100 for Anthropic)
4. Save configuration
```bash theme={null}
# OpenAI with high throughput settings
curl --location 'http://localhost:8080/api/providers' \
--header 'Content-Type: application/json' \
--data '{
"provider": "openai",
"keys": [
{
"name": "openai-key-1",
"value": "env.OPENAI_API_KEY",
"models": ["*"],
"weight": 1.0
}
],
"concurrency_and_buffer_size": {
"concurrency": 100,
"buffer_size": 500
}
}'
# Anthropic with conservative settings
curl --location 'http://localhost:8080/api/providers' \
--header 'Content-Type: application/json' \
--data '{
"provider": "anthropic",
"keys": [
{
"name": "openai-key-1",
"value": "env.ANTHROPIC_API_KEY",
"models": ["*"],
"weight": 1.0
}
],
"concurrency_and_buffer_size": {
"concurrency": 25,
"buffer_size": 100
}
}'
```
```json theme={null}
{
"providers": {
"openai": {
"keys": [
{
"name": "openai-key-1",
"value": "env.OPENAI_API_KEY",
"models": ["*"],
"weight": 1.0
}
],
"concurrency_and_buffer_size": {
"concurrency": 100,
"buffer_size": 500
}
},
"anthropic": {
"keys": [
{
"name": "anthropic-key-1",
"value": "env.ANTHROPIC_API_KEY",
"models": ["*"],
"weight": 1.0
}
],
"concurrency_and_buffer_size": {
"concurrency": 25,
"buffer_size": 100
}
}
}
}
```
### Custom Headers
Bifrost supports two ways to add custom headers to provider requests: **static headers** configured at the provider level, and **dynamic headers** passed per-request.
#### Static Headers (Provider Level)
Configure headers that are automatically included in every request to a specific provider. This is useful for provider-specific requirements, API versioning, or organizational metadata.
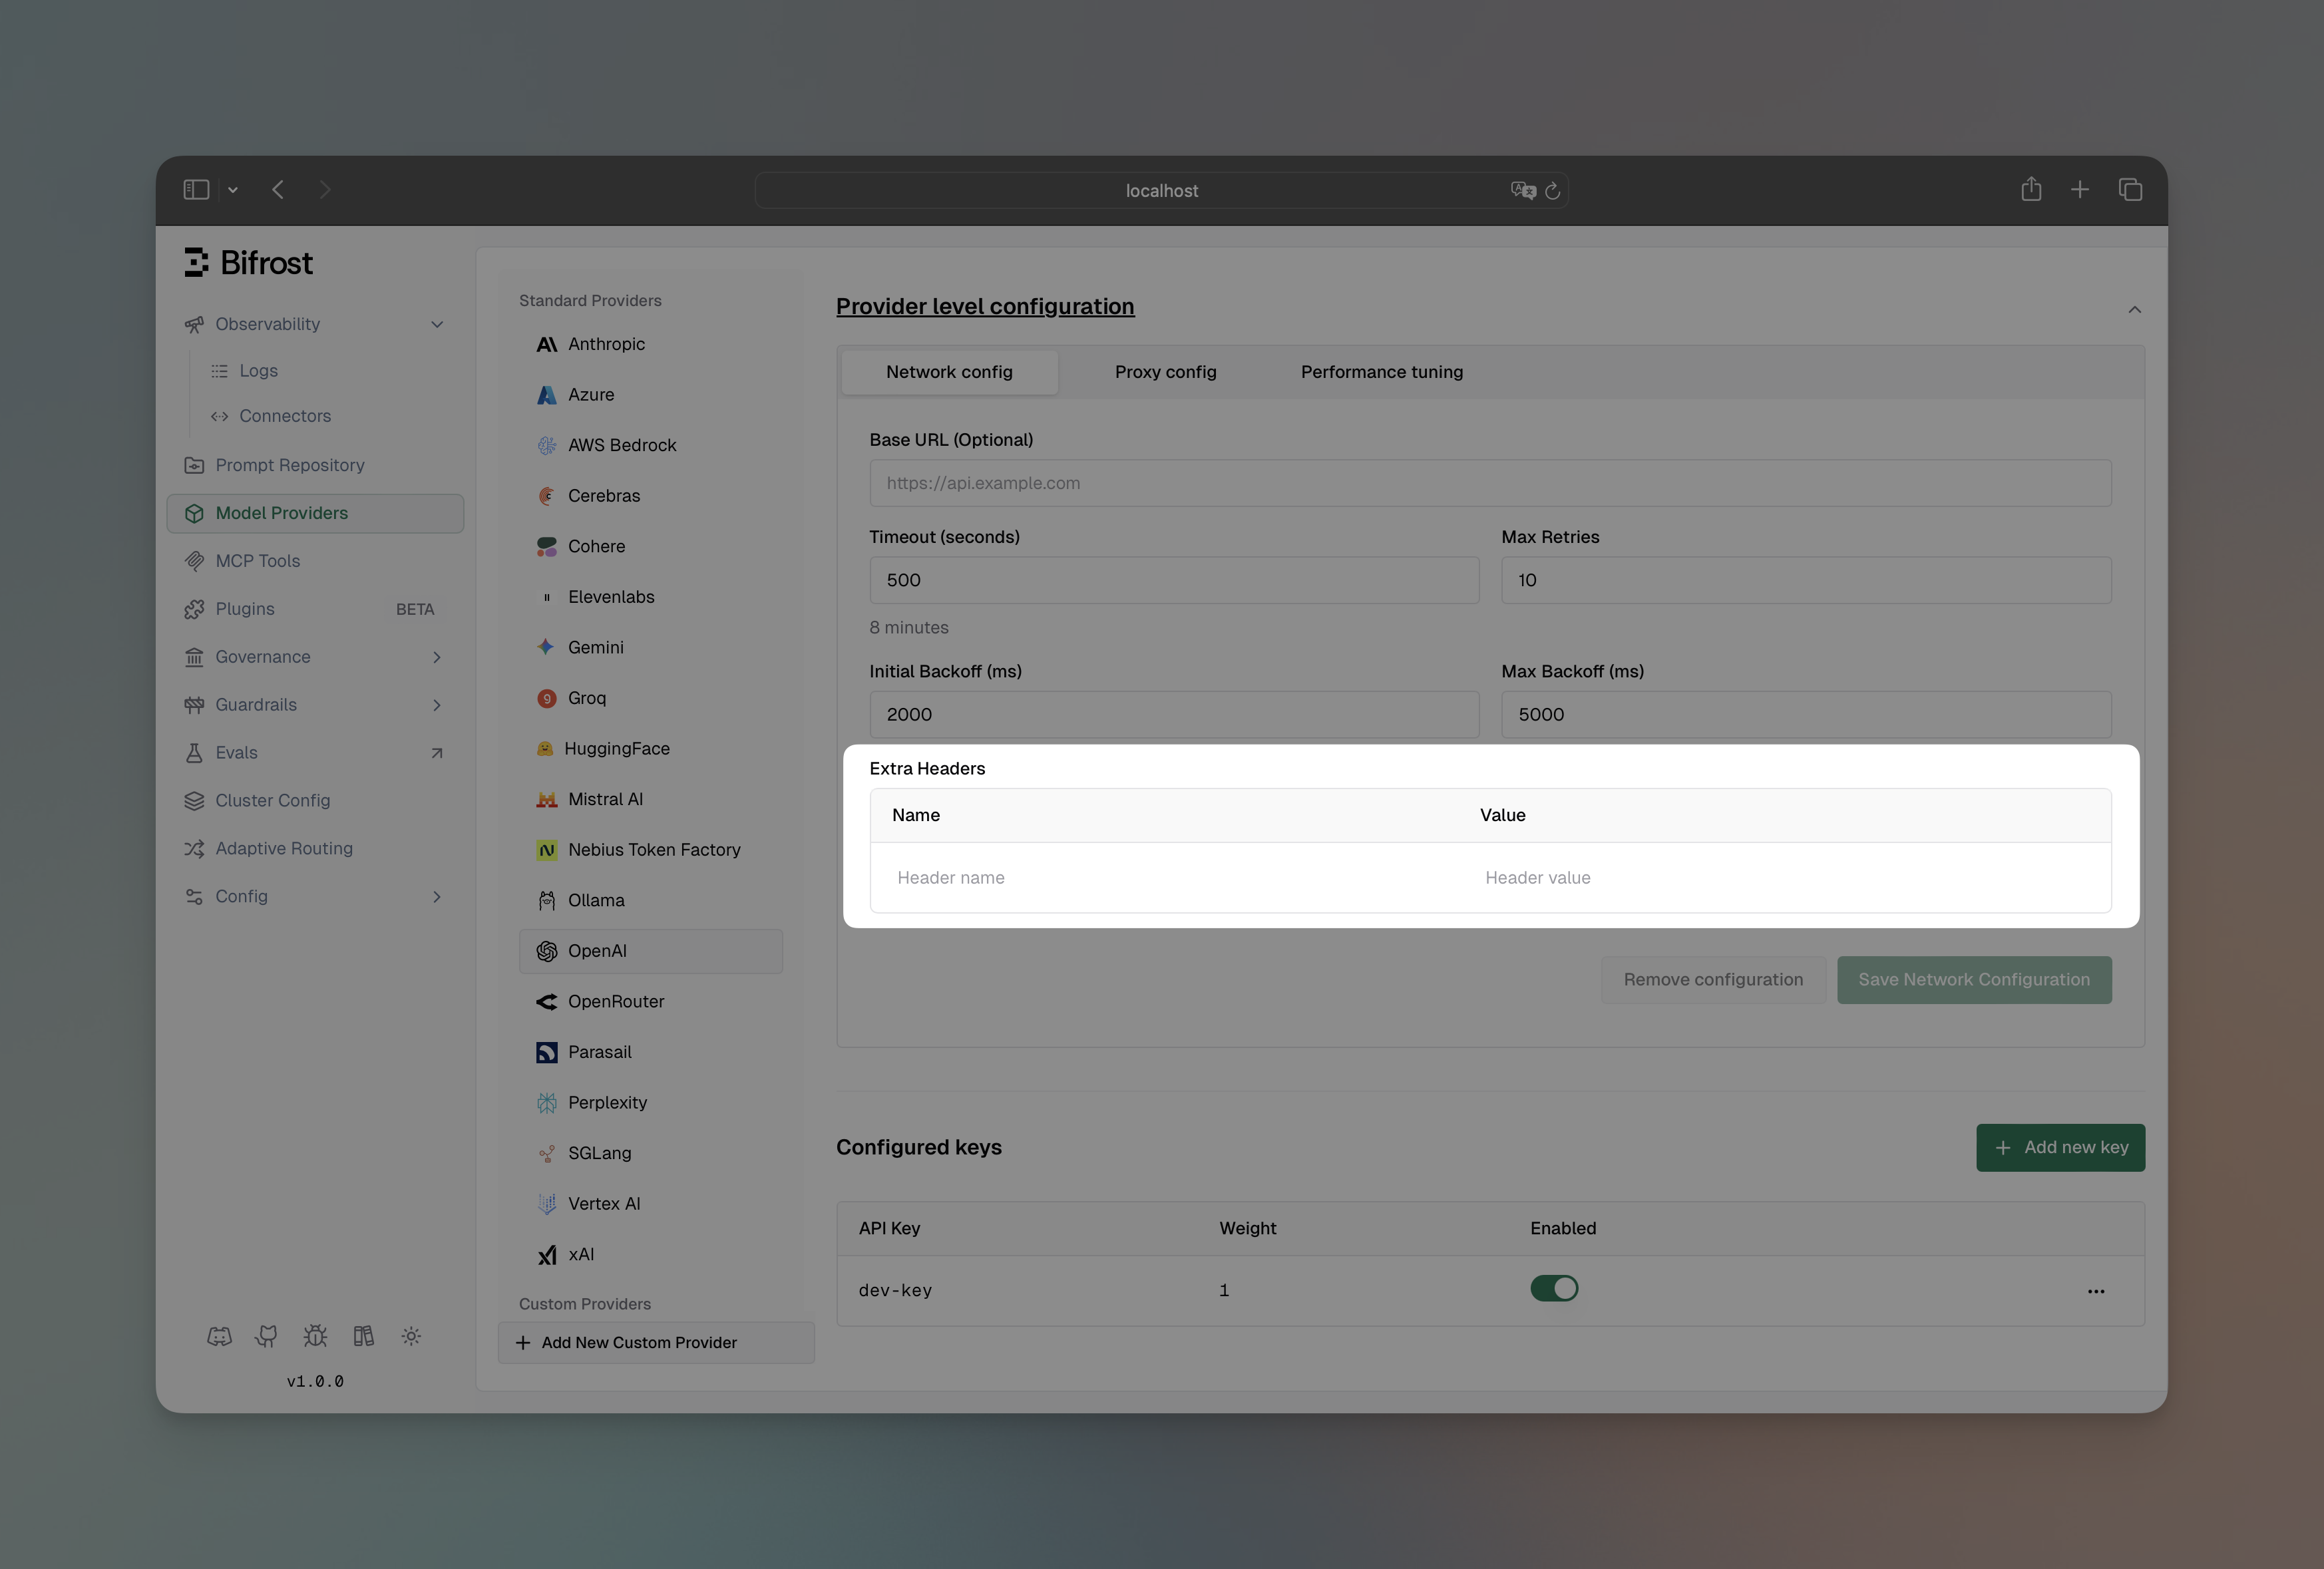 1. Navigate to **"Model Providers"** → **"Configurations"** → **"OpenAI"** → **"Provider level configuration"** → **"Network config"**
2. Add headers in the **"Extra Headers"** section
3. Save configuration
```bash theme={null}
curl --location 'http://localhost:8080/api/providers' \
--header 'Content-Type: application/json' \
--data '{
"provider": "openai",
"keys": [
{
"name": "openai-key-1",
"value": "env.OPENAI_API_KEY",
"models": ["*"],
"weight": 1.0
}
],
"network_config": {
"extra_headers": {
"x-custom-org": "my-organization",
"x-environment": "production"
}
}
}'
```
```json theme={null}
{
"providers": {
"openai": {
"keys": [
{
"name": "openai-key-1",
"value": "env.OPENAI_API_KEY",
"models": ["*"],
"weight": 1.0
}
],
"network_config": {
"extra_headers": {
"x-custom-org": "my-organization",
"x-environment": "production"
}
}
}
}
}
```
#### Dynamic Headers (Per Request)
Send custom headers with individual requests using the `x-bf-eh-*` prefix. Headers are automatically propagated to the provider after stripping the prefix. This is useful for request-specific metadata, user identification, or custom tracking information.
```bash theme={null}
curl --location 'http://localhost:8080/v1/chat/completions' \
--header 'Content-Type: application/json' \
--header 'x-bf-eh-user-id: user-123' \
--header 'x-bf-eh-tracking-id: trace-456' \
--data '{
"model": "openai/gpt-4o-mini",
"messages": [
{"role": "user", "content": "Hello!"}
]
}'
```
The `x-bf-eh-` prefix is stripped before forwarding, so `x-bf-eh-user-id` becomes `user-id` in the request to the provider.
**Example use cases:**
* User identification: `x-bf-eh-user-id`, `x-bf-eh-tenant-id`
* Request tracking: `x-bf-eh-correlation-id`, `x-bf-eh-trace-id`
* Custom metadata: `x-bf-eh-department`, `x-bf-eh-cost-center`
* A/B testing: `x-bf-eh-experiment-id`, `x-bf-eh-variant`
#### Security Denylist
Bifrost maintains a security denylist of headers that are never forwarded to providers, regardless of configuration:
```go theme={null}
denylist := map[string]bool{
"proxy-authorization": true,
"cookie": true,
"host": true,
"content-length": true,
"connection": true,
"transfer-encoding": true,
// prevent auth/key overrides via x-bf-eh-*
"x-api-key": true,
"x-goog-api-key": true,
"x-bf-api-key": true,
"x-bf-vk": true,
}
```
This denylist is applied to both static and dynamic headers to prevent security vulnerabilities.
#### Beta Header Overrides
For Anthropic-family providers (Anthropic, Vertex, Bedrock, Azure), Bifrost maintains a default support matrix for `anthropic-beta` headers. You can override these defaults per provider when upstream support changes before Bifrost updates its defaults.
1. Navigate to **"Model Providers"** → **"Configurations"** → select your provider → **"Beta Headers"** tab
2. Each known beta header shows its default support status
3. Use the override dropdown to set **Enabled**, **Disabled**, or **Default** (use built-in defaults)
4. Save configuration
```bash theme={null}
curl --location --request PUT 'http://localhost:8080/api/providers/vertex' \
--header 'Content-Type: application/json' \
--data '{
"network_config": {
"beta_header_overrides": {
"redact-thinking-": true,
"fast-mode-": false
}
}
}'
```
```json theme={null}
{
"providers": {
"vertex": {
"network_config": {
"beta_header_overrides": {
"redact-thinking-": true,
"fast-mode-": false
}
}
}
}
}
```
Override keys are beta header **prefixes** (e.g. `"redact-thinking-"`), not full header values. This ensures overrides apply regardless of date-versioned header bumps. See the full support matrix in the [Anthropic provider docs](/providers/supported-providers/anthropic#beta-headers).
### Setting Up a Proxy
Route requests through proxies for compliance, security, or geographic requirements. This example shows both HTTP proxy for OpenAI and authenticated SOCKS5 proxy for Anthropic, useful for corporate environments or regional access.
1. Navigate to **"Model Providers"** → **"Configurations"** → **"OpenAI"** → **"Provider level configuration"** → **"Network config"**
2. Add headers in the **"Extra Headers"** section
3. Save configuration
```bash theme={null}
curl --location 'http://localhost:8080/api/providers' \
--header 'Content-Type: application/json' \
--data '{
"provider": "openai",
"keys": [
{
"name": "openai-key-1",
"value": "env.OPENAI_API_KEY",
"models": ["*"],
"weight": 1.0
}
],
"network_config": {
"extra_headers": {
"x-custom-org": "my-organization",
"x-environment": "production"
}
}
}'
```
```json theme={null}
{
"providers": {
"openai": {
"keys": [
{
"name": "openai-key-1",
"value": "env.OPENAI_API_KEY",
"models": ["*"],
"weight": 1.0
}
],
"network_config": {
"extra_headers": {
"x-custom-org": "my-organization",
"x-environment": "production"
}
}
}
}
}
```
#### Dynamic Headers (Per Request)
Send custom headers with individual requests using the `x-bf-eh-*` prefix. Headers are automatically propagated to the provider after stripping the prefix. This is useful for request-specific metadata, user identification, or custom tracking information.
```bash theme={null}
curl --location 'http://localhost:8080/v1/chat/completions' \
--header 'Content-Type: application/json' \
--header 'x-bf-eh-user-id: user-123' \
--header 'x-bf-eh-tracking-id: trace-456' \
--data '{
"model": "openai/gpt-4o-mini",
"messages": [
{"role": "user", "content": "Hello!"}
]
}'
```
The `x-bf-eh-` prefix is stripped before forwarding, so `x-bf-eh-user-id` becomes `user-id` in the request to the provider.
**Example use cases:**
* User identification: `x-bf-eh-user-id`, `x-bf-eh-tenant-id`
* Request tracking: `x-bf-eh-correlation-id`, `x-bf-eh-trace-id`
* Custom metadata: `x-bf-eh-department`, `x-bf-eh-cost-center`
* A/B testing: `x-bf-eh-experiment-id`, `x-bf-eh-variant`
#### Security Denylist
Bifrost maintains a security denylist of headers that are never forwarded to providers, regardless of configuration:
```go theme={null}
denylist := map[string]bool{
"proxy-authorization": true,
"cookie": true,
"host": true,
"content-length": true,
"connection": true,
"transfer-encoding": true,
// prevent auth/key overrides via x-bf-eh-*
"x-api-key": true,
"x-goog-api-key": true,
"x-bf-api-key": true,
"x-bf-vk": true,
}
```
This denylist is applied to both static and dynamic headers to prevent security vulnerabilities.
#### Beta Header Overrides
For Anthropic-family providers (Anthropic, Vertex, Bedrock, Azure), Bifrost maintains a default support matrix for `anthropic-beta` headers. You can override these defaults per provider when upstream support changes before Bifrost updates its defaults.
1. Navigate to **"Model Providers"** → **"Configurations"** → select your provider → **"Beta Headers"** tab
2. Each known beta header shows its default support status
3. Use the override dropdown to set **Enabled**, **Disabled**, or **Default** (use built-in defaults)
4. Save configuration
```bash theme={null}
curl --location --request PUT 'http://localhost:8080/api/providers/vertex' \
--header 'Content-Type: application/json' \
--data '{
"network_config": {
"beta_header_overrides": {
"redact-thinking-": true,
"fast-mode-": false
}
}
}'
```
```json theme={null}
{
"providers": {
"vertex": {
"network_config": {
"beta_header_overrides": {
"redact-thinking-": true,
"fast-mode-": false
}
}
}
}
}
```
Override keys are beta header **prefixes** (e.g. `"redact-thinking-"`), not full header values. This ensures overrides apply regardless of date-versioned header bumps. See the full support matrix in the [Anthropic provider docs](/providers/supported-providers/anthropic#beta-headers).
### Setting Up a Proxy
Route requests through proxies for compliance, security, or geographic requirements. This example shows both HTTP proxy for OpenAI and authenticated SOCKS5 proxy for Anthropic, useful for corporate environments or regional access.
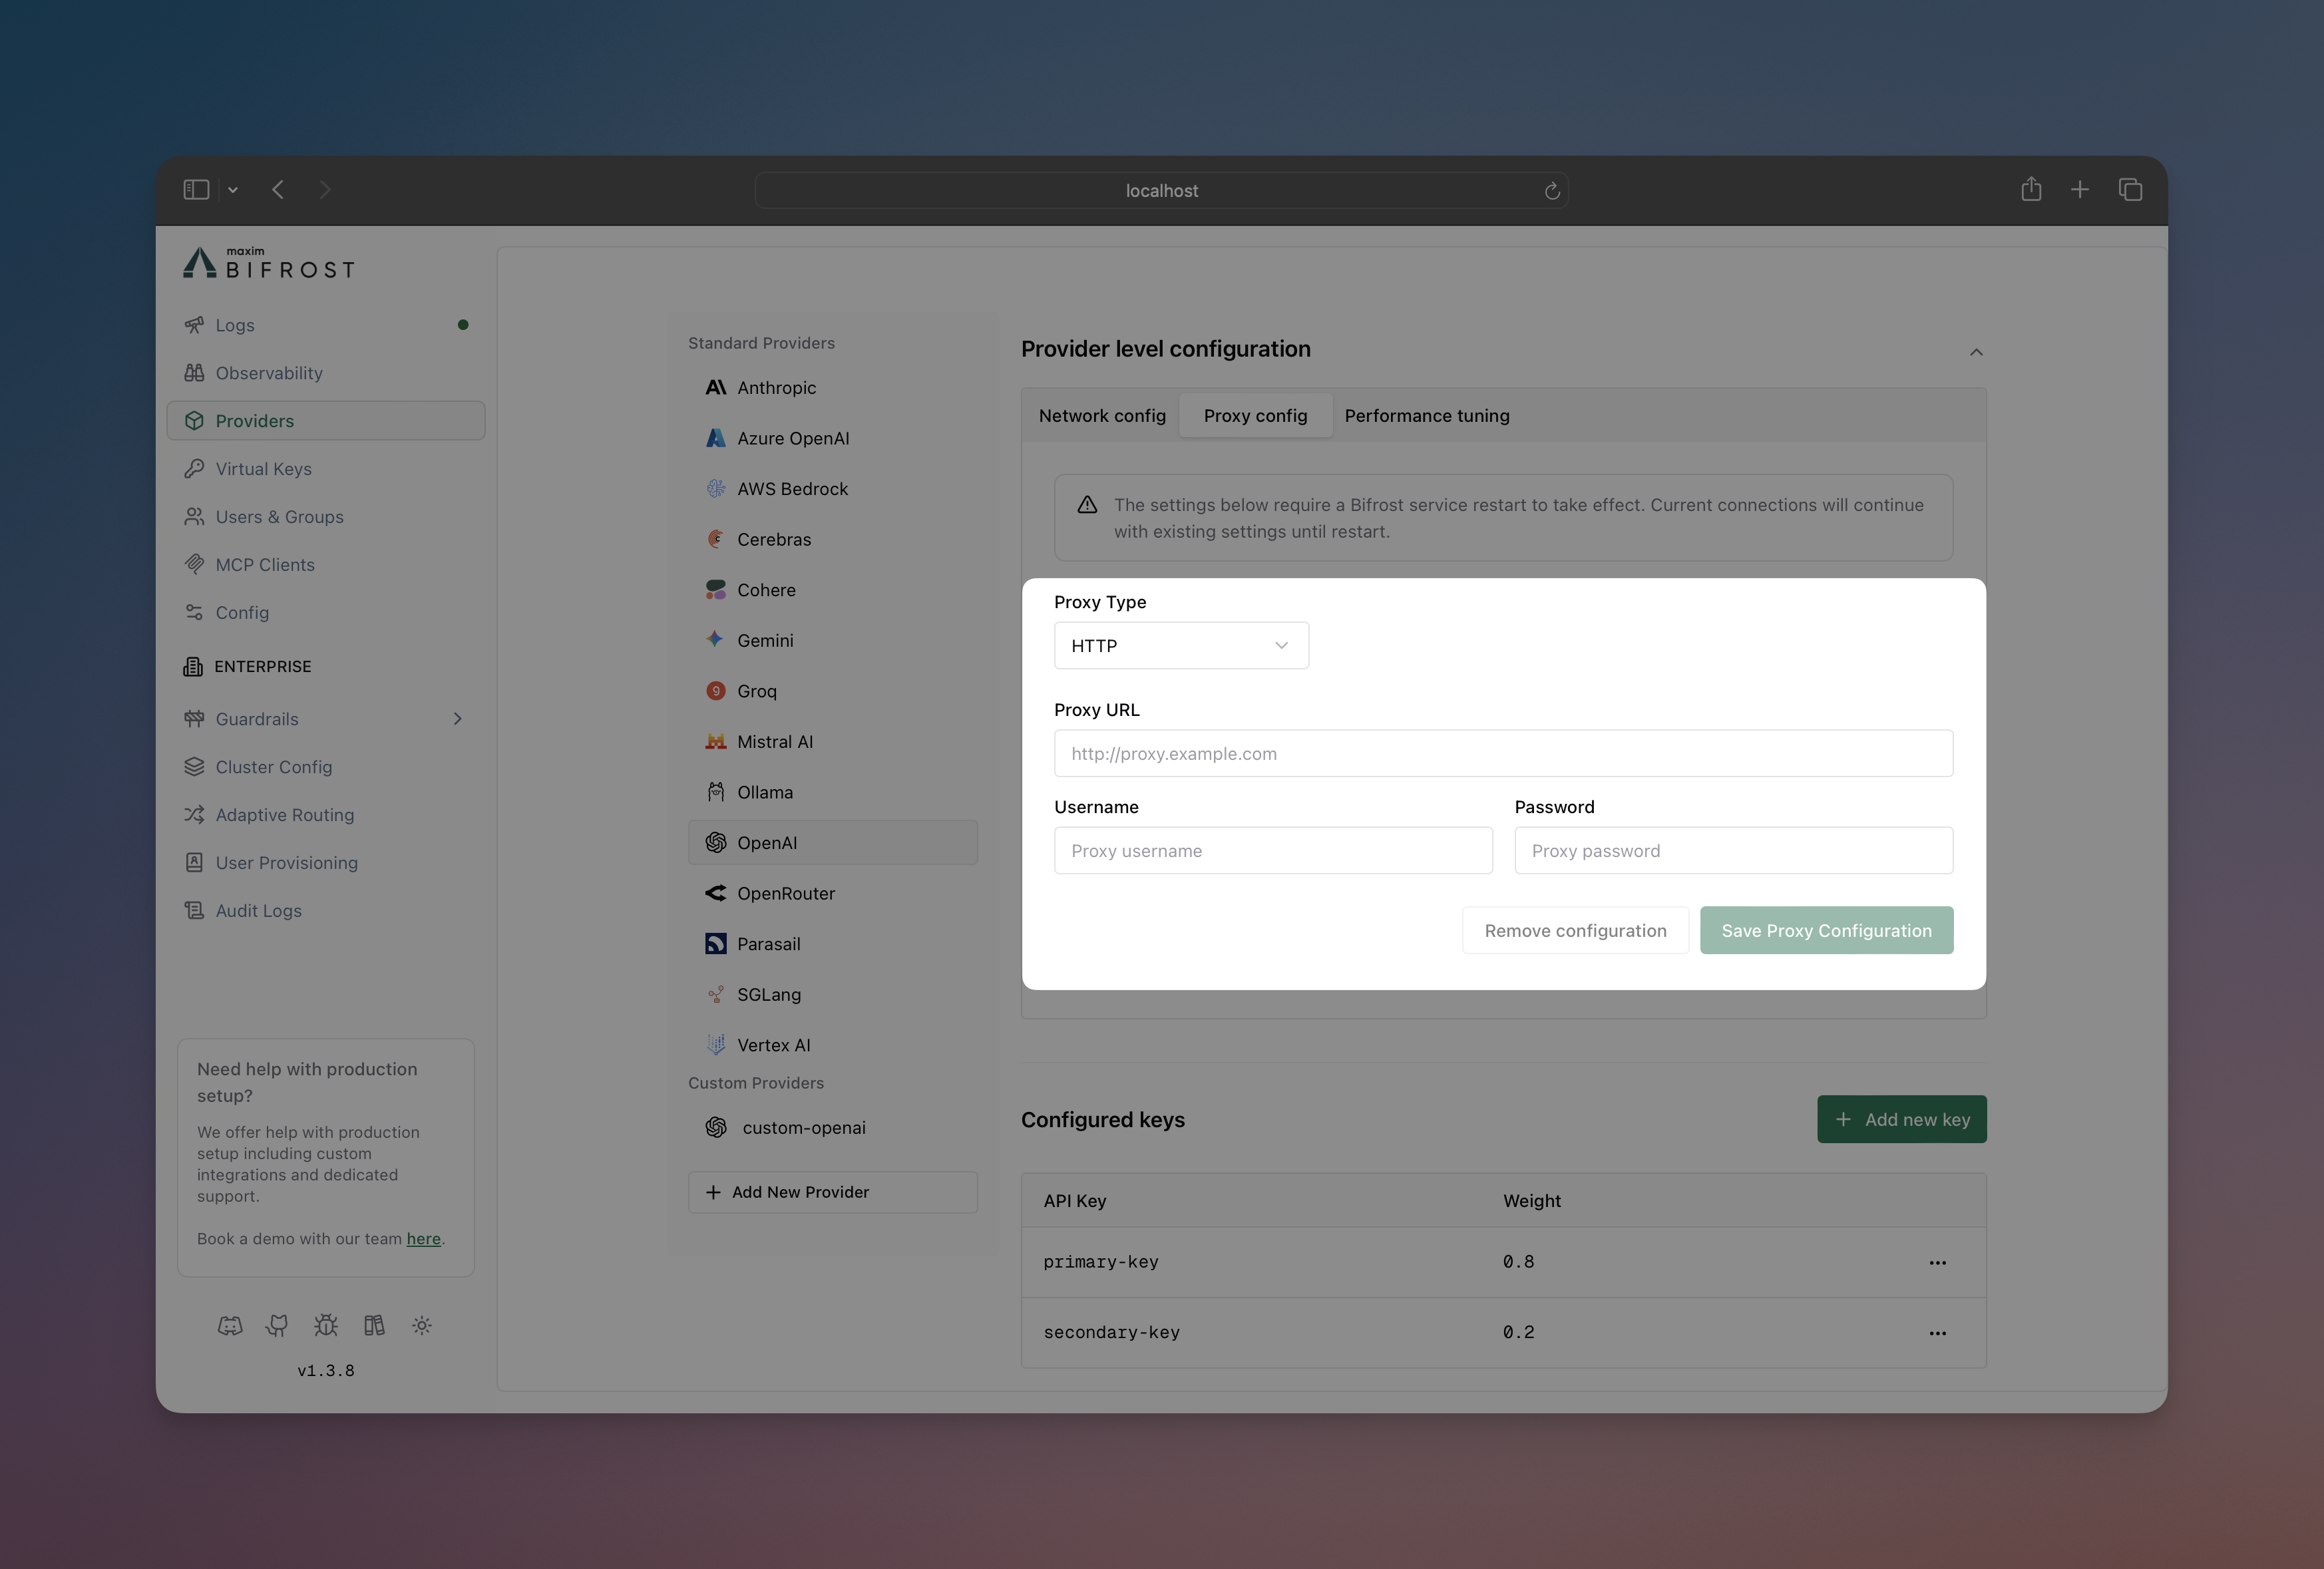 1. Navigate to **"Model Providers"** → **"Configurations"** → **{Provider}** → **"Provider level configuration"** → **"Proxy config"**
2. Select **Proxy Type**: HTTP or SOCKS5
3. Set **Proxy URL**: `http://localhost:8000`
4. Add credentials if needed (username/password)
5. Save configuration
```bash theme={null}
# HTTP proxy for OpenAI
curl --location 'http://localhost:8080/api/providers' \
--header 'Content-Type: application/json' \
--data '{
"provider": "openai",
"keys": [
{
"name": "openai-key-1",
"value": "env.OPENAI_API_KEY",
"models": ["*"],
"weight": 1.0
}
],
"proxy_config": {
"type": "http",
"url": "http://localhost:8000"
}
}'
# SOCKS5 proxy with authentication for Anthropic
curl --location 'http://localhost:8080/api/providers' \
--header 'Content-Type: application/json' \
--data '{
"provider": "anthropic",
"keys": [
{
"name": "anthropic-key-1",
"value": "env.ANTHROPIC_API_KEY",
"models": ["*"],
"weight": 1.0
}
],
"proxy_config": {
"type": "socks5",
"url": "http://localhost:8000",
"username": "user",
"password": "password"
}
}'
```
```json theme={null}
{
"providers": {
"openai": {
"keys": [
{
"name": "openai-key-1",
"value": "env.OPENAI_API_KEY",
"models": ["*"],
"weight": 1.0
}
],
"proxy_config": {
"type": "http",
"url": "http://localhost:8000"
}
},
"anthropic": {
"keys": [
{
"name": "anthropic-key-1",
"value": "env.ANTHROPIC_API_KEY",
"models": ["*"],
"weight": 1.0
}
],
"proxy_config": {
"type": "socks5",
"url": "http://localhost:8000",
"username": "user",
"password": "password"
}
}
}
}
```
### Send Back Raw Response
Include the original provider response alongside Bifrost's standardized response format. Useful for debugging and accessing provider-specific metadata.
You can override this per request using the `x-bf-send-back-raw-response`
header (`"true"` or `"false"`), regardless of the provider-level config. See
[Request Options](../../providers/request-options#send-back-raw-response) for
details.
1. Navigate to **"Model Providers"** → **"Configurations"** → **{Provider}** → **"Provider level configuration"** → **"Proxy config"**
2. Select **Proxy Type**: HTTP or SOCKS5
3. Set **Proxy URL**: `http://localhost:8000`
4. Add credentials if needed (username/password)
5. Save configuration
```bash theme={null}
# HTTP proxy for OpenAI
curl --location 'http://localhost:8080/api/providers' \
--header 'Content-Type: application/json' \
--data '{
"provider": "openai",
"keys": [
{
"name": "openai-key-1",
"value": "env.OPENAI_API_KEY",
"models": ["*"],
"weight": 1.0
}
],
"proxy_config": {
"type": "http",
"url": "http://localhost:8000"
}
}'
# SOCKS5 proxy with authentication for Anthropic
curl --location 'http://localhost:8080/api/providers' \
--header 'Content-Type: application/json' \
--data '{
"provider": "anthropic",
"keys": [
{
"name": "anthropic-key-1",
"value": "env.ANTHROPIC_API_KEY",
"models": ["*"],
"weight": 1.0
}
],
"proxy_config": {
"type": "socks5",
"url": "http://localhost:8000",
"username": "user",
"password": "password"
}
}'
```
```json theme={null}
{
"providers": {
"openai": {
"keys": [
{
"name": "openai-key-1",
"value": "env.OPENAI_API_KEY",
"models": ["*"],
"weight": 1.0
}
],
"proxy_config": {
"type": "http",
"url": "http://localhost:8000"
}
},
"anthropic": {
"keys": [
{
"name": "anthropic-key-1",
"value": "env.ANTHROPIC_API_KEY",
"models": ["*"],
"weight": 1.0
}
],
"proxy_config": {
"type": "socks5",
"url": "http://localhost:8000",
"username": "user",
"password": "password"
}
}
}
}
```
### Send Back Raw Response
Include the original provider response alongside Bifrost's standardized response format. Useful for debugging and accessing provider-specific metadata.
You can override this per request using the `x-bf-send-back-raw-response`
header (`"true"` or `"false"`), regardless of the provider-level config. See
[Request Options](../../providers/request-options#send-back-raw-response) for
details.
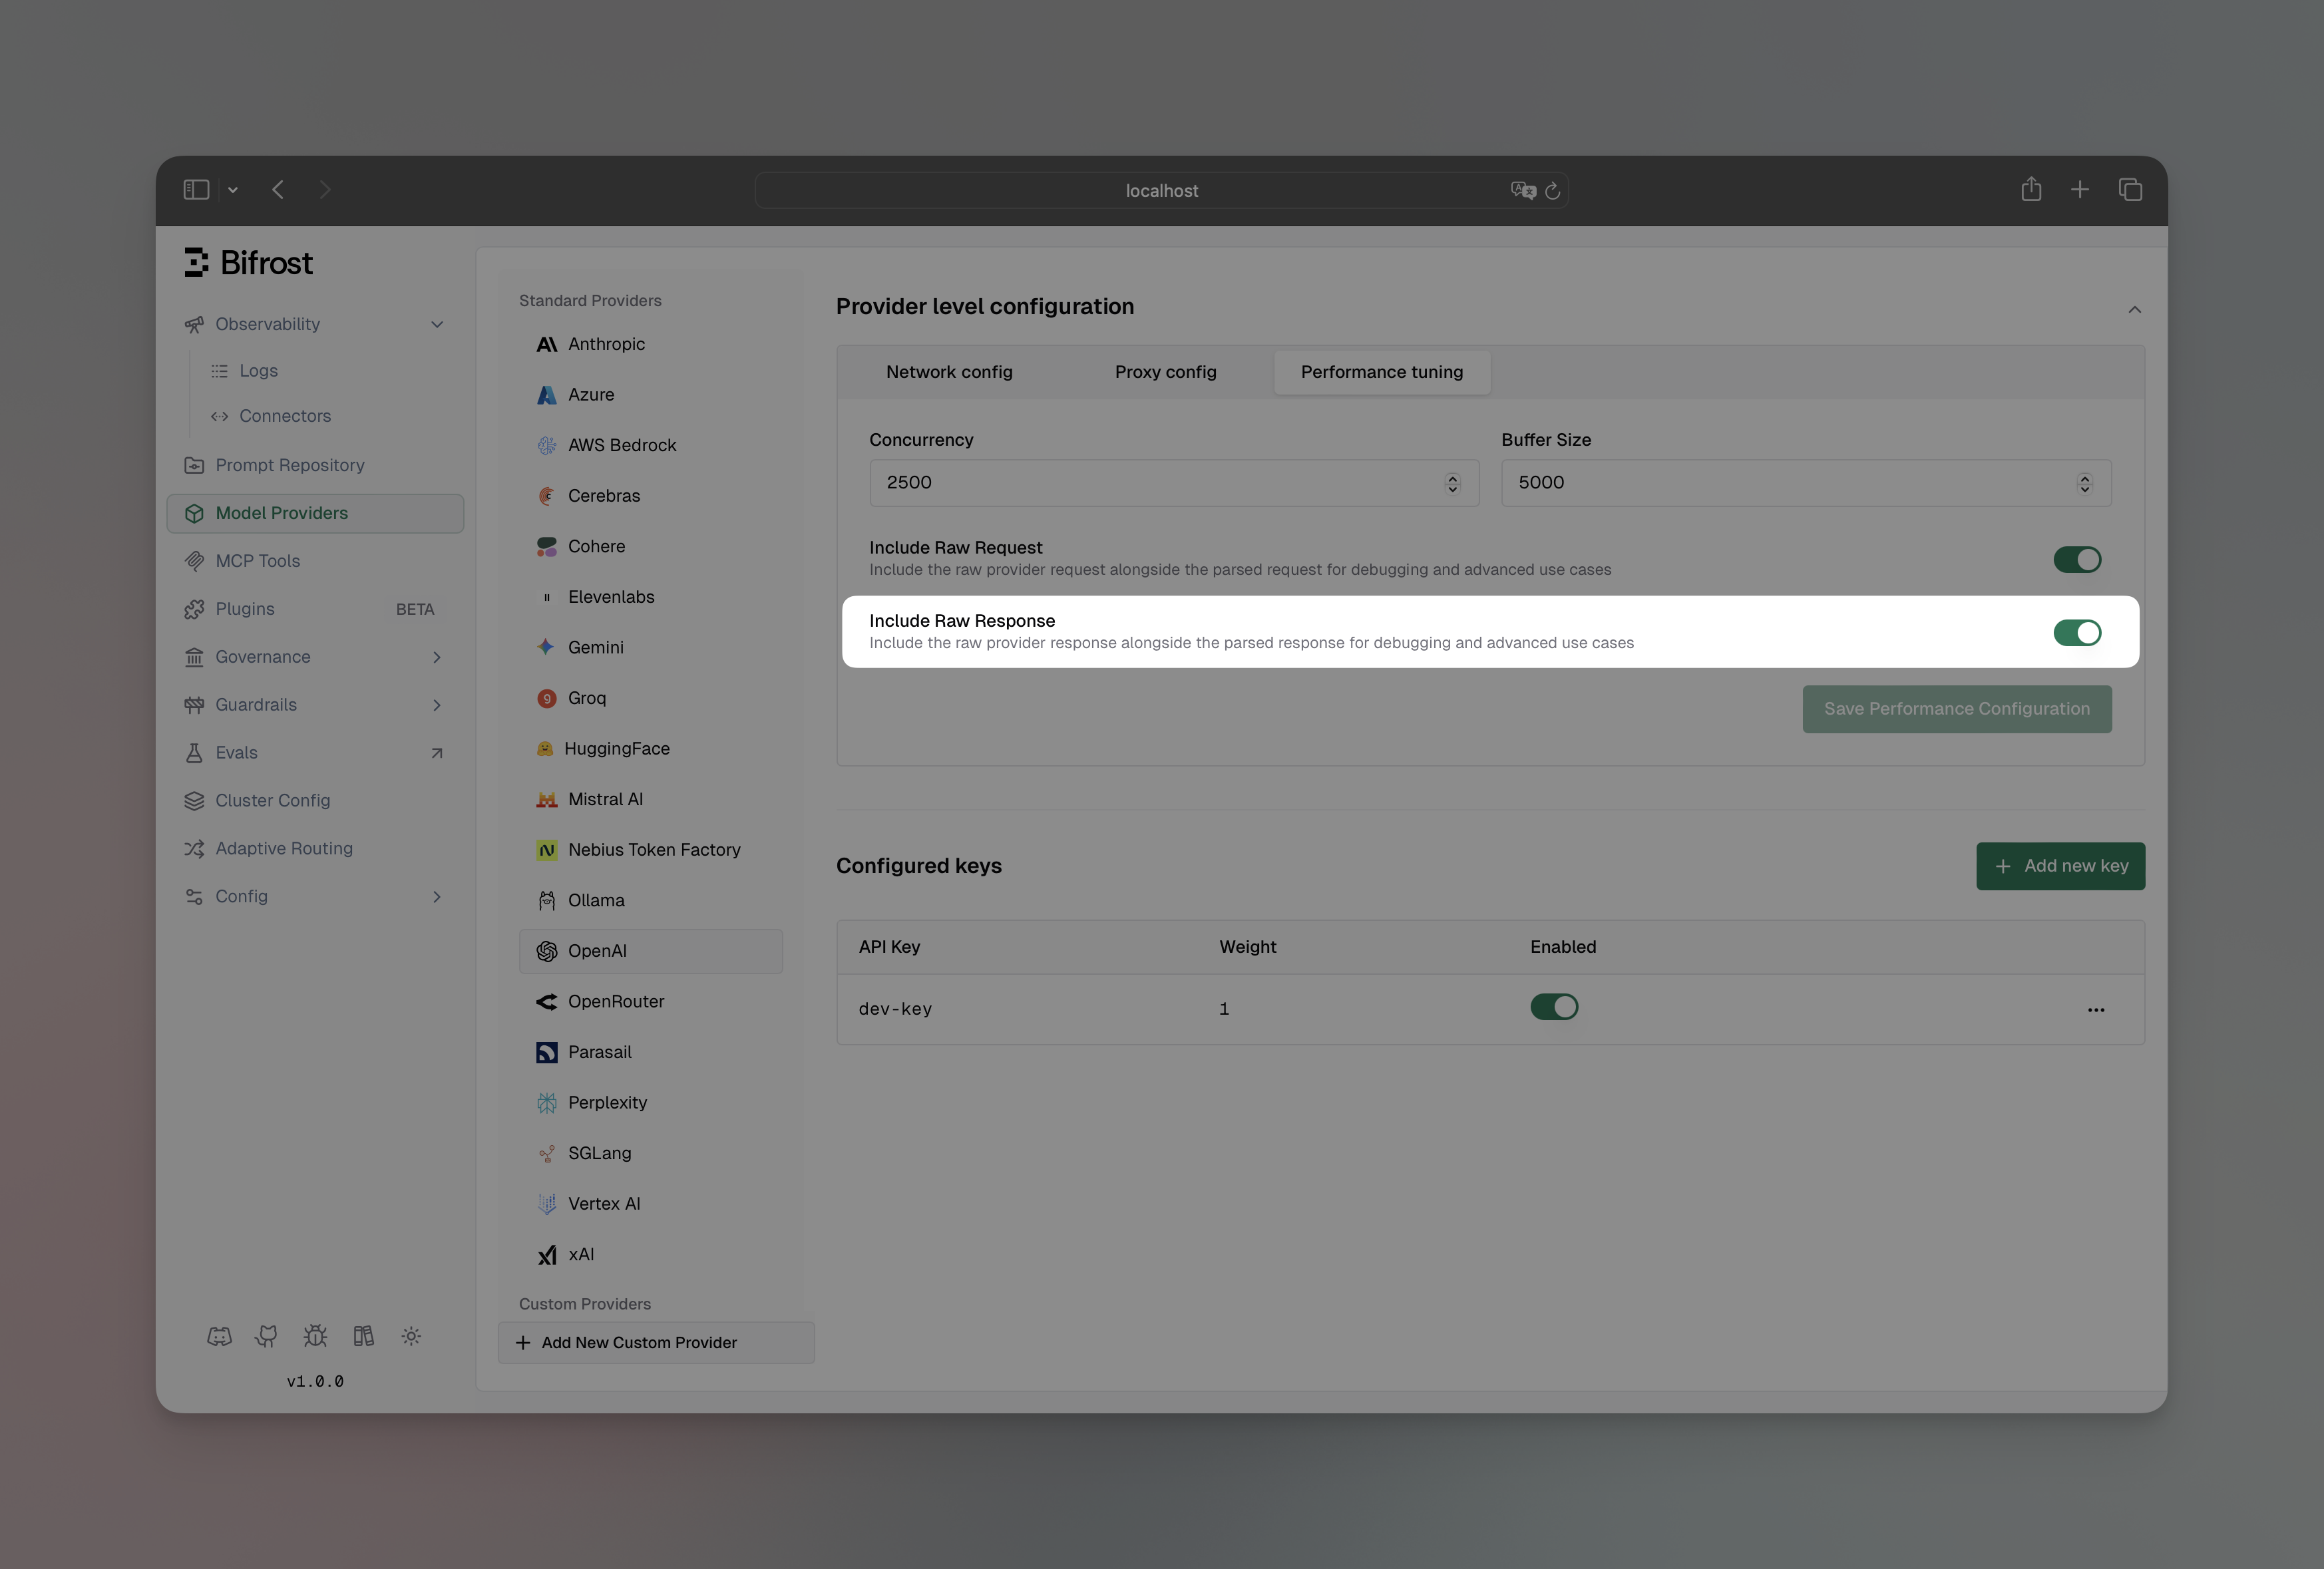 1. Navigate to **"Model Providers"** → **"Configurations"** → **{Provider}** → **"Provider level configuration"** → **"Performance tuning"**
2. Toggle **"Include Raw Response"** to enabled
3. Save configuration
```bash theme={null}
curl --location 'http://localhost:8080/api/providers' \
--header 'Content-Type: application/json' \
--data '{
"provider": "openai",
"keys": [
{
"name": "openai-key-1",
"value": "env.OPENAI_API_KEY",
"models": ["*"],
"weight": 1.0
}
],
"send_back_raw_response": true
}'
```
```json theme={null}
{
"providers": {
"openai": {
"keys": [
{
"name": "openai-key-1",
"value": "env.OPENAI_API_KEY",
"models": ["*"],
"weight": 1.0
}
],
"send_back_raw_response": true
}
}
}
```
When enabled, the raw provider response appears in `extra_fields.raw_response`:
```json theme={null}
{
"choices": [...],
"usage": {...},
"extra_fields": {
"provider": "openai",
"raw_response": {
// Original OpenAI response here
}
}
}
```
### Send Back Raw Request
Include the original request sent to the provider alongside Bifrost's response. Useful for debugging request transformations and verifying what was actually sent to the provider.
You can override this per request using the `x-bf-send-back-raw-request`
header (`"true"` or `"false"`), regardless of the provider-level config. See
[Request Options](../../providers/request-options#send-back-raw-request) for
details.
1. Navigate to **"Model Providers"** → **"Configurations"** → **{Provider}** → **"Provider level configuration"** → **"Performance tuning"**
2. Toggle **"Include Raw Response"** to enabled
3. Save configuration
```bash theme={null}
curl --location 'http://localhost:8080/api/providers' \
--header 'Content-Type: application/json' \
--data '{
"provider": "openai",
"keys": [
{
"name": "openai-key-1",
"value": "env.OPENAI_API_KEY",
"models": ["*"],
"weight": 1.0
}
],
"send_back_raw_response": true
}'
```
```json theme={null}
{
"providers": {
"openai": {
"keys": [
{
"name": "openai-key-1",
"value": "env.OPENAI_API_KEY",
"models": ["*"],
"weight": 1.0
}
],
"send_back_raw_response": true
}
}
}
```
When enabled, the raw provider response appears in `extra_fields.raw_response`:
```json theme={null}
{
"choices": [...],
"usage": {...},
"extra_fields": {
"provider": "openai",
"raw_response": {
// Original OpenAI response here
}
}
}
```
### Send Back Raw Request
Include the original request sent to the provider alongside Bifrost's response. Useful for debugging request transformations and verifying what was actually sent to the provider.
You can override this per request using the `x-bf-send-back-raw-request`
header (`"true"` or `"false"`), regardless of the provider-level config. See
[Request Options](../../providers/request-options#send-back-raw-request) for
details.
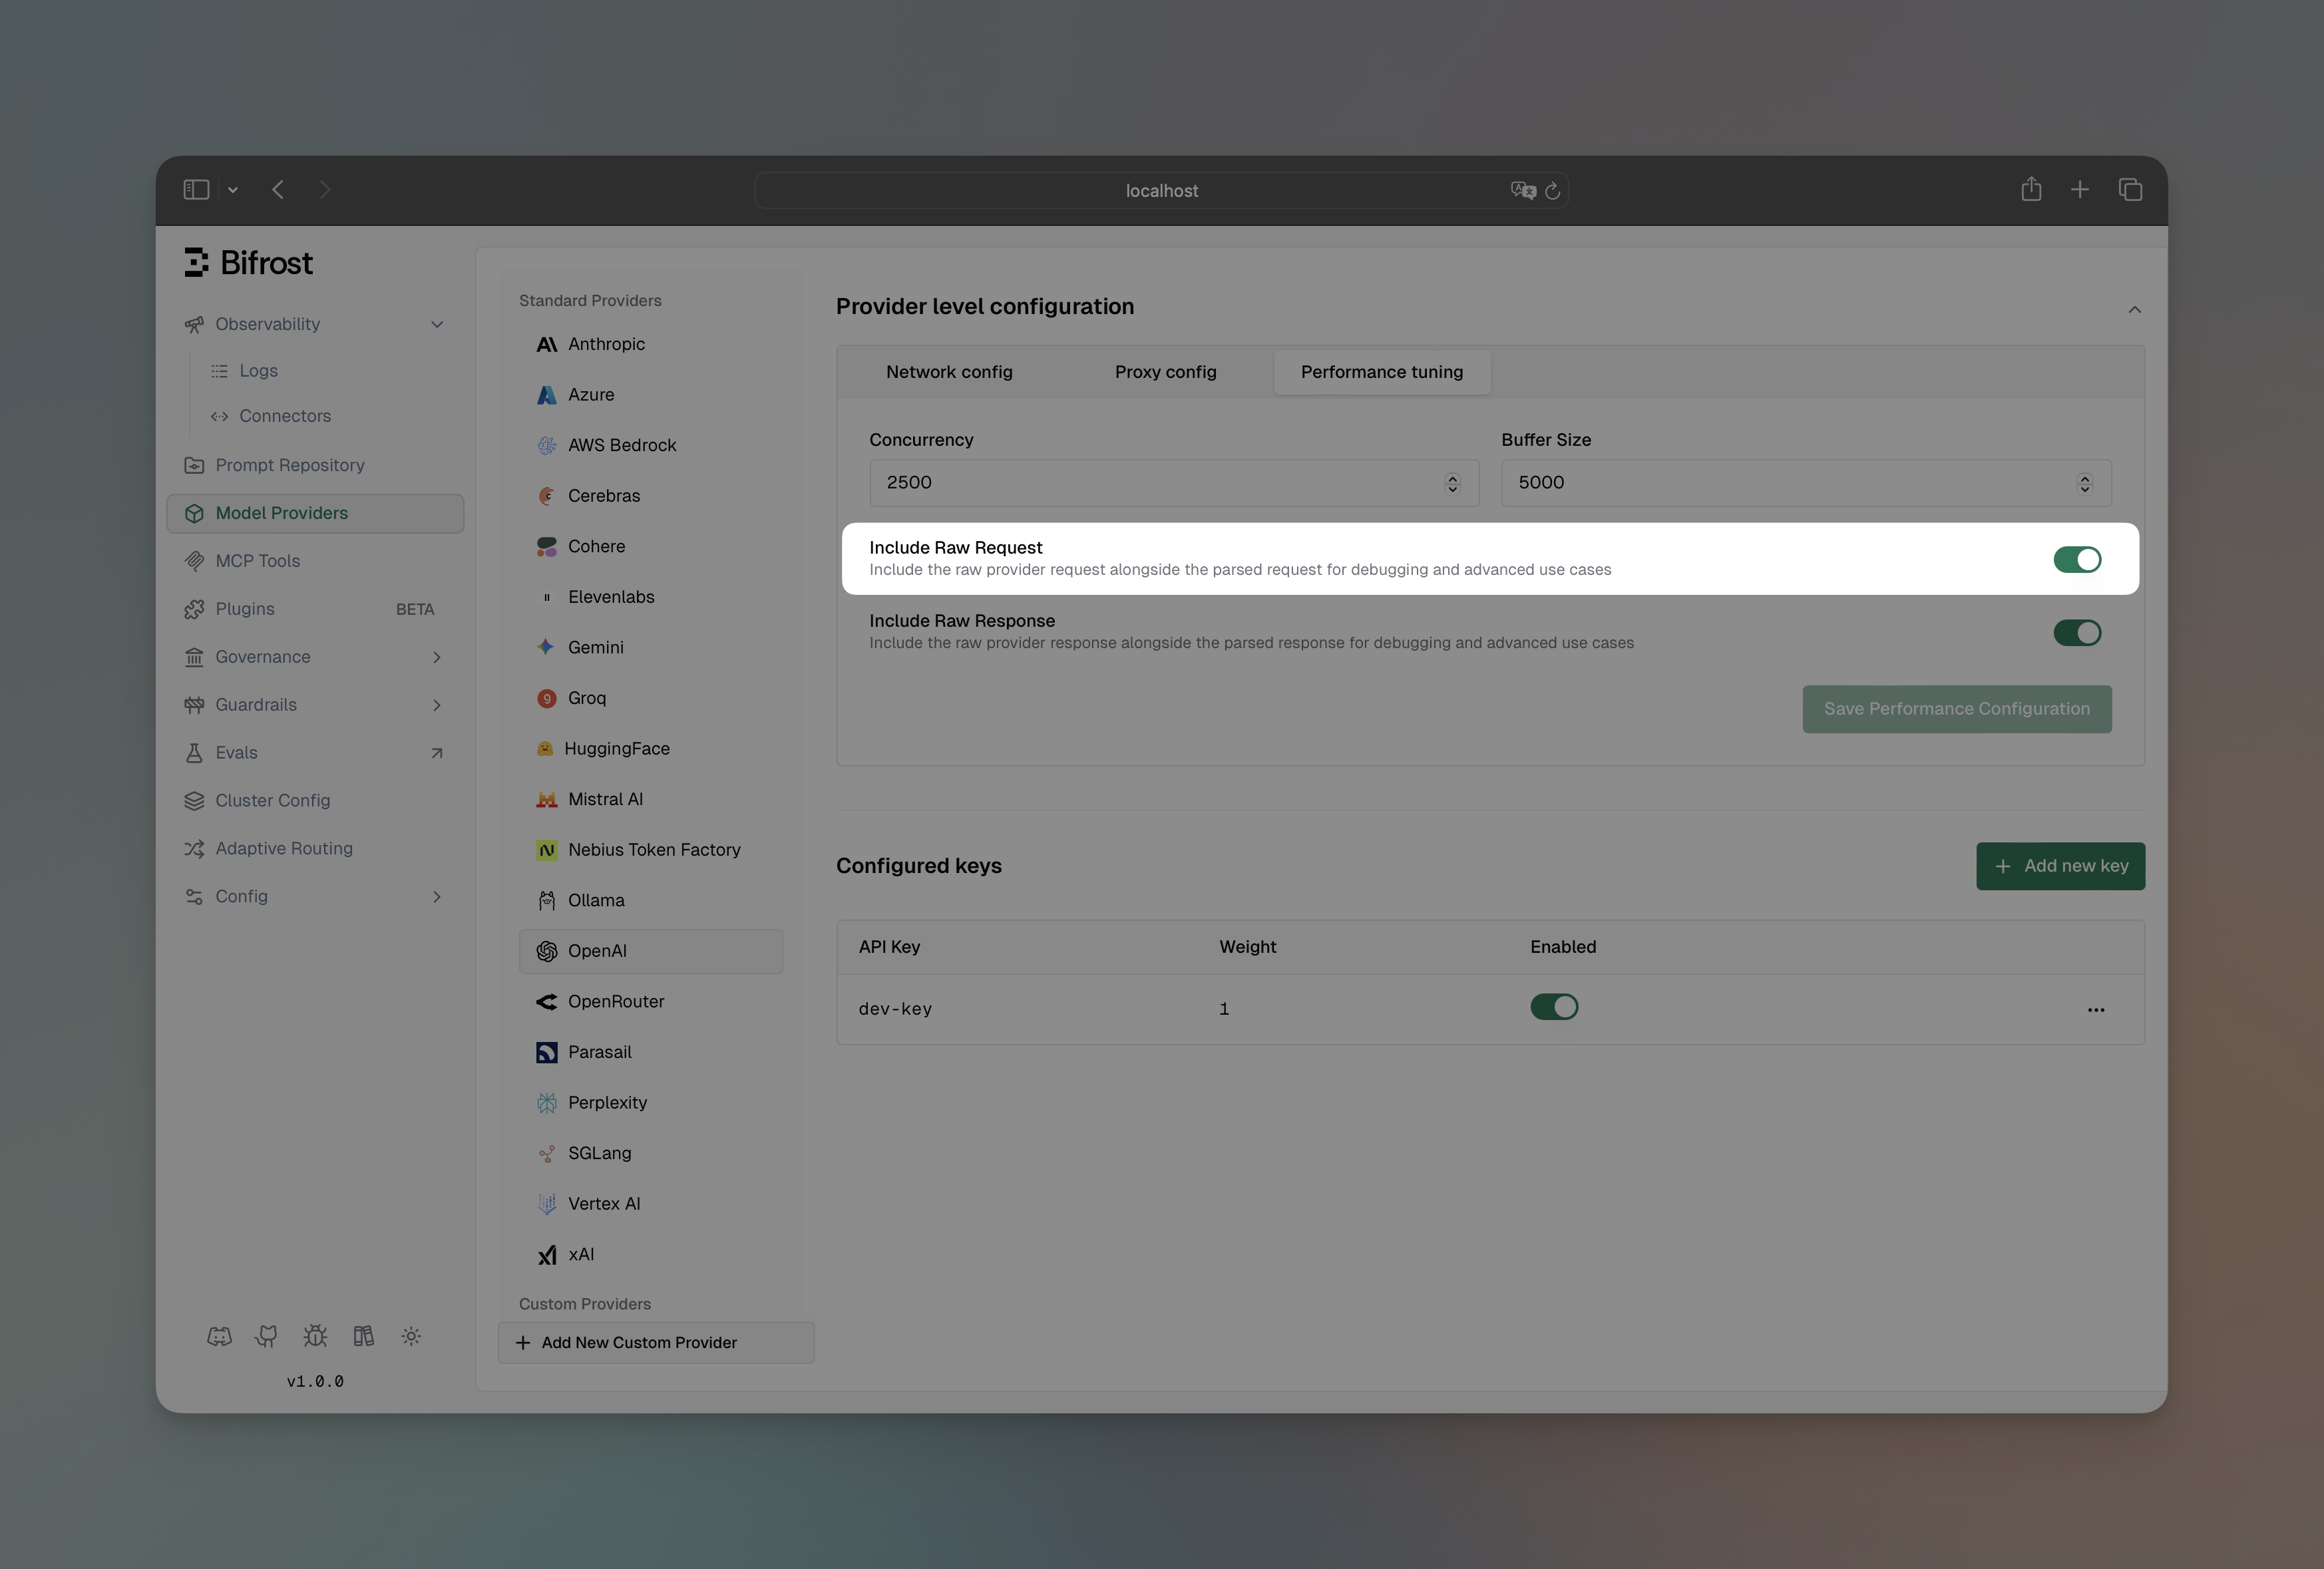 1. Navigate to **"Model Providers"** → **"Configurations"** → **{Provider}** → **"Provider level configuration"** → **"Performance tuning"**
2. Toggle **"Include Raw Request"** to enabled
3. Save configuration
```bash theme={null}
curl --location 'http://localhost:8080/api/providers' \
--header 'Content-Type: application/json' \
--data '{
"provider": "openai",
"keys": [
{
"name": "openai-key-1",
"value": "env.OPENAI_API_KEY",
"models": ["*"],
"weight": 1.0
}
],
"send_back_raw_request": true
}'
```
```json theme={null}
{
"providers": {
"openai": {
"keys": [
{
"name": "openai-key-1",
"value": "env.OPENAI_API_KEY",
"models": ["*"],
"weight": 1.0
}
],
"send_back_raw_request": true
}
}
}
```
When enabled, the raw provider request appears in `extra_fields.raw_request`:
```json theme={null}
{
"choices": [...],
"usage": {...},
"extra_fields": {
"provider": "openai",
"raw_request": {
// Original request sent to OpenAI here
}
}
}
```
You can enable both `send_back_raw_request` and `send_back_raw_response`
together to see the complete request-response cycle for debugging purposes.
### Store Raw Request/Response
Persist the raw provider request and response in the log record. This is orthogonal to `send_back_raw_request` and `send_back_raw_response` - enabling this does not affect whether raw data appears in the API response, and enabling send-back does not automatically store raw data in logs. Enable both to do both.
1. Navigate to **"Model Providers"** → **"Configurations"** → **{Provider}** → **"Provider level configuration"** → **"Performance tuning"**
2. Toggle **"Store Raw Request/Response"** to enabled
3. Save configuration
```bash theme={null}
curl --location 'http://localhost:8080/api/providers' \
--header 'Content-Type: application/json' \
--data '{
"provider": "openai",
"keys": [
{
"name": "openai-key-1",
"value": "env.OPENAI_API_KEY",
"models": ["*"],
"weight": 1.0
}
],
"store_raw_request_response": true
}'
```
```json theme={null}
{
"providers": {
"openai": {
"keys": [
{
"name": "openai-key-1",
"value": "env.OPENAI_API_KEY",
"models": ["*"],
"weight": 1.0
}
],
"store_raw_request_response": true
}
}
}
```
`store_raw_request_response` only has effect when the logging plugin is active - raw data is written to the log record by the logging plugin. Without it, enabling this flag captures the data but nothing persists it.
You can override this per request using the `x-bf-store-raw-request-response` header (`"true"` or `"false"`), regardless of the provider-level config. See [Request Options](../../providers/request-options#store-raw-requestresponse) for details.
### Passthrough Extra Parameters
Enable passthrough mode for extra parameters. When enabled, any parameters in the `extra_params` field (or provider-specific extra parameter fields) will be merged directly into the request sent to the provider, bypassing Bifrost's parameter filtering.
```bash theme={null}
curl --location 'http://localhost:8080/v1/chat/completions' \
--header 'Content-Type: application/json' \
--header 'x-bf-passthrough-extra-params: true' \
--data '{
"model": "openai/gpt-4o-mini",
"messages": [
{"role": "user", "content": "Hello!"}
],
"extra_params": {
"custom_param": "value",
"another_param": 123,
"nested_param": {
"nested_key": "nested_value"
}
}
}'
```
When enabled, the extra parameters are merged into the JSON request body sent to the provider. This allows you to pass provider-specific parameters that Bifrost doesn't natively support.
* This feature only works for JSON requests, not multipart/form-data requests
* Parameters already handled by Bifrost (like `addWatermark`, `enhancePrompt`) are not duplicated - they appear in their proper location
* Nested parameters (e.g., `parameters.custom_field`) are merged recursively with existing nested structures
* See [Supported Headers](../../providers/supported-headers) for a complete list of all Bifrost headers
## Next Steps
Now that you understand provider configuration, explore these related topics:
### Essential Topics
* **[Streaming Responses](./streaming)** - Real-time response generation
* **[Tool Calling](./tool-calling)** - Enable AI to use external functions
* **[Multimodal AI](./multimodal)** - Process images, audio, and text
* **[Integrations](./integrations)** - Drop-in compatibility with existing SDKs
### Advanced Topics
* **[Core Features](../../features/)** - Advanced Bifrost capabilities
* **[Architecture](../../architecture/)** - How Bifrost works internally
* **[Deployment](../../deployment-guides)** - Production setup and scaling
1. Navigate to **"Model Providers"** → **"Configurations"** → **{Provider}** → **"Provider level configuration"** → **"Performance tuning"**
2. Toggle **"Include Raw Request"** to enabled
3. Save configuration
```bash theme={null}
curl --location 'http://localhost:8080/api/providers' \
--header 'Content-Type: application/json' \
--data '{
"provider": "openai",
"keys": [
{
"name": "openai-key-1",
"value": "env.OPENAI_API_KEY",
"models": ["*"],
"weight": 1.0
}
],
"send_back_raw_request": true
}'
```
```json theme={null}
{
"providers": {
"openai": {
"keys": [
{
"name": "openai-key-1",
"value": "env.OPENAI_API_KEY",
"models": ["*"],
"weight": 1.0
}
],
"send_back_raw_request": true
}
}
}
```
When enabled, the raw provider request appears in `extra_fields.raw_request`:
```json theme={null}
{
"choices": [...],
"usage": {...},
"extra_fields": {
"provider": "openai",
"raw_request": {
// Original request sent to OpenAI here
}
}
}
```
You can enable both `send_back_raw_request` and `send_back_raw_response`
together to see the complete request-response cycle for debugging purposes.
### Store Raw Request/Response
Persist the raw provider request and response in the log record. This is orthogonal to `send_back_raw_request` and `send_back_raw_response` - enabling this does not affect whether raw data appears in the API response, and enabling send-back does not automatically store raw data in logs. Enable both to do both.
1. Navigate to **"Model Providers"** → **"Configurations"** → **{Provider}** → **"Provider level configuration"** → **"Performance tuning"**
2. Toggle **"Store Raw Request/Response"** to enabled
3. Save configuration
```bash theme={null}
curl --location 'http://localhost:8080/api/providers' \
--header 'Content-Type: application/json' \
--data '{
"provider": "openai",
"keys": [
{
"name": "openai-key-1",
"value": "env.OPENAI_API_KEY",
"models": ["*"],
"weight": 1.0
}
],
"store_raw_request_response": true
}'
```
```json theme={null}
{
"providers": {
"openai": {
"keys": [
{
"name": "openai-key-1",
"value": "env.OPENAI_API_KEY",
"models": ["*"],
"weight": 1.0
}
],
"store_raw_request_response": true
}
}
}
```
`store_raw_request_response` only has effect when the logging plugin is active - raw data is written to the log record by the logging plugin. Without it, enabling this flag captures the data but nothing persists it.
You can override this per request using the `x-bf-store-raw-request-response` header (`"true"` or `"false"`), regardless of the provider-level config. See [Request Options](../../providers/request-options#store-raw-requestresponse) for details.
### Passthrough Extra Parameters
Enable passthrough mode for extra parameters. When enabled, any parameters in the `extra_params` field (or provider-specific extra parameter fields) will be merged directly into the request sent to the provider, bypassing Bifrost's parameter filtering.
```bash theme={null}
curl --location 'http://localhost:8080/v1/chat/completions' \
--header 'Content-Type: application/json' \
--header 'x-bf-passthrough-extra-params: true' \
--data '{
"model": "openai/gpt-4o-mini",
"messages": [
{"role": "user", "content": "Hello!"}
],
"extra_params": {
"custom_param": "value",
"another_param": 123,
"nested_param": {
"nested_key": "nested_value"
}
}
}'
```
When enabled, the extra parameters are merged into the JSON request body sent to the provider. This allows you to pass provider-specific parameters that Bifrost doesn't natively support.
* This feature only works for JSON requests, not multipart/form-data requests
* Parameters already handled by Bifrost (like `addWatermark`, `enhancePrompt`) are not duplicated - they appear in their proper location
* Nested parameters (e.g., `parameters.custom_field`) are merged recursively with existing nested structures
* See [Supported Headers](../../providers/supported-headers) for a complete list of all Bifrost headers
## Next Steps
Now that you understand provider configuration, explore these related topics:
### Essential Topics
* **[Streaming Responses](./streaming)** - Real-time response generation
* **[Tool Calling](./tool-calling)** - Enable AI to use external functions
* **[Multimodal AI](./multimodal)** - Process images, audio, and text
* **[Integrations](./integrations)** - Drop-in compatibility with existing SDKs
### Advanced Topics
* **[Core Features](../../features/)** - Advanced Bifrost capabilities
* **[Architecture](../../architecture/)** - How Bifrost works internally
* **[Deployment](../../deployment-guides)** - Production setup and scaling