> ## Documentation Index
> Fetch the complete documentation index at: https://docs.getbifrost.ai/llms.txt
> Use this file to discover all available pages before exploring further.
# Bifrost CLI
> Launch any coding agent through Bifrost with a single command. Automatic configuration, model selection, and MCP integration - no environment variables needed.
## What is Bifrost CLI?
Bifrost CLI is an interactive terminal tool that connects your favorite coding agents - Claude Code, Codex CLI, Gemini CLI, and Opencode - to your Bifrost gateway with zero manual configuration.
Instead of setting environment variables, editing config files, and looking up provider paths, you just run `bifrost` and pick your agent, model, and go.
**What it does for you:**
* Automatically configures base URLs, API keys, and model settings for each agent
* Fetches available models from your Bifrost gateway's `/v1/models` endpoint
* Installs missing agents via npm if needed
* Auto-attaches Bifrost's MCP server to Claude Code for tool access
* Launches agents inside a persistent tabbed terminal UI so you can switch sessions without re-running the CLI
* Shows per-tab activity badges so you can tell when a session is progressing, idle, or has sent an alert
* Stores your selections securely (virtual keys go to your OS keyring, never plaintext on disk)
## Installation
```bash theme={null}
npx -y @maximhq/bifrost-cli
```
This downloads and runs the latest Bifrost CLI. No global install required - npx handles everything.
Bifrost CLI requires **Node.js 18+** (for npx) and a running Bifrost gateway. See [Gateway Setup](/quickstart/gateway/setting-up) if you haven't started one yet.
### Install a Specific Version
```bash theme={null}
npx -y @maximhq/bifrost-cli --cli-version v1.0.0
```
## Quick Start
### 1. Start your Bifrost gateway
Make sure your Bifrost gateway is running. The default is `http://localhost:8080`:
```bash theme={null}
npx -y @maximhq/bifrost
```
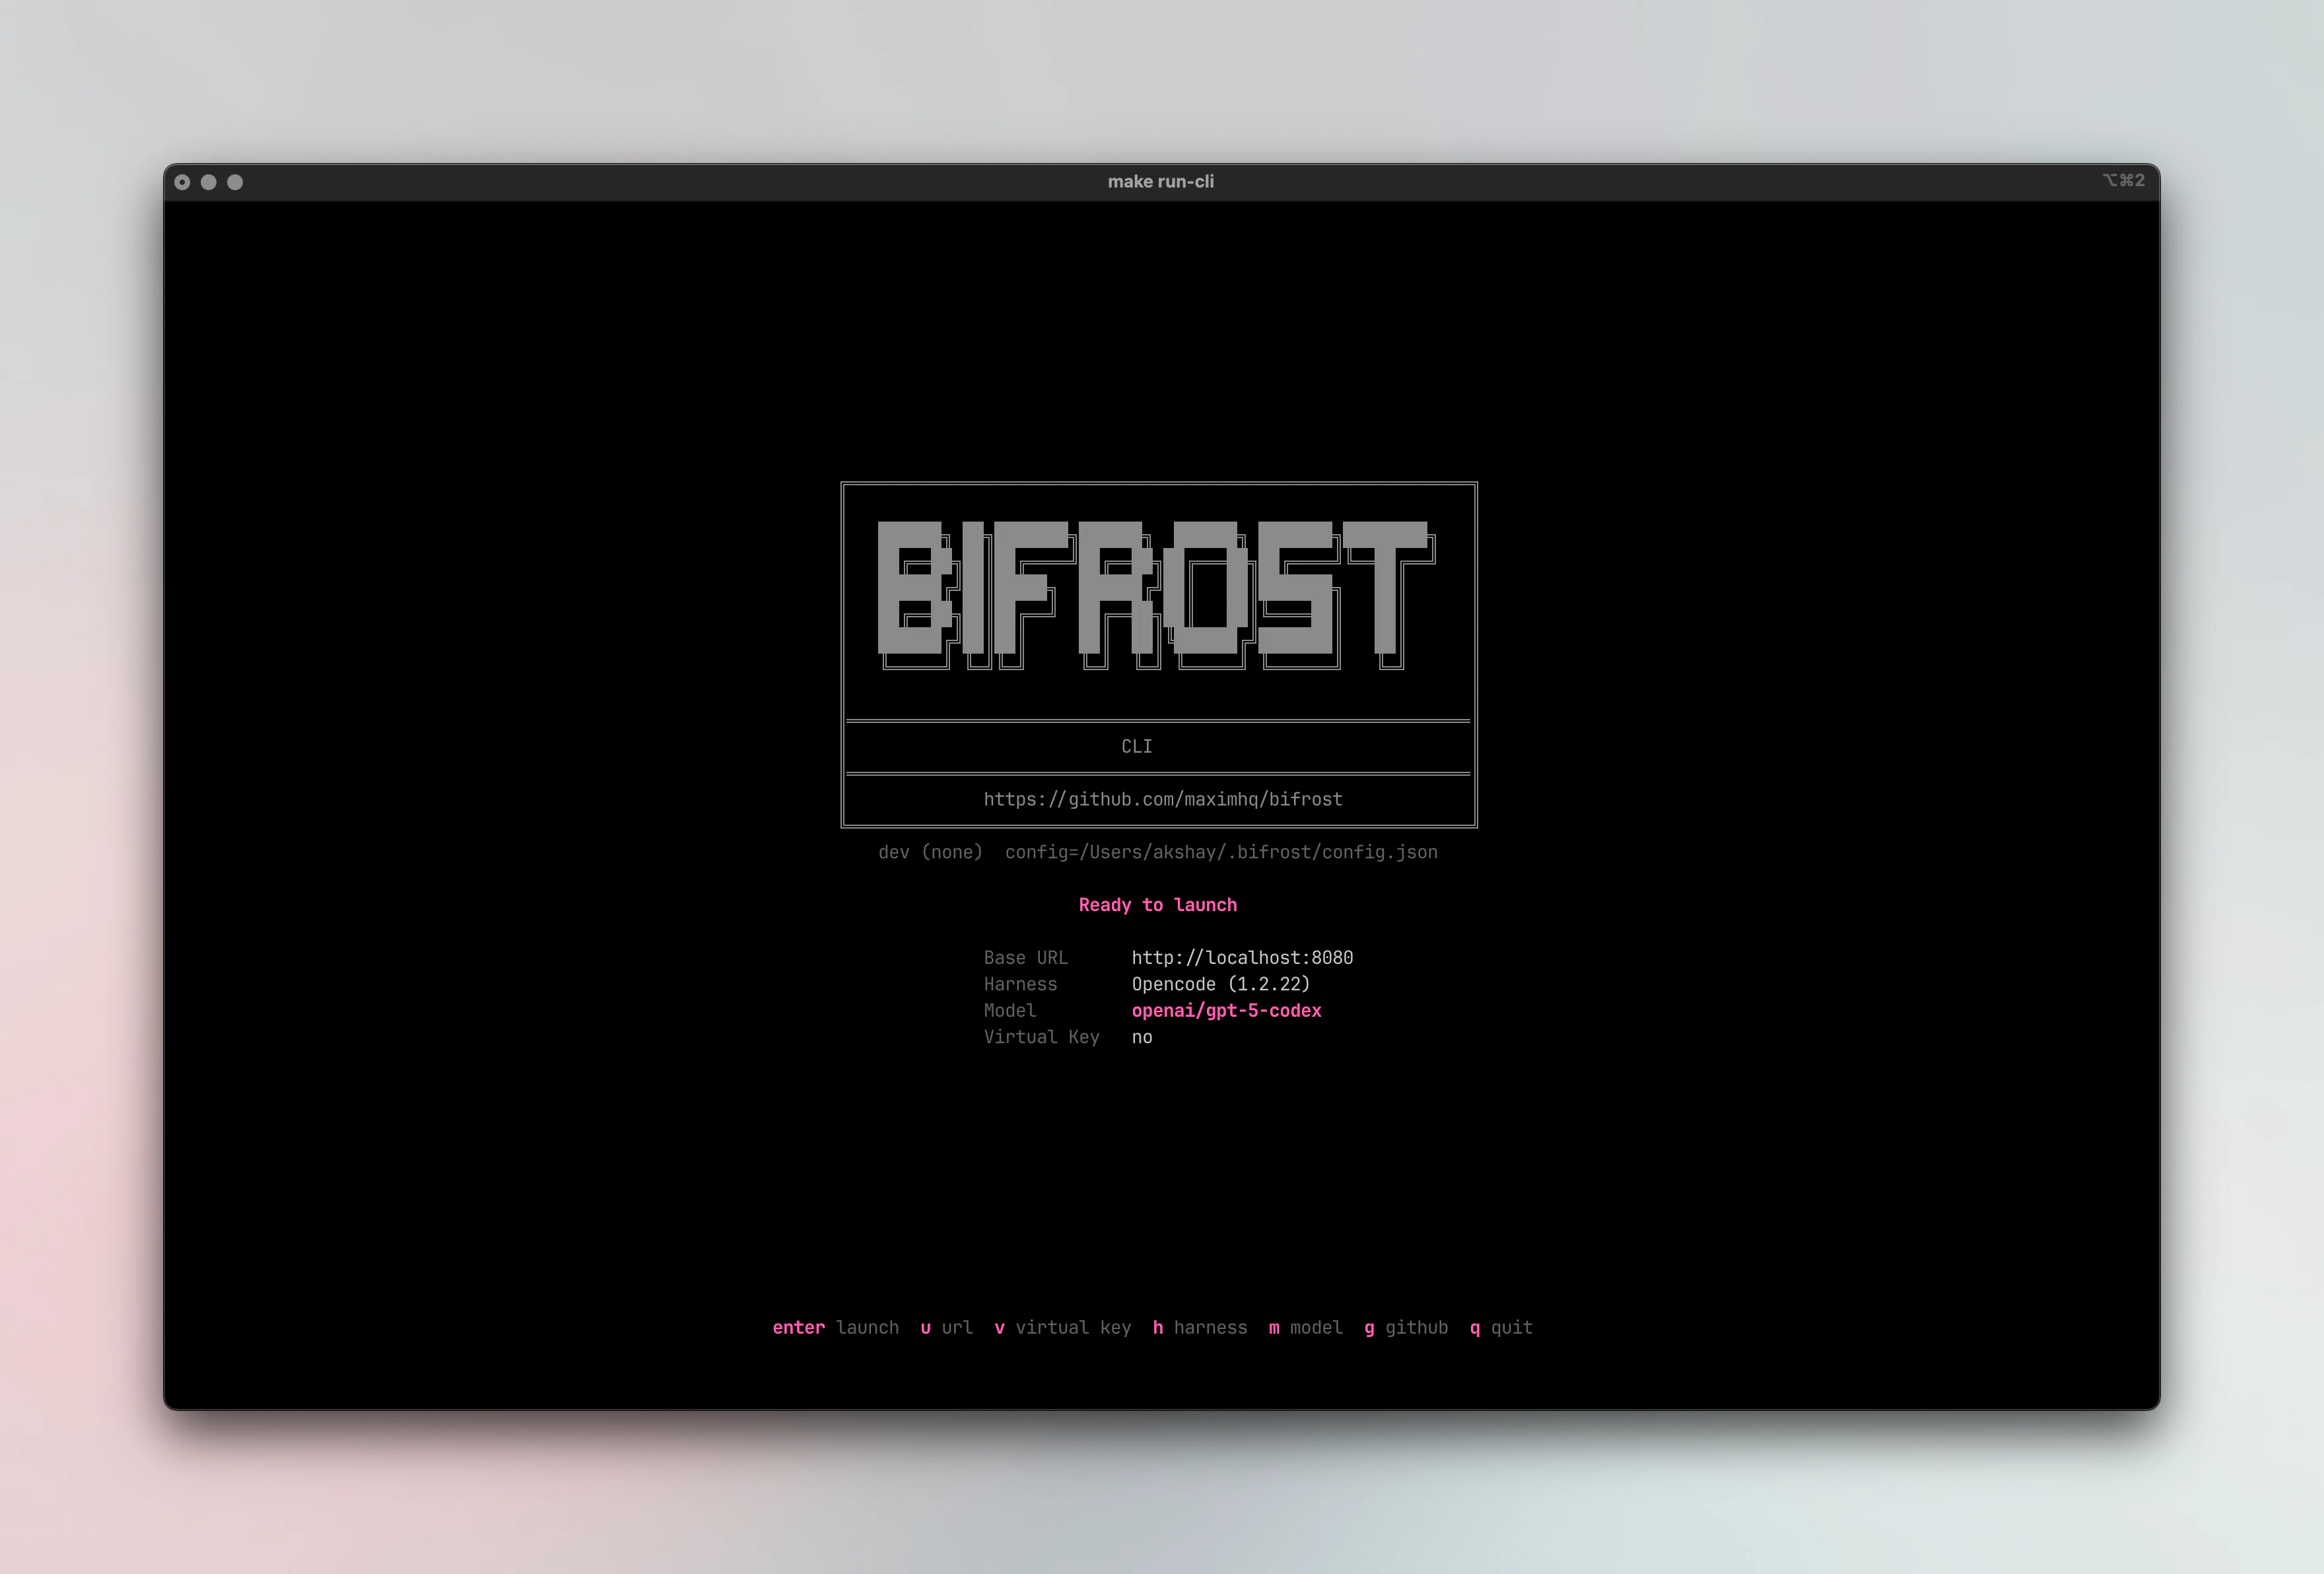
### 2. Launch the CLI
In another terminal:
To install
```bash theme={null}
npx -y @maximhq/bifrost-cli
```
If you have already installed run
```bash theme={null}
bifrost
```
 ### 3. Walk through the setup
The CLI guides you through an interactive setup flow:
**Step 1 - Base URL**
Enter your Bifrost gateway URL. If you're running locally, this is typically `http://localhost:8080`.
**Step 2 - Virtual Key (optional)**
If your Bifrost gateway has [virtual key authentication](/features/governance/virtual-keys) enabled, enter your virtual key here. Otherwise, press Enter to skip.
**Step 3 - Choose a Harness**
Select which coding agent you want to launch. The CLI shows installation status and version for each:
| Harness | Binary | Provider Path | Notes |
| ----------- | ---------- | ------------- | -------------------------------------------------------------------------- |
| Claude Code | `claude` | `/anthropic` | MCP auto-attach, worktree support |
| Codex CLI | `codex` | `/openai` | Sets `OPENAI_BASE_URL` to `{base}/openai/v1`; model override via `--model` |
| Gemini CLI | `gemini` | `/genai` | Model override via `--model` flag |
| Opencode | `opencode` | `/openai` | Custom models configured automatically through generated OpenCode config |
If a harness isn't installed, the CLI will offer to install it via npm for you.
**Step 4 - Select a Model**
The CLI fetches available models from your Bifrost gateway and presents a searchable list. Type to filter, arrow keys to navigate:
You can type any model name manually - even if it's not in the list. Just type the full model identifier and press Enter.
**Step 5 - Launch**
Review your configuration in the summary screen. Press Enter to launch, or use the shortcut keys to adjust any setting:
| Key | Action |
| ------- | ------------------------------------ |
| `Enter` | Launch the harness |
| `u` | Change base URL |
| `v` | Change virtual key |
| `h` | Change harness |
| `m` | Change model |
| `w` | Set worktree name (Claude Code only) |
| `d` | Open Bifrost dashboard |
| `r` | Open documentation |
| `l` | Toggle harness exit logs |
| `i` | Report an issue on GitHub |
| `s` | Star the repo on GitHub |
| `q` | Quit |
The CLI then launches your agent with all the correct environment variables and configuration set automatically.
## Tabbed Session UI
After launch, Bifrost CLI keeps you inside a tabbed terminal UI instead of exiting after the first session. The bottom tab bar shows:
* The `Bifrost CLI` label and current CLI version
* One tab per running or recent agent session
* A status badge for each tab:
* `🧠` - the visible screen is actively changing, so the agent is still working
* `✅` - the session looks idle and ready
* `🔔` - the PTY emitted a real terminal alert
Use `Ctrl+B` at any time to focus the tab bar. From tab mode you can:
| Key | Action |
| -------------------------- | ----------------------------------------------- |
| `n` | Open a new tab and launch another agent session |
| `x` | Close the current tab |
| `h` / `l` | Move left or right across tabs |
| `1`-`9` | Jump directly to a tab |
| `Esc` / `Enter` / `Ctrl+B` | Return to the active session |
If you press `Ctrl+B` before launching your first session, Bifrost CLI stays open on the Home tab bar so you can create a new tab from there.
## Configuration
### Config File
The CLI stores its configuration at `~/.bifrost/config.json`. This file is created automatically on first run and updated when you change settings through the TUI.
```json theme={null}
{
"base_url": "http://localhost:8080",
"default_harness": "claude",
"default_model": "anthropic/claude-sonnet-4-5-20250929"
}
```
| Field | Description |
| ----------------- | -------------------------------------------------------------- |
| `base_url` | Your Bifrost gateway URL |
| `default_harness` | Last used harness ID (`claude`, `codex`, `gemini`, `opencode`) |
| `default_model` | Last used model identifier |
Never put your virtual key in the config file. The CLI stores virtual keys securely in your OS keyring (macOS Keychain, Windows Credential Manager, or Linux Secret Service).
### CLI Flags
```bash theme={null}
npx -y @maximhq/bifrost-cli [flags]
```
| Flag | Description |
| ------------------ | -------------------------------------------------------- |
| `-config ` | Path to a custom `config.json` file |
| `-no-resume` | Skip resume flow and open fresh setup |
| `-worktree ` | Create a git worktree for the session (Claude Code only) |
### Using a Custom Config Path
Point the CLI to a project-specific config:
```bash theme={null}
npx -y @maximhq/bifrost-cli -config ./my-project/bifrost.json
```
This is useful when working across multiple Bifrost gateways or projects with different configurations.
## Switching Harnesses and Models
The CLI handles all environment variables, API keys, and provider-specific configuration automatically - you never need to set them yourself. To change your setup, use the shortcut keys from the summary screen:
| Key | Action |
| ------- | ------------------------------------------------------------------------ |
| `h` | Switch to a different harness (Claude Code, Codex, Gemini CLI, Opencode) |
| `m` | Pick a different model from the gateway's available models |
| `u` | Change the Bifrost gateway URL |
| `v` | Update your virtual key |
| `w` | Set worktree name (Claude Code only) |
| `d` | Open the Bifrost dashboard in your browser |
| `r` | Open the CLI documentation |
| `l` | Toggle harness exit logs |
| `i` | Report an issue on GitHub |
| `s` | Star the repo on GitHub |
| `Enter` | Launch with current settings |
| `q` | Quit |
When you switch harnesses, the CLI reconfigures everything for the new agent - base URLs, API keys, model flags, and any agent-specific setup. You can switch as many times as you like before launching.
After a session ends, the CLI returns to the summary screen with your previous configuration intact. Press `h` to switch agents or `m` to try a different model, then `Enter` to re-launch.
### Opencode Notes
Bifrost CLI applies two OpenCode-specific behaviors automatically:
* **Custom model selection**: when you pick a model in Bifrost CLI, OpenCode is launched with the correct provider-qualified model reference and a generated OpenCode runtime config.
* **Theme handling**: if your OpenCode `tui.json` already defines a theme, Bifrost preserves it. If not, Bifrost supplies the adaptive `system` theme so OpenCode does not fall back to its default dark-only appearance.
## Session Flow
The CLI is designed for iterative development sessions:
1. **Launch** - Select your agent and model, press Enter
2. **Work** - Use your agent as normal, all traffic routes through Bifrost
3. **Switch** - Press `Ctrl+B` any time to open the tab bar and jump to another session or start a new one
4. **Return** - When an agent exits (or you quit it), the CLI returns to the chooser with your previous configuration intact
5. **Re-launch** - Change model, switch harness, or re-launch the same setup instantly
Your last selections are remembered across sessions. The next time you run `bifrost`, you'll see the summary screen with your previous configuration ready to go. Press Enter to re-launch immediately, or adjust any setting.
## Worktree Support
Worktree support is currently available for **Claude Code** only.
Launch Claude Code in an isolated git worktree for parallel development:
```bash theme={null}
npx -y @maximhq/bifrost-cli -worktree feature-branch
```
Or select worktree mode from the TUI during the setup flow. The CLI passes the `--worktree` flag to Claude Code automatically.
## MCP Integration
When launching **Claude Code**, the CLI automatically registers Bifrost's MCP server endpoint (`/mcp`) so all your configured MCP tools are available inside the agent.
If a virtual key is configured, the CLI sets up authenticated MCP access with the correct `Authorization` header - no manual `claude mcp add-json` commands needed.
For other harnesses, the CLI prints the MCP server URL so you can configure it manually in your agent's settings.
## Troubleshooting
### "npm not found in path"
The CLI needs npm to install harnesses. Make sure Node.js is installed:
```bash theme={null}
node --version # Should be 18+
npm --version
```
### Agent not found after install
If a harness was installed but the binary still isn't found, you may need to restart your terminal or add npm's global bin directory to your `PATH`:
```bash theme={null}
# Check npm global bin path
npm config get prefix
# Add to PATH (add to ~/.zshrc or ~/.bashrc for persistence)
export PATH="$(npm config get prefix)/bin:$PATH"
```
### Models not loading
If the model list doesn't load, check that:
1. Your Bifrost gateway is running and accessible at the configured base URL
2. You have at least one provider configured in Bifrost
3. If using virtual keys, your key has permission to list models
### Virtual key not persisting
The CLI stores virtual keys in your OS keyring. On Linux, ensure `gnome-keyring` or `kwallet` is running. If keyring access fails, the CLI will log a warning but continue working - the key will need to be re-entered next session.
## Next Steps
Set up a Bifrost gateway if you haven't already
Configure AI providers in your Bifrost gateway
Set up authentication and usage limits
Configure MCP tools for your agents
### 3. Walk through the setup
The CLI guides you through an interactive setup flow:
**Step 1 - Base URL**
Enter your Bifrost gateway URL. If you're running locally, this is typically `http://localhost:8080`.
**Step 2 - Virtual Key (optional)**
If your Bifrost gateway has [virtual key authentication](/features/governance/virtual-keys) enabled, enter your virtual key here. Otherwise, press Enter to skip.
**Step 3 - Choose a Harness**
Select which coding agent you want to launch. The CLI shows installation status and version for each:
| Harness | Binary | Provider Path | Notes |
| ----------- | ---------- | ------------- | -------------------------------------------------------------------------- |
| Claude Code | `claude` | `/anthropic` | MCP auto-attach, worktree support |
| Codex CLI | `codex` | `/openai` | Sets `OPENAI_BASE_URL` to `{base}/openai/v1`; model override via `--model` |
| Gemini CLI | `gemini` | `/genai` | Model override via `--model` flag |
| Opencode | `opencode` | `/openai` | Custom models configured automatically through generated OpenCode config |
If a harness isn't installed, the CLI will offer to install it via npm for you.
**Step 4 - Select a Model**
The CLI fetches available models from your Bifrost gateway and presents a searchable list. Type to filter, arrow keys to navigate:
You can type any model name manually - even if it's not in the list. Just type the full model identifier and press Enter.
**Step 5 - Launch**
Review your configuration in the summary screen. Press Enter to launch, or use the shortcut keys to adjust any setting:
| Key | Action |
| ------- | ------------------------------------ |
| `Enter` | Launch the harness |
| `u` | Change base URL |
| `v` | Change virtual key |
| `h` | Change harness |
| `m` | Change model |
| `w` | Set worktree name (Claude Code only) |
| `d` | Open Bifrost dashboard |
| `r` | Open documentation |
| `l` | Toggle harness exit logs |
| `i` | Report an issue on GitHub |
| `s` | Star the repo on GitHub |
| `q` | Quit |
The CLI then launches your agent with all the correct environment variables and configuration set automatically.
## Tabbed Session UI
After launch, Bifrost CLI keeps you inside a tabbed terminal UI instead of exiting after the first session. The bottom tab bar shows:
* The `Bifrost CLI` label and current CLI version
* One tab per running or recent agent session
* A status badge for each tab:
* `🧠` - the visible screen is actively changing, so the agent is still working
* `✅` - the session looks idle and ready
* `🔔` - the PTY emitted a real terminal alert
Use `Ctrl+B` at any time to focus the tab bar. From tab mode you can:
| Key | Action |
| -------------------------- | ----------------------------------------------- |
| `n` | Open a new tab and launch another agent session |
| `x` | Close the current tab |
| `h` / `l` | Move left or right across tabs |
| `1`-`9` | Jump directly to a tab |
| `Esc` / `Enter` / `Ctrl+B` | Return to the active session |
If you press `Ctrl+B` before launching your first session, Bifrost CLI stays open on the Home tab bar so you can create a new tab from there.
## Configuration
### Config File
The CLI stores its configuration at `~/.bifrost/config.json`. This file is created automatically on first run and updated when you change settings through the TUI.
```json theme={null}
{
"base_url": "http://localhost:8080",
"default_harness": "claude",
"default_model": "anthropic/claude-sonnet-4-5-20250929"
}
```
| Field | Description |
| ----------------- | -------------------------------------------------------------- |
| `base_url` | Your Bifrost gateway URL |
| `default_harness` | Last used harness ID (`claude`, `codex`, `gemini`, `opencode`) |
| `default_model` | Last used model identifier |
Never put your virtual key in the config file. The CLI stores virtual keys securely in your OS keyring (macOS Keychain, Windows Credential Manager, or Linux Secret Service).
### CLI Flags
```bash theme={null}
npx -y @maximhq/bifrost-cli [flags]
```
| Flag | Description |
| ------------------ | -------------------------------------------------------- |
| `-config ` | Path to a custom `config.json` file |
| `-no-resume` | Skip resume flow and open fresh setup |
| `-worktree ` | Create a git worktree for the session (Claude Code only) |
### Using a Custom Config Path
Point the CLI to a project-specific config:
```bash theme={null}
npx -y @maximhq/bifrost-cli -config ./my-project/bifrost.json
```
This is useful when working across multiple Bifrost gateways or projects with different configurations.
## Switching Harnesses and Models
The CLI handles all environment variables, API keys, and provider-specific configuration automatically - you never need to set them yourself. To change your setup, use the shortcut keys from the summary screen:
| Key | Action |
| ------- | ------------------------------------------------------------------------ |
| `h` | Switch to a different harness (Claude Code, Codex, Gemini CLI, Opencode) |
| `m` | Pick a different model from the gateway's available models |
| `u` | Change the Bifrost gateway URL |
| `v` | Update your virtual key |
| `w` | Set worktree name (Claude Code only) |
| `d` | Open the Bifrost dashboard in your browser |
| `r` | Open the CLI documentation |
| `l` | Toggle harness exit logs |
| `i` | Report an issue on GitHub |
| `s` | Star the repo on GitHub |
| `Enter` | Launch with current settings |
| `q` | Quit |
When you switch harnesses, the CLI reconfigures everything for the new agent - base URLs, API keys, model flags, and any agent-specific setup. You can switch as many times as you like before launching.
After a session ends, the CLI returns to the summary screen with your previous configuration intact. Press `h` to switch agents or `m` to try a different model, then `Enter` to re-launch.
### Opencode Notes
Bifrost CLI applies two OpenCode-specific behaviors automatically:
* **Custom model selection**: when you pick a model in Bifrost CLI, OpenCode is launched with the correct provider-qualified model reference and a generated OpenCode runtime config.
* **Theme handling**: if your OpenCode `tui.json` already defines a theme, Bifrost preserves it. If not, Bifrost supplies the adaptive `system` theme so OpenCode does not fall back to its default dark-only appearance.
## Session Flow
The CLI is designed for iterative development sessions:
1. **Launch** - Select your agent and model, press Enter
2. **Work** - Use your agent as normal, all traffic routes through Bifrost
3. **Switch** - Press `Ctrl+B` any time to open the tab bar and jump to another session or start a new one
4. **Return** - When an agent exits (or you quit it), the CLI returns to the chooser with your previous configuration intact
5. **Re-launch** - Change model, switch harness, or re-launch the same setup instantly
Your last selections are remembered across sessions. The next time you run `bifrost`, you'll see the summary screen with your previous configuration ready to go. Press Enter to re-launch immediately, or adjust any setting.
## Worktree Support
Worktree support is currently available for **Claude Code** only.
Launch Claude Code in an isolated git worktree for parallel development:
```bash theme={null}
npx -y @maximhq/bifrost-cli -worktree feature-branch
```
Or select worktree mode from the TUI during the setup flow. The CLI passes the `--worktree` flag to Claude Code automatically.
## MCP Integration
When launching **Claude Code**, the CLI automatically registers Bifrost's MCP server endpoint (`/mcp`) so all your configured MCP tools are available inside the agent.
If a virtual key is configured, the CLI sets up authenticated MCP access with the correct `Authorization` header - no manual `claude mcp add-json` commands needed.
For other harnesses, the CLI prints the MCP server URL so you can configure it manually in your agent's settings.
## Troubleshooting
### "npm not found in path"
The CLI needs npm to install harnesses. Make sure Node.js is installed:
```bash theme={null}
node --version # Should be 18+
npm --version
```
### Agent not found after install
If a harness was installed but the binary still isn't found, you may need to restart your terminal or add npm's global bin directory to your `PATH`:
```bash theme={null}
# Check npm global bin path
npm config get prefix
# Add to PATH (add to ~/.zshrc or ~/.bashrc for persistence)
export PATH="$(npm config get prefix)/bin:$PATH"
```
### Models not loading
If the model list doesn't load, check that:
1. Your Bifrost gateway is running and accessible at the configured base URL
2. You have at least one provider configured in Bifrost
3. If using virtual keys, your key has permission to list models
### Virtual key not persisting
The CLI stores virtual keys in your OS keyring. On Linux, ensure `gnome-keyring` or `kwallet` is running. If keyring access fails, the CLI will log a warning but continue working - the key will need to be re-entered next session.
## Next Steps
Set up a Bifrost gateway if you haven't already
Configure AI providers in your Bifrost gateway
Set up authentication and usage limits
Configure MCP tools for your agents