> ## Documentation Index
> Fetch the complete documentation index at: https://docs.getbifrost.ai/llms.txt
> Use this file to discover all available pages before exploring further.
# Adaptive Load Balancing
> Advanced load balancing algorithms with predictive scaling, health monitoring, and performance optimization for enterprise-grade traffic distribution.
**Looking for comprehensive provider routing documentation?**
For a detailed guide covering how adaptive load balancing works with governance routing, the two-level architecture (provider + key selection), Model Catalog integration, and example scenarios, see the [**Provider Routing Guide**](/providers/provider-routing).
This page focuses on the technical implementation and performance characteristics of adaptive load balancing.
## Overview
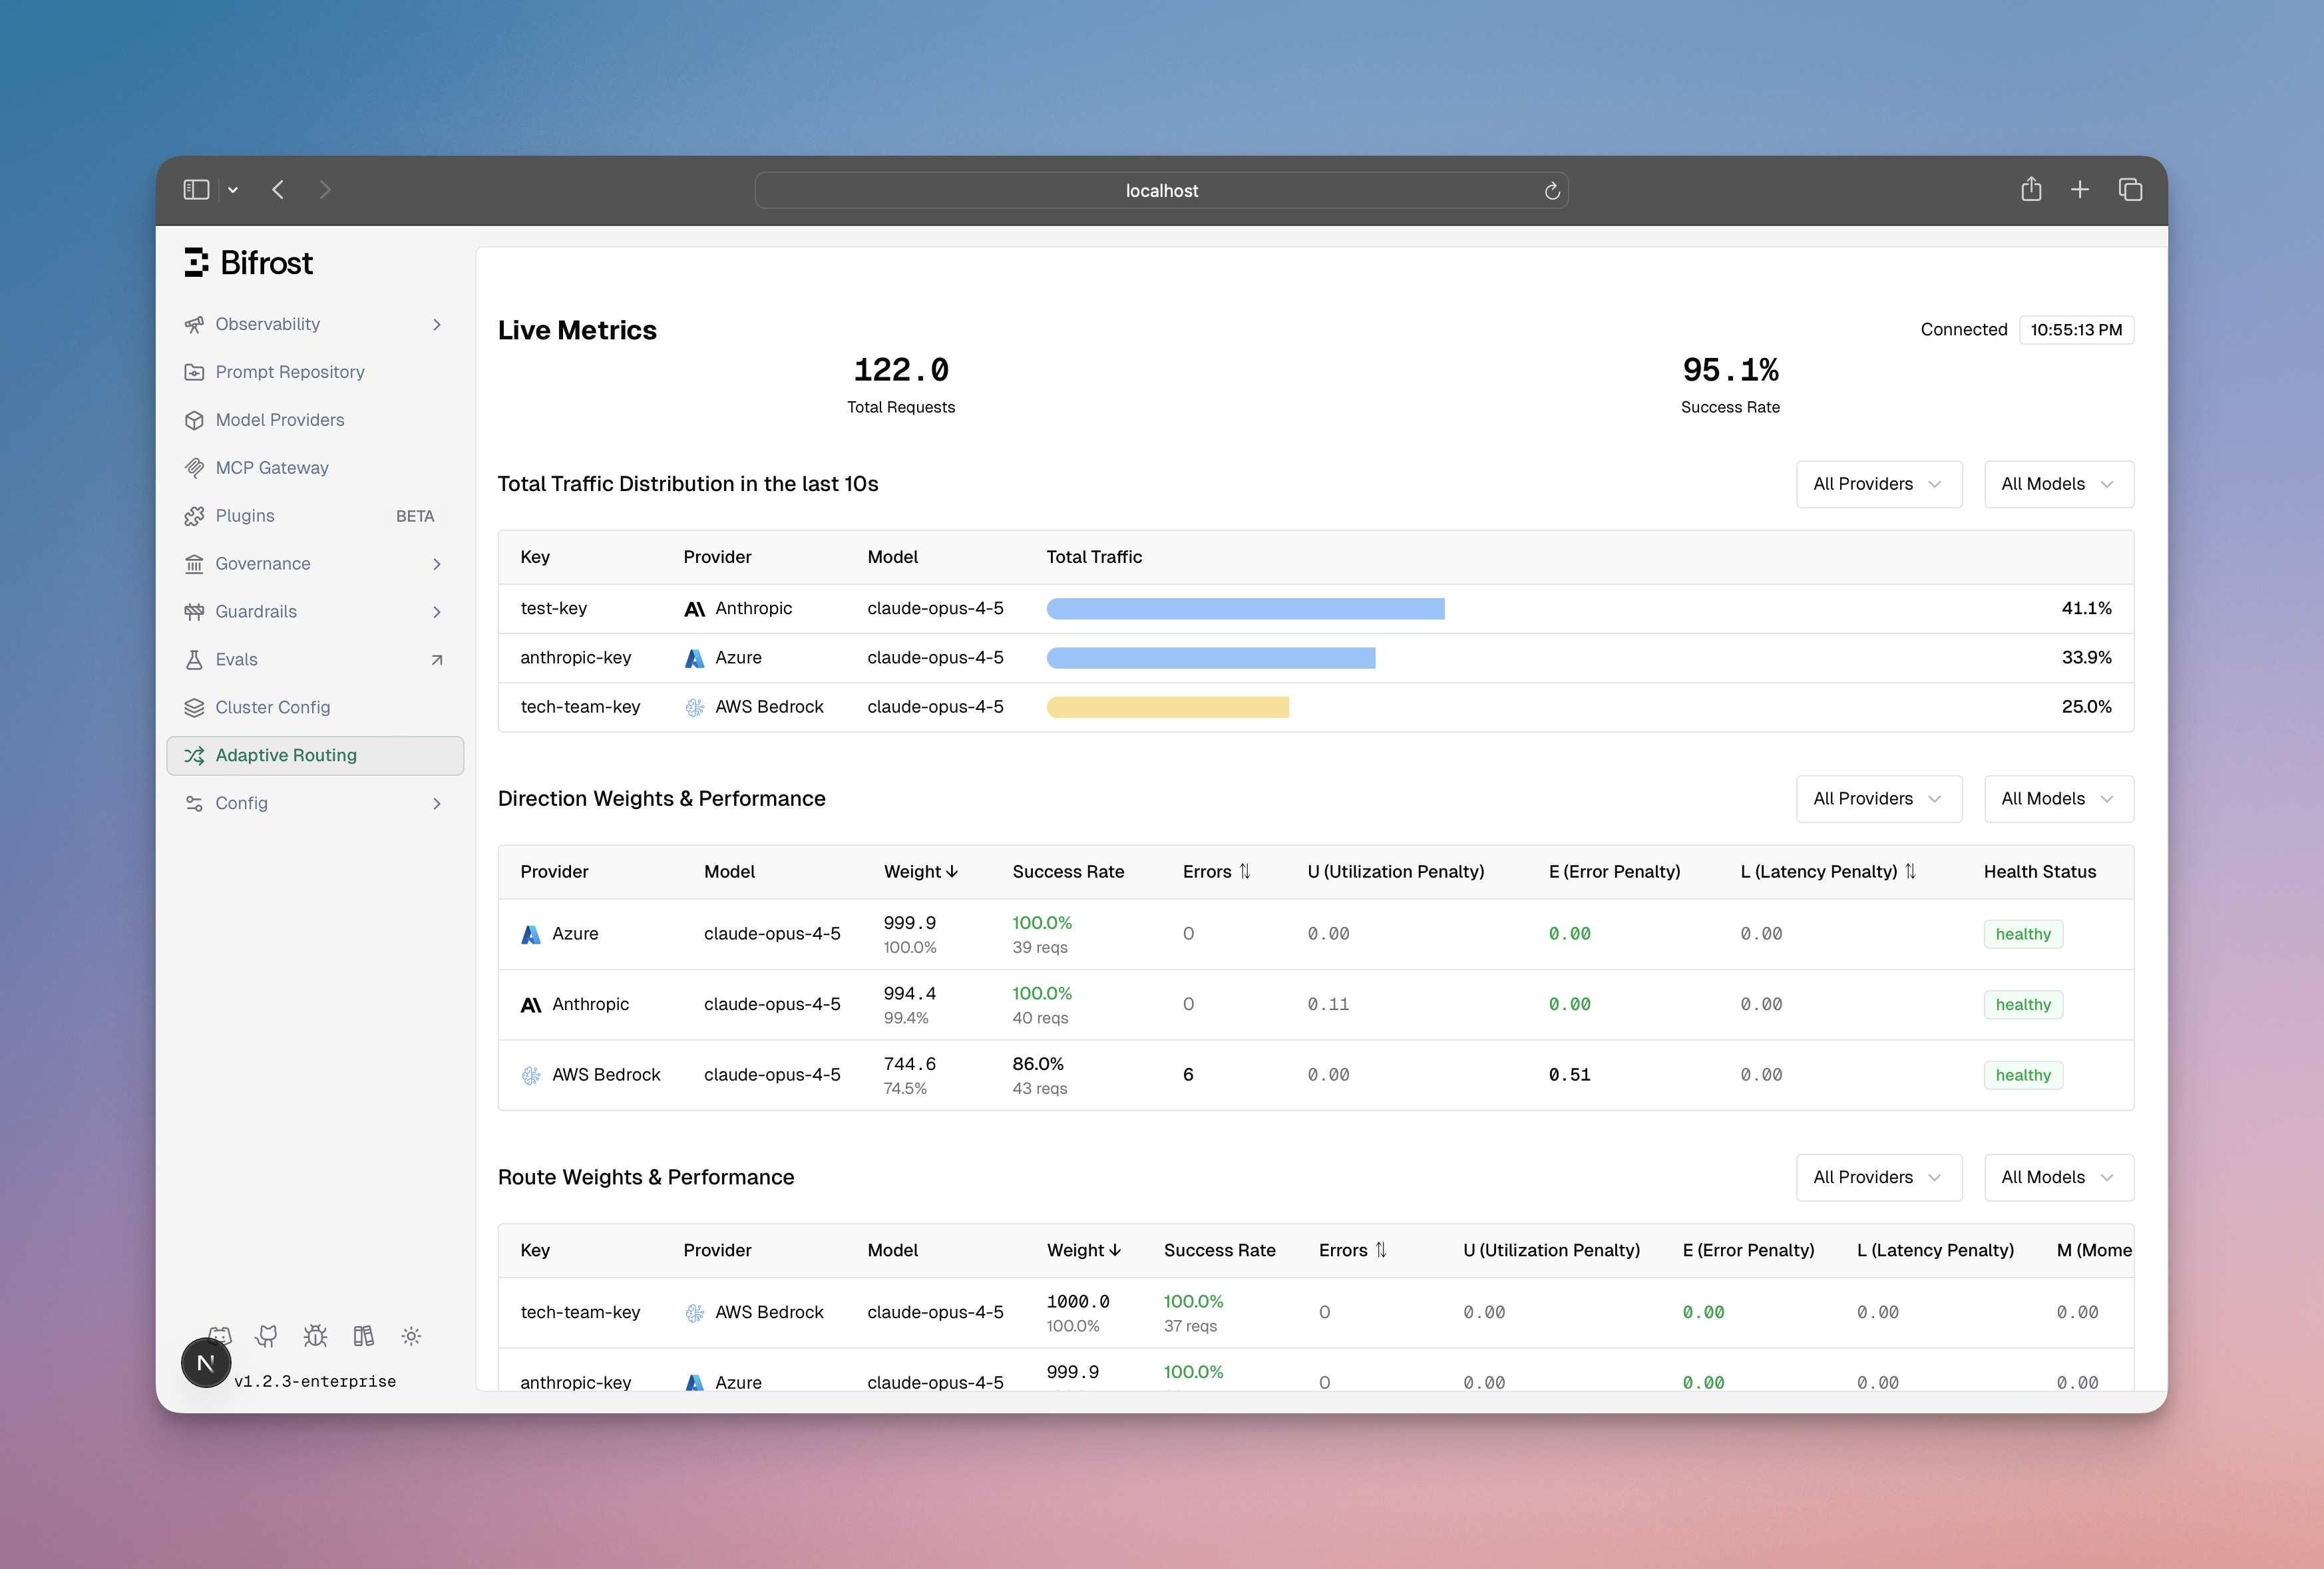
**Adaptive Load Balancing** in Bifrost Enterprise automatically optimizes traffic distribution across providers and keys based on real-time performance metrics. The system operates at **two levels** - provider selection (direction) and key selection (route) - continuously monitoring error rates, latency, and throughput to dynamically adjust weights, ensuring optimal performance and reliability.
### Key Features
| Feature | Description |
| ------------------------------------ | ------------------------------------------------------------------------------ |
| **Dynamic Weight Adjustment** | Automatically adjusts key weights based on performance metrics |
| **Real-time Performance Monitoring** | Tracks error rates, latency, and success rates per model-key combination |
| **Cross-Node Synchronization** | Gossip protocol ensures consistent weight information across all cluster nodes |
| **Circuit Breaker Integration** | Temporarily removes poorly performing keys from rotation |
| **Fast Recovery** | Momentum-based scoring helps routes recover quickly after transient failures |
**Zero-overhead design**: All route selection logic adds less than **10 microseconds** to hot path latency. Weight calculations happen asynchronously every 5 seconds, so request routing uses pre-computed weights with minimal overhead.
***
## Architecture
The load balancing system operates at two levels:
* **Direction-level** (provider + model): Decides which provider to use for a given model
* **Route-level** (provider + model + key): Decides which API key to use within a provider
This two-tier approach enables both macro-level provider selection and micro-level key optimization.
```mermaid theme={null}
graph TB
Request["Incoming Request
model: gpt-4"]
subgraph DirectionSelection["Direction Selection"]
DS["Provider Selector
Score-based selection"]
DP1["OpenAI
score: 0.92"]
DP2["Azure
score: 0.85"]
DP3["Anthropic
score: 0.78"]
end
subgraph RouteSelection["Route Selection"]
RS["Key Selector
Weighted random"]
K1["Key 1
weight: 850"]
K2["Key 2
weight: 620"]
K3["Key 3
weight: 45"]
end
subgraph Tracker["Metrics Tracker"]
T["Real-time Metrics
5-second recomputation"]
M1["Error Rate"]
M2["Latency Score"]
M3["Utilization"]
end
Request --> DS
DS --> DP1 & DP2 & DP3
DP1 --> RS
RS --> K1 & K2 & K3
K1 --> Response["API Response"]
Response --> T
T --> M1 & M2 & M3
M1 & M2 & M3 -.->|"Update Weights"| DS & RS
```
***
## How Weight Calculation Works
Every 5 seconds, the system recalculates weights for all routes based on four factors:
| Factor | Weight | Purpose |
| --------------------- | -------- | ----------------------------------------------- |
| **Error Penalty** | 50% | Penalizes routes with high error rates |
| **Latency Score** | 20% | Penalizes routes with abnormally slow responses |
| **Utilization Score** | 5% | Prevents overloading high-performing routes |
| **Momentum Bias** | Additive | Rewards routes that are recovering well |
The system combines these into a single score, then converts it to a weight between 1 and 1000. Lower penalties mean higher weights, which means more traffic.
$$
Score = (P_{error} \times 0.5) + (P_{latency} \times 0.2) + (P_{util} \times 0.05) - M_{momentum}
$$
$$
Weight = W_{min} + (1 - Score) \times (W_{max} - W_{min})
$$
```mermaid theme={null}
flowchart LR
subgraph Inputs["Raw Metrics"]
E["Error Rate"]
L["Latency"]
U["Utilization"]
M["Momentum"]
end
subgraph Scoring["Score Computation"]
EP["Error Penalty
50% weight"]
LP["Latency Score
20% weight"]
US["Utilization Score
5% weight"]
MS["Momentum Bias"]
end
subgraph Output["Final Weight"]
NS["Normalized Score"]
FW["Route Weight
1 - 1000"]
end
E --> EP
L --> LP
U --> US
M --> MS
EP & LP & US --> NS
MS --> NS
NS --> FW
```
***
## Key Capabilities
1. **Automatic Route Health Management**: Routes automatically transition between 4 states (Healthy, Degraded, Failed, Recovering) based on error rates and latency. No manual intervention required when a route fails or recovers.
2. **Fair Traffic Distribution**: The system prevents any single route from being overloaded while still favoring better performers. Low-weight routes always get minimum traffic to prove recovery.
3. **Real-time Dashboard**: Provides visibility into weight distribution, performance metrics (error rates, latency), state transitions, and actual vs expected traffic per route.
 4. **Multi-Factor Scoring**: Routes are scored using 4 components - Error Penalty (50% weight, time-decayed), Latency Score (token-aware via MV-TACOS algorithm), Utilization Score (fair-share balancing), and Momentum (accelerates recovery after failures).
5. **Smart Key Selection**: Uses weighted random selection with jitter (5% band) and 25% exploration probability to probe potentially recovered routes, rather than always picking the best route.
6. **Performance Thresholds**: Specific triggers drive state transitions -> 2% error rate triggers Degraded, >5% error rate or TPM hit triggers Failed, \<2% error with 50%+ expected traffic triggers Healthy.
The system is designed to be self-healing: it penalizes failing routes quickly, but also enables fast recovery (90% penalty reduction in 30 seconds) once issues are fixed.
***
## Next Steps
Contact your Bifrost Enterprise representative to enable adaptive load balancing for your deployment
Use the dashboard to observe how weights adapt to real traffic patterns
Review route state transitions and weight adjustments to understand system behavior
4. **Multi-Factor Scoring**: Routes are scored using 4 components - Error Penalty (50% weight, time-decayed), Latency Score (token-aware via MV-TACOS algorithm), Utilization Score (fair-share balancing), and Momentum (accelerates recovery after failures).
5. **Smart Key Selection**: Uses weighted random selection with jitter (5% band) and 25% exploration probability to probe potentially recovered routes, rather than always picking the best route.
6. **Performance Thresholds**: Specific triggers drive state transitions -> 2% error rate triggers Degraded, >5% error rate or TPM hit triggers Failed, \<2% error with 50%+ expected traffic triggers Healthy.
The system is designed to be self-healing: it penalizes failing routes quickly, but also enables fast recovery (90% penalty reduction in 30 seconds) once issues are fixed.
***
## Next Steps
Contact your Bifrost Enterprise representative to enable adaptive load balancing for your deployment
Use the dashboard to observe how weights adapt to real traffic patterns
Review route state transitions and weight adjustments to understand system behavior